シンプル商品を構築する
学習の目的
この単元を完了すると、次のことができるようになります。
- シンプル商品と商品バンドルを区別する。
- シンプル商品を作成する。
- 商品を見積に追加する。

シンプル商品と商品バンドルについて知る
ゴムボールや接着剤など、最近購入したシンプルな単品商品を思い浮かべてみてください。こうした商品は敢えてパーソナライズする必要はありません。では、ホームシアターを設置する場合はどうでしょうか? テレビ、プロジェクター、スピーカーなどの複数の商品で構成され、特定の仕様や互換性要件などを考慮しなければなりません。こうした商品をバンドルにまとめれば、お客様が購入しやすくなり、設定や連動関係の処理が容易になります。
商品デザイナーの観点から言えば、シンプル商品とバンドル商品は区別する必要があります。シンプル商品は単独で存在し、バンドル商品は複数の品目が階層になっています。
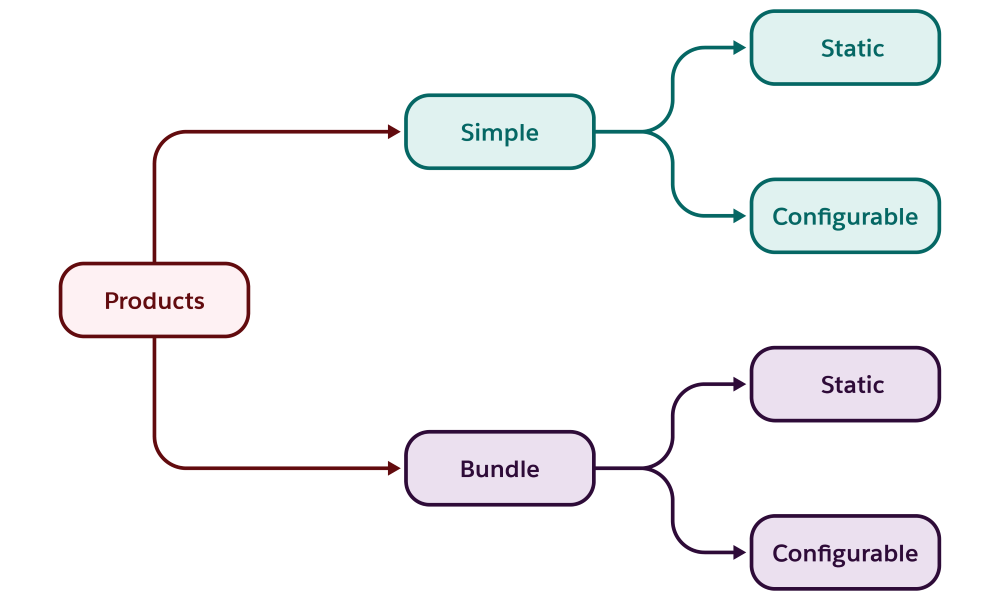
お客様または営業担当が購入時に商品属性を調整する必要があるかどうかに応じて、商品を静的と設定可能に分類することもできます。静的商品は設定できません。他方、商品を設定可能として定義した場合は、お客様が商品の特定の属性に適切な値を選択できます。
各種の商品について理解することができました。
では、組織でシンプル商品を作成する手順を Manoj と一緒に実行しましょう。
シンプル商品を作成する
商品を設定するための基本的な詳細を定義します。
- アプリケーションランチャーで、[Product Catalog Management (商品カタログ管理)] を見つけて選択します。
- 商品カタログ管理のホームページで、[Products (商品)] タイルをクリックします。
-
[New (新規)] をクリックし、[Commercial (商用)] を選択して、[Next (次へ)] をクリックします。
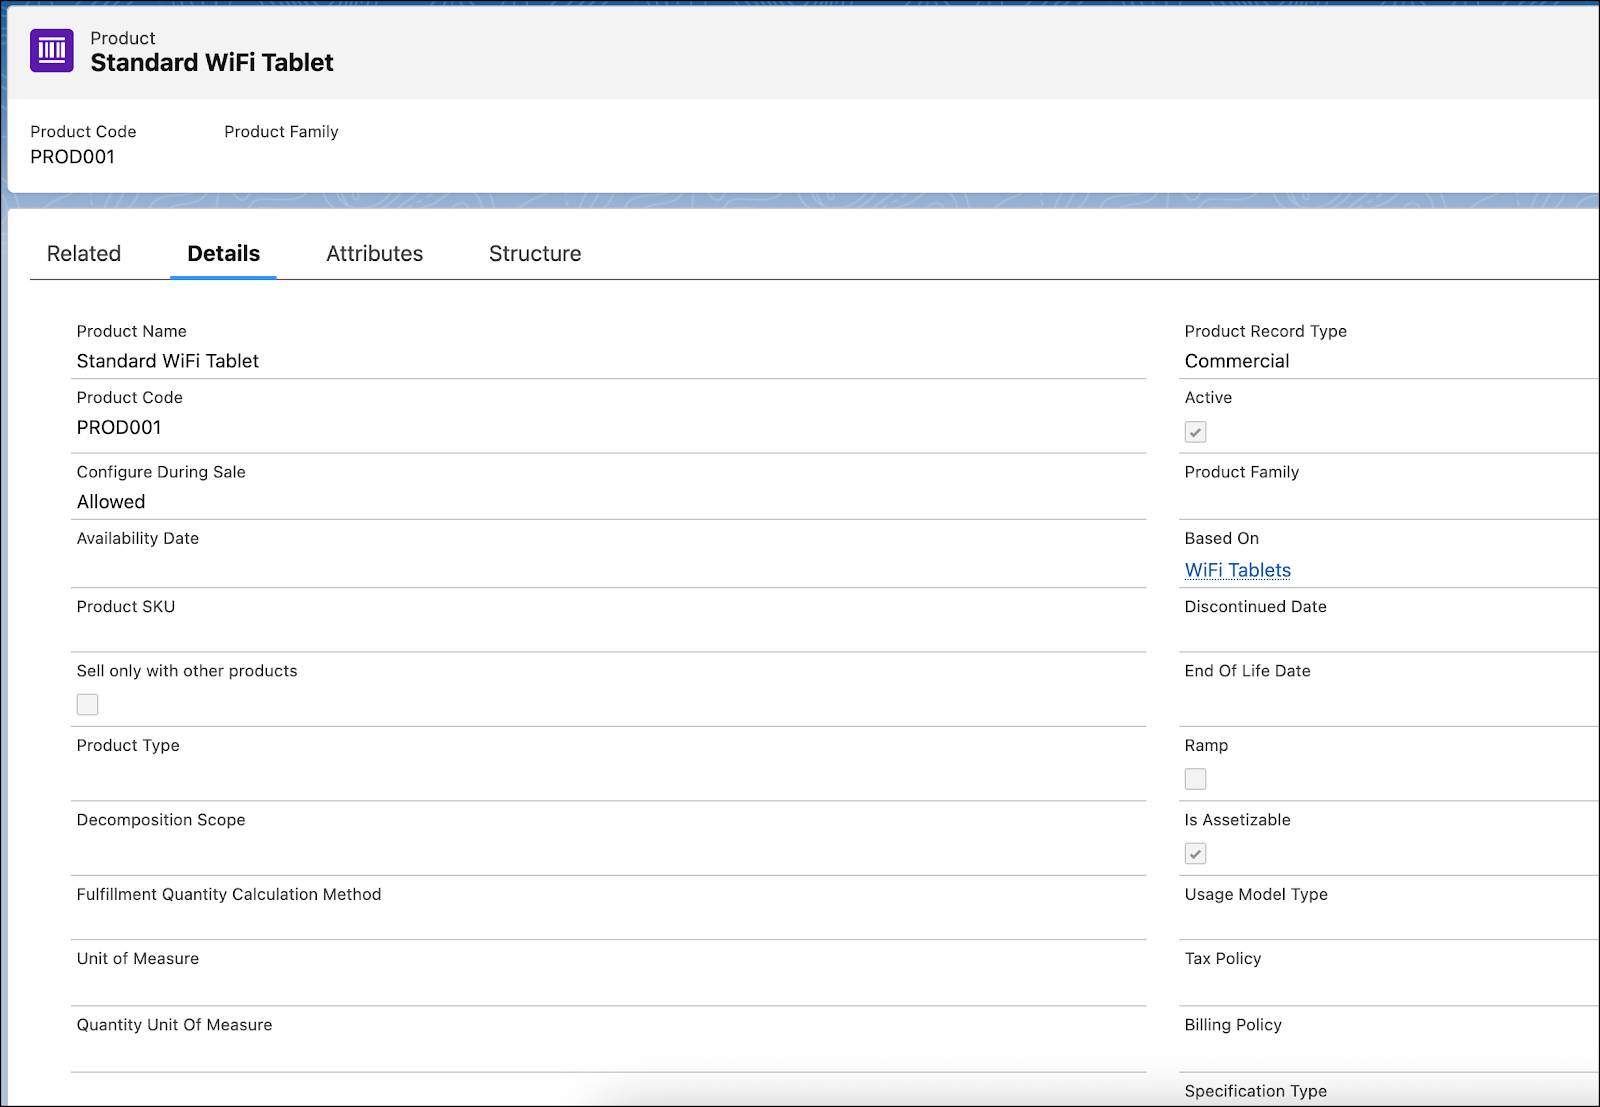
次の詳細を追加します。
- Product Name (商品名):
Standard WiFi Tablet(標準 WiFi タブレット)
- Product Code (商品コード):
PROD001 - Active (有効): オン
- Based On (条件): WiFi Tablets (WiFi タブレット)
- Product Description (商品説明):
Standard WiFi Tablet device; not part of a bundle(標準の WiFi タブレットデバイス。バンドル商品ではありません)
- Product Name (商品名):
- 次の詳細を確認します。
- Configure During Sale (販売中に構成): Allowed (許可)
- Product Type (商品種別): None (なし)
- Is Assetizable (アセット化可能): オン
- Configure During Sale (販売中に構成): Allowed (許可)
-
[Save (保存)] をクリックします。
新しい標準 WiFi タブレット商品が作成されました。
お疲れさまでした。商品の基本情報を定義しました。この商品は、ベースになっている商品分類のすべての属性を継承します。
属性を構成する
前述のとおり、商品が商品分類から継承した属性にはデフォルト値が設定されています。Manoj は、属性にこの商品に応じた値を構成したいと考えています。
- [Standard WiFi Tablet (標準 WiFi タブレット)] レコードページで、[Attribute (属性)] タブをクリックします。[WiFi Tablets (WiFi タブレット)] 商品分類から継承した属性がすべてリストされます。
- [Tablet Display Size (タブレットディスプレイサイズ)] 行でドロップダウンをクリックし、[Configure (構成)] を選択します。
- [Default Value (デフォルト値)] ドロップダウンで、[16 inch (16 インチ)] を選択します。
-
[Save (保存)] をクリックします。
- [Standard WiFi Tablet (標準 WiFi タブレット)] レコードに戻ります。
- [Attributes (属性)] タブで、[Tablet Display Size (タブレットディスプレイサイズ)] 属性が [Overridden Inherited Attributes (上書きされた継承属性)] セクションに移動されています。
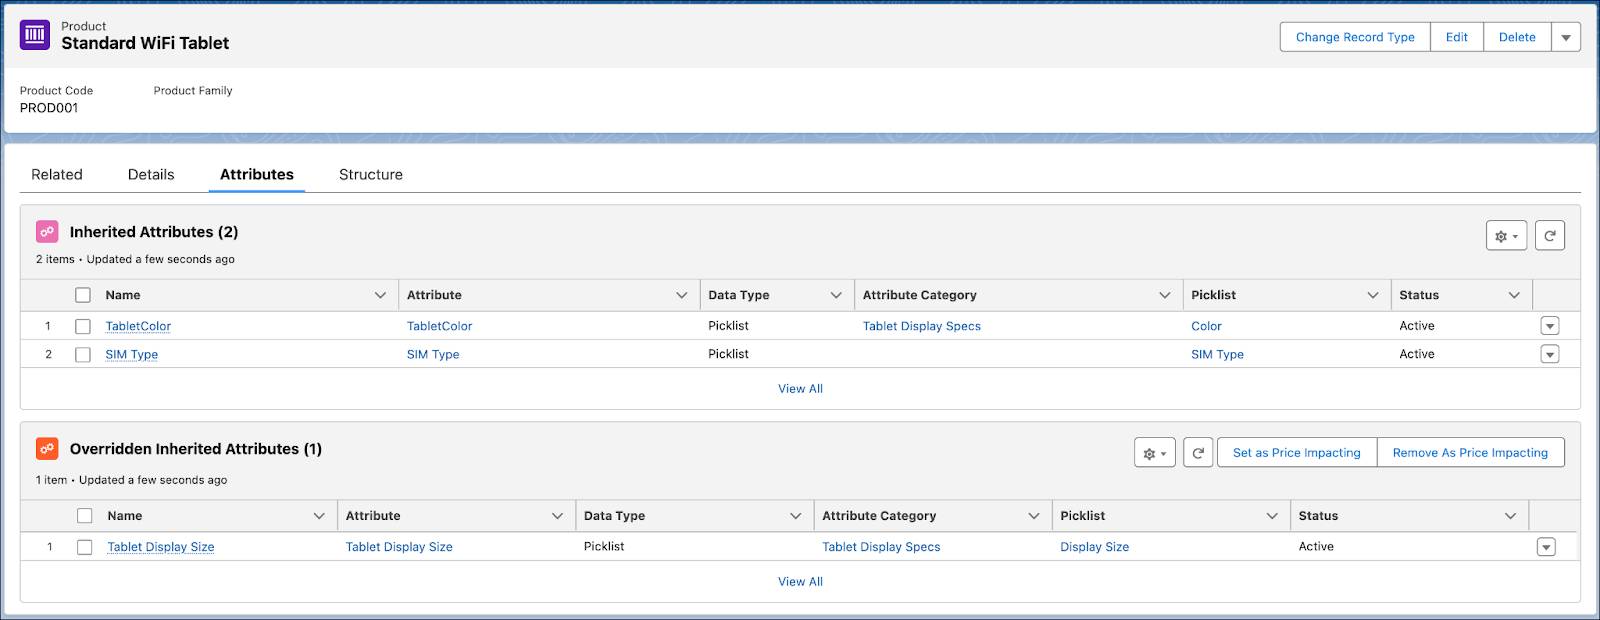
- [Tablet Display Size (タブレットディスプレイサイズ)] 行でドロップダウンをクリックし、[Include or Exclude Picklist Values (選択リスト値を含めるまたは除外する)] を選択します。
- 選択リストに選択可能なすべての値が表示されます。[10 inch (10 インチ)] を選択解除して、[Save (保存)] をクリックします。この値を非表示にしたため、商品の選択時に選択できなくなります。
素晴らしい! 商品属性に、デフォルト値とは異なる特定の値を構成できました。次のステップは、この商品をカテゴリまたはサブカテゴリに割り当てることです。
商品をカテゴリに割り当てる
商品を適切なカテゴリに割り当てて、お客様や営業担当が商品を見つけやすくします。こうすれば、購入エクスペリエンスが向上します。
- タブを [Standard WiFi Tablet (標準 WiFi タブレット)] レコードページに切り替えます。
-
[Related (関連)] タブをクリックします。
- [Categories (カテゴリ)] セクションで、[Assign (割り当て)] をクリックし、次の詳細を追加します。
- Category (カテゴリ): WiFi Tablets (WiFi タブレット)
- Category (カテゴリ): WiFi Tablets (WiFi タブレット)
-
[Save (保存)] をクリックします。
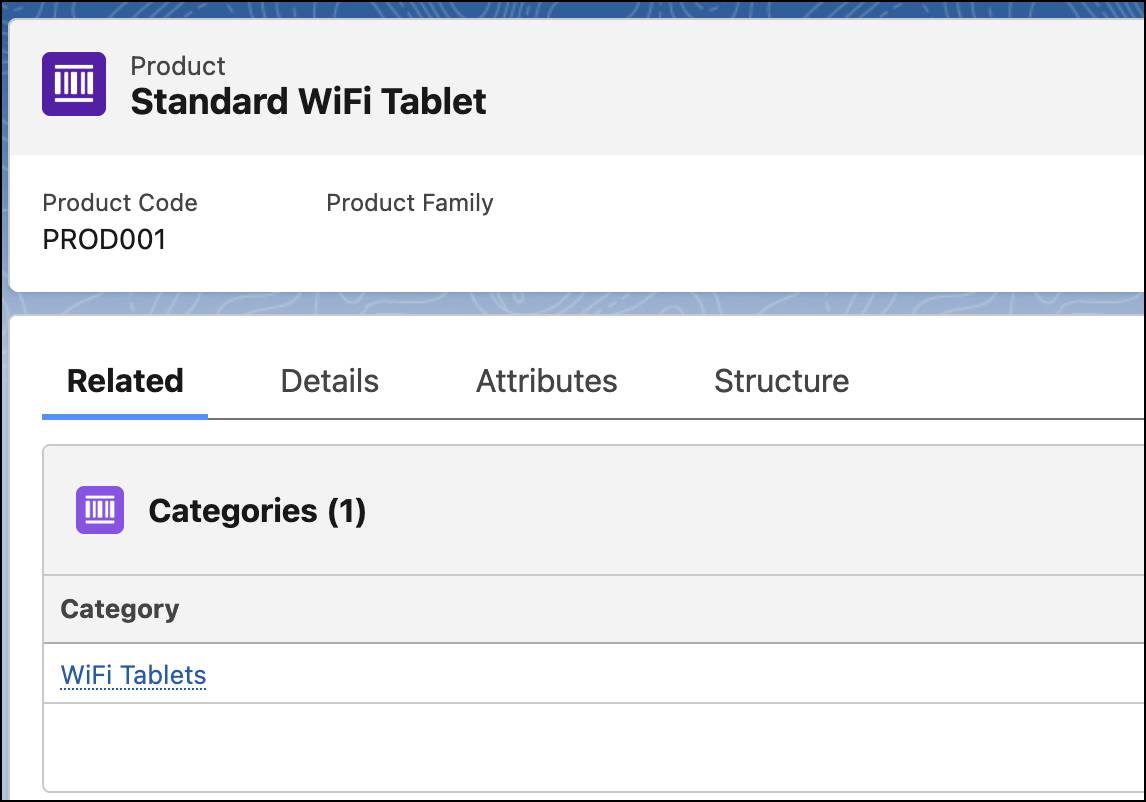
商品を適切なカテゴリに割り当てたため、お客様がカタログの商品を見つけやすくなりました。
商品価格設定を定義する
この時点で、Manoj は商品の設定をほぼ完成させています。ただし、商品を購入可能にするためには、Manoj が価格を定義する必要があります。お客様や営業担当がカタログを閲覧しているときにこの情報が表示されます。価格設定については、次の 2 点を定義します。
-
商品販売モデルは、1 回、定義済み期間、エバーグリーンなど、商品の販売方法を指定します。1 つの商品に複数の商品販売モデルを関連付けることができます。
-
リスト価格は、商品詳細ページでお客様に表示される金額です。
早速、商品販売モデルと価格を商品に割り当てましょう。
- [Standard WiFi Tablet (標準 WiFi タブレット)] タブをクリックして、[Related (関連)] タブをクリックします。
- [Product Selling Model Options (商品販売モデルオプション)] セクションで [New (新規)] をクリックします。
- [New Product Selling Model Options (新規商品販売モデルオプション)] ウィンドウで、次の詳細を追加します。
- Product Selling Model (商品販売モデル): One Time (1 回)
- Product Selling Model (商品販売モデル): One Time (1 回)
-
[Save (保存)] をクリックします。
- ステップ 2 ~ 4 を繰り返し、[Term Based - Yearly (期間ベース - 毎年)] 商品販売モデルをこの商品に関連付けます。
- タブを [Standard WiFi Tablet (標準 WiFi タブレット)] | [Product (商品)] に切り替えます。
- スクロールダウンして、[Price Books (価格表)] 関連リストを見つけます。
-
[Add Standard Price (標準価格を追加)] をクリックして、次の詳細を追加します。
- List Price (リスト価格):
149
- Product Selling Model (商品販売モデル): One Time (1 回)
- List Price (リスト価格):
-
[Save (保存)] をクリックします。
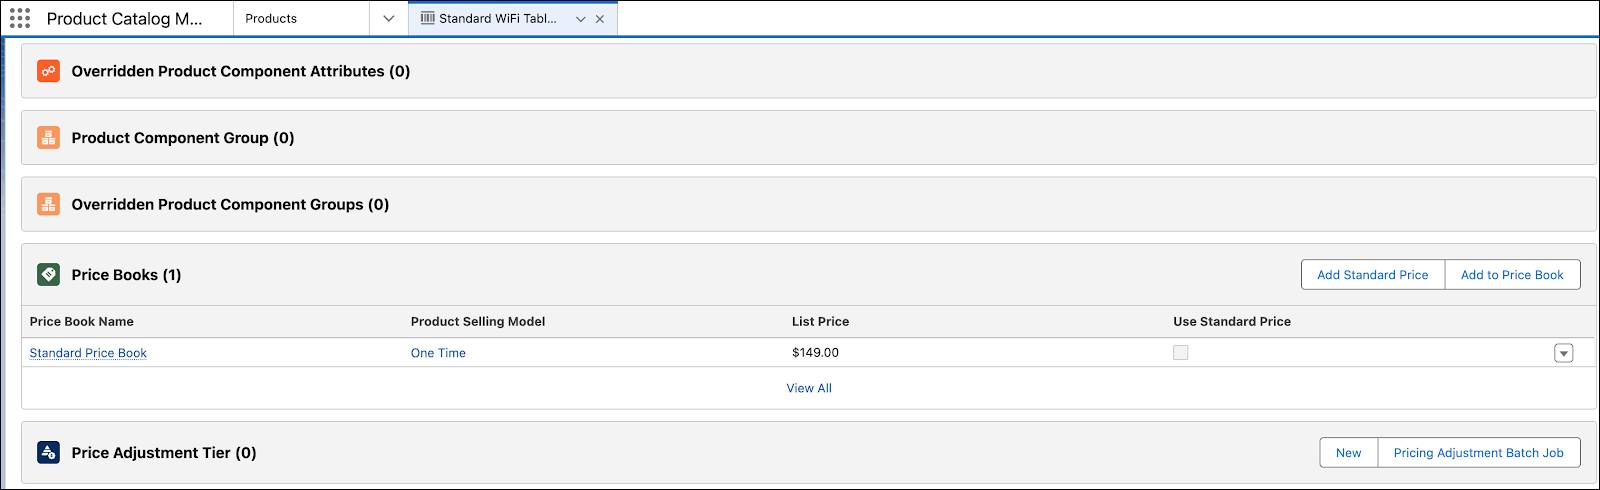
追加した価格設定の詳細は、[Price Books (価格表)] セクションに表示されます。このセクションには、価格表名とリスト価格も示されます。
- ステップ 8 ~ 9 を繰り返し、この商品に関連付けた [Term Based - Yearly (期間ベース - 毎年)] 商品販売モデルの価格設定を追加します。
シンプル商品を作成し、価格設定を関連付けました。次に、お客様がカタログを閲覧しているときにどのように表示されるのか確認しましょう。その前に、こうした変更がランタイムビューに反映されるように、さらなる手順を実行する必要があります。
価格設定を同期して、インデックスを再構築する
すべての決定表に最新の価格設定データが反映され、ランタイムシステムが最新の商品データにアクセスできるように、データを同期してインデックスを再構築します。
- [Setup (設定)] で [Salesforce Pricing Setup (Salesforce 価格設定)] ページに移動し、[Sync Pricing (価格設定を同期)] をクリックします。
![[Sync (同期)] ボタンが強調表示された [Sync Pricing Data (価格設定データを同期)] セクション。](https://res.cloudinary.com/hy4kyit2a/f_auto/fl_lossy/q_70/learn/modules/product-catalog-management-with-revenue-cloud/build-a-simple-product/images/ja-JP/7c3b5e13c2c7877414a0cfe6d51860b5_kix.2w0d8o8t8x0q.png)
- 商品カタログ管理のホームページで [Index and Search Configuration (インデックスと検索構成)] をクリックします。
-
[Rebuild Index (インデックスを再構築)] をクリックし、[Partial Index Rebuild (部分的なインデックスの再構築)] を選択して、[Rebuild (再構築)] をクリックします。
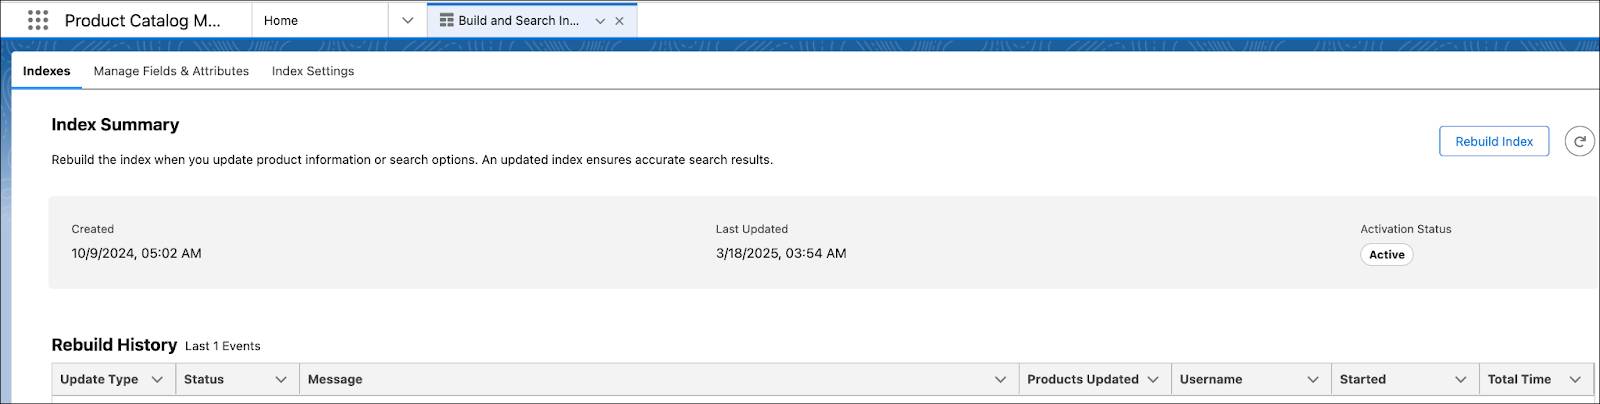
実行した変更がすべて Developer Edition 組織に反映されました。
見積を作成して商品を追加する
ここで、お客様または営業担当になったつもりで、実行時の操作を確認します。商品カタログを閲覧し、各種のカテゴリに整然と配置されている商品の中から、必要なものを選択します。このほか、商品の詳細を表示して構成することもできます。
- アプリケーションランチャーで、[Revenue Lifecycle Management (収益ライフサイクル管理)] を検索して選択します。
- ドロップダウンから [Quotes (見積)] を選択し、[New Quote (新規見積)] をクリックします。
- [Quotes Name (見積名)] は、
Tablets Purchase(タブレット購入) にします。
- [Account for Quote (見積の取引先)] は、[Edge Communications] にします。
-
[Save (保存)] をクリックします。
- [Tablet Purchase Quote (タブレット購入見積)] レコードで、[Browse Catalogs (カタログを参照)] をクリックします。
- [Choose Price Book (価格表の選択)] ウィンドウの [Price Book (価格表)] に [Standard Price Book (標準価格表)] が選択されている状態で、[Save (保存)] をクリックします。カタログ管理者がデフォルトのカタログを設定している場合は、そのカタログページが開きます。デフォルトのカタログが設定されていない場合は、[All Catalogs (すべてのカタログ)] ウィンドウが開きます。
-
[Hardware Catalog (ハードウェアカタログ)] を選択して、[Next (次へ)] をクリックします。[Hardware Catalog (ハードウェアカタログ)] のすべてのカテゴリが表示されます。
- 先ほど作成した [Tablets (タブレット)] カテゴリも示されます。
-
[Tablets (タブレット)] をクリックします。[Tablets (タブレット)] カテゴリの下にサブカテゴリが表示されます。
-
[WiFi Tablets (WiFi タブレット)] を選択します。
![[Tablets (タブレット)] カテゴリのサブカテゴリ。](https://res.cloudinary.com/hy4kyit2a/f_auto/fl_lossy/q_70/learn/modules/product-catalog-management-with-revenue-cloud/build-a-simple-product/images/ja-JP/c2e13408638434a79b363955f9d39b6a_kix.mcjb66p190n3.png)
-
[Add (追加)] をクリックして、[Standard WiFi Tablet (標準 WiFi タブレット)] を見積に追加します。
-
[Save Quote (見積を保存)] を選択します。

見積品目として選択した WiFi タブレットが見積に表示されます。商品に指定した価格設定も確認できます。
以前に作成した商品分類を使用して、シンプル商品を作成しました。また、商品分類の属性が商品にどのように継承されるかも確認しました。
Manoj が作成したシンプル商品をお客様や営業担当が注文できるようになりました。次の単元では、シンプル商品よりやや複雑なバンドル商品を作成する方法を学習します。