Implement Block Pricing
Learning Objectives
After completing this unit, you’ll be able to:
- Create block pricing tiers for products that should be priced based on quantity.
- Create an OverageRate field for per-unit pricing above certain quantities.
Think Inside the Box
Imagine that you have two boxes, one that can hold up to 10 pencils, and one that can hold 50 pencils. Each box has a price: $1 for the small 10-pencil box, $3 for the big 50-pencil box. Now imagine your customer wants to buy 7 pencils. With block pricing, you price the pencils based on the box big enough to hold them all. In this case, the total price for the pencil quote line would be $1 since the 10-pencil box is sufficient for 7 pencils.
Notice that we’re not multiplying $1 by 7 to charge the customer $7. We’re charging them the price of the small box, not per-unit. With this pricing structure, the customer should probably order 10 pencils since it’ll be the same $1 price. If they ordered 11, they would then need the big 50-pencil box, so we would charge them $3.

Top-Tier Tiers
To use block pricing, we need to define the sizes and prices of our boxes. Technically, these boxes are “tiers” so we use that word from now on. A tier typically describes four important pieces of information.
-
Name: A way for administrators to identify a given tier. Most users won’t see the name.
-
Lower Bound: The lowest quantity that a given tier supports. In our pencil box example, the lower bound for the small 10-pencil box is 1.
-
Upper Bound: The first quantity that the tier doesn’t support. So, the upper bound for the small 10-pencil box is actually 11. The upper tier is 11 because the big 50-pencil box uses 11 as the lower bound. If the small box had an upper bound of only 10, then there would be a gap between boxes, where quantities like 10.25 can slip through.
Tip: It’s best practice to make the upper bound of a tier the same as the lower bound of the next tier.
-
Price: The value that replaces the price book price. When block pricing is used for a product, the price book price is ignored.
Set Up Block Pricing
Let’s set up block pricing for one of AW Computing’s products: Toner Recycling. This is a service where toner cartridges are picked up from an office location. Most of the cost for pickup is in time and travel, so we charge the customer enough to cover our transportation costs even if they recycle only a few toners. However, if they recycle a lot of toners, we give them a better deal since we’ve already made the trip.
Here’s how AW Computing wants to price their toner recycling service.
Service |
Quantities |
Price |
|---|---|---|
Small Pickup |
Between 1 and 20 toners |
$25 |
Large Pickup |
Between 21 and 50 toners |
$35 |
Block pricing is related to the Product object, so we first navigate to the Toner Recycling product.
- Click the App Launcher (
 ), and then click the Salesforce CPQ tile.
- Click Products in the navigation bar, then choose the All Products list view.
- Click Toner Recycling.
- Click the Related tab.
- In the Block Prices related list, click Edit All.
- In the Price Name field, enter
Small Pickup.
- In the Lower Bound field, enter
1.
- In the Upper Bound field, enter
21.
Remember, although Small Pickup only supports 20 toners, you enter the first quantity not supported.
- In the Price ($) field, enter
25.
- Click the + button to make another tier.
- For the Price Name field, enter
Large Pickup.
- For the Lower Bound field, enter
21.
- For the Upper Bound field, enter
51.
- For the Price ($) field, enter
35.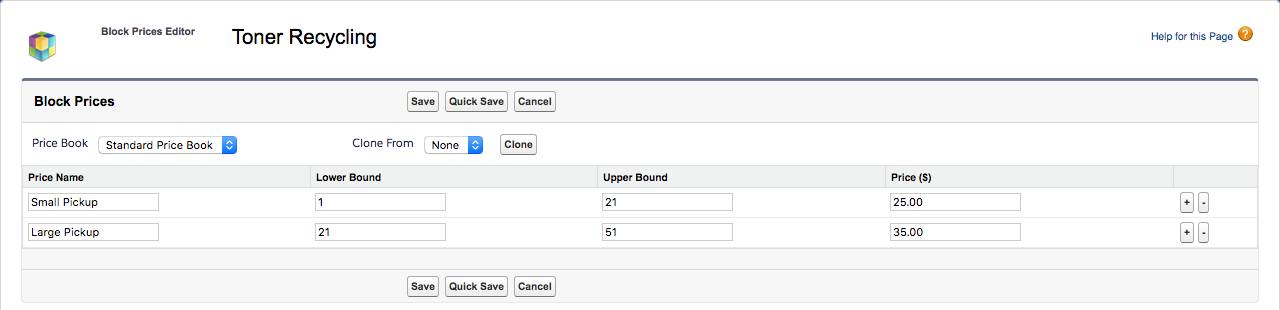
- Click Save.
You’re almost done, but we still need to tell Salesforce CPQ to use our new Block Prices.
- Click Edit.
- Change Pricing Method to Block.
- Click Save.
Excellent, now let’s pretend to be a sales rep and add Toner Recycling to a quote to see what happens.
- Click Quotes in the navigation bar, then choose the All list view.
- Click Q-00014.
- Click Edit Lines.
The first time the page loads, it can take a few minutes. Subsequent page loads are faster.
- Click Save to choose the Standard Price Book.
- Click Add Products.
- Check the box next to the Toner Recycling product. Note that the List Price states $0.00. That’s the price book price, and it is ignored when calculating the quote’s prices.
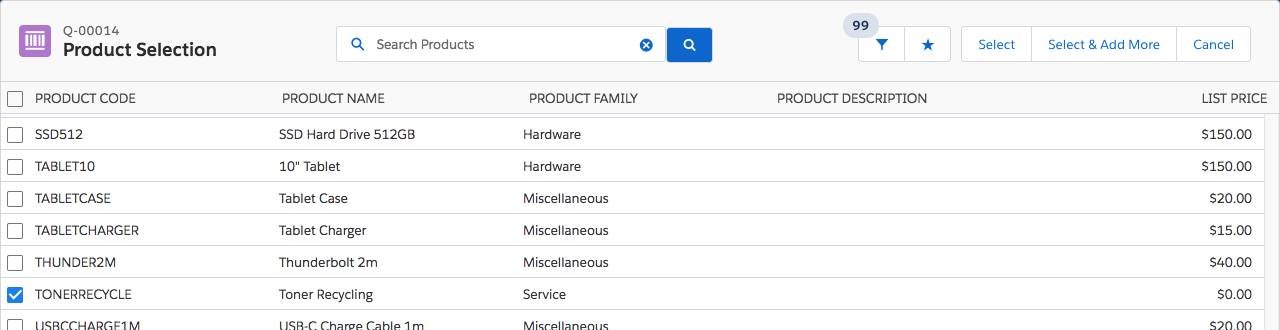
- Click Select.
The Quote Line Editor shows the list price of Toner Recycling is $25.00, the price of our first tier.
- Change the quantity of Toner Recycling to
4.
- Click Calculate.
Notice that the list price and net total didn’t change. We’re still in the first tier.
- Change the quantity of Toner Recycling to
30.
- Click Calculate.
Now we see that list price and net total change to $35.00 since we’re now in the second tier.
- Click Save.
Looks good! You now have a product using a single price book, but with different prices based on quantity.
Overage Rates
AW Computing can now sell its toner recycling service using two different tiers, handling up to 50 recycled toners. But what happens when a customer needs to recycle 51 toners? Technically, sales reps can add another Toner Recycling line to the quote, but that can get cumbersome fast especially in large quantities.
There’s a better way, and it’s to use what we call an overage rate. An overage rate is a per-unit price for any quantity above our highest tier. AW Computing has a plan to use an overage rate for the following scenario: If a customer needs more than 50 toners recycled, AW Computing charges $45, plus $1 for every toner after 51. (So recycling 52 toners costs $46, 53 toners is $47, and so on.)
To use overage rates, we must create a special custom field on the Block Price object. This is a one-time step for any org using Salesforce CPQ.
- Click
 and click Setup. The Setup page opens in a new tab.
- Click Object Manager.
- Click Block Price.
- Click Fields & Relationships.
- Click New.
- Choose Currency, then click Next.
- For both Field Label and Field Name, enter
OverageRate.
- For Length, enter
16.
- For Decimal Places, enter
2.
Even though this is a custom field, you must use OverageRate as the exact name for field name and label, or CPQ won’t incorporate overage rates into its calculations.
- Click Next.
- Click Next to keep field-level security as is.
- Click Save.
Close the Setup browser tab to return to the Salesforce CPQ app.
Great! Now that we have a place to define our overage rates, let’s update the Toner Recycling product.
- Click Products in the navigation bar.
- Click Toner Recycling.
- Click the Related tab.
- In the Block Prices related list, click Edit All.
- Click the bottom + button to make another tier.
- For the Price Name field, enter
Overage.
- For the Lower Bound field, enter
51.
- For the Price ($) field, enter
45.
The price for overage tiers always represents the price of the lower bound quantity.
- For the OverageRate ($) field, enter
1.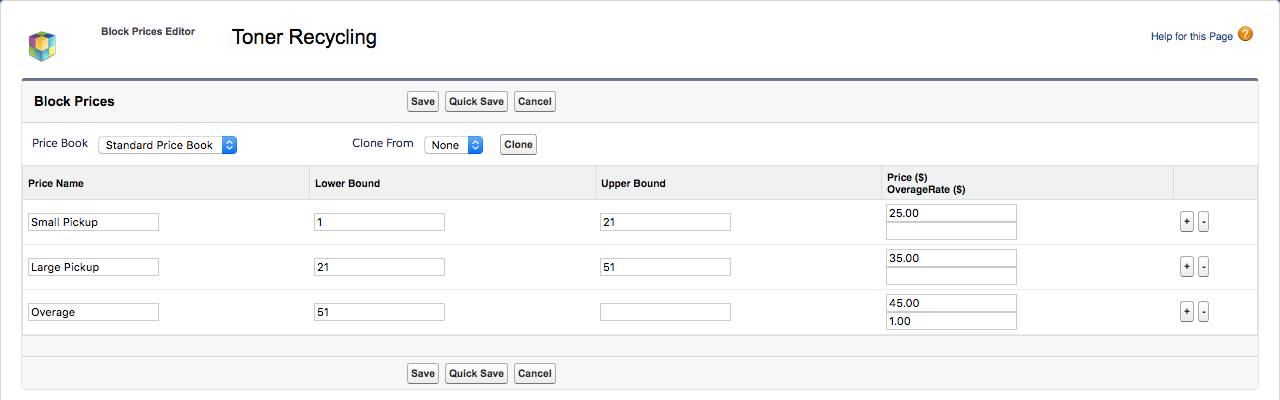
- Click Save.
That’s it! Now if you navigate back to Q-00014 and edit lines, you see that changing the quantity of Toner Recycling to 51 (and then clicking calculate) changes the list and net prices to $45.00. Updating the quantity to 52 results in $46.00 for Toner Recycling.

Block pricing is a great way to set a price based on a range of quantities instead of per-unit pricing while maintaining the flexibility of a per-unit overage rate. Next, we learn how to give a product a price based on the value of other quote lines by using the percent of total pricing method.
Resources