Deploy Metadata Using the Manifest
Learning Objectives
After completing this unit, you'll be able to:
- Define metadata components using Metadata API.
- Deploy using package.xml.
Push Metadata
Before you start developing, the metadata first needs to be pushed into the scratch org.
- In the terminal window in VS Code, run the following command to push the metadata into your new scratch org.
sf project deploy start -a 64.0
If the scratch org isn't marked as the default (using the -d flag when creating the scratch org identifies it as the default), you will need to include the -u flag and add in the scratch org username or alias.
- Once the command completes running, the terminal window lists the metadata items that were successfully pushed to the scratch org. Visually check all components were successfully pushed.

Edit in a Scratch Org
Next, let's do some development and create a permission set for the sticker project. To follow best practices and not overload profiles with permissions, you'll create a custom permission set.
- In the terminal window in VS Code, open your scratch org by running this command:
sf org open
- From Setup, in the Quick Find menu, search for and select Permission Sets.
- Click New.
- Label:
Sticker Manager - API Name:
Sticker_Manager
- Click Save.
- Select Object Settings.
- Select Stickers.
- Click Edit.
- Tab Settings: select Available and Visible.
- Object Permissions: select Read, Create, Edit, and View All Records.
- Click Save.
Pull Changes
Development in the scratch org is complete, and now it's time to pull all of the changes into the sticker project. When the pull command is complete, all of the changes you made in the scratch org will be pulled into the project, and the new files representing the new custom permission set you created will be added to the force-app/main/default folder structure. Let's go ahead and pull the latest changes and update the sticker project.
- In the terminal window in VS Code, run the following command to pull the changes from the scratch org:
sf project retrieve start -a 64.0
- The terminal window displays the assets that were successfully pulled.

In one command, you pulled updated metadata into the force-app directory.
Review the Package Directory
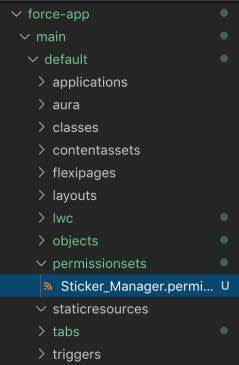
Remember, after pulling metadata, it's a good idea to always visually confirm the components and files are inside the correct force-app/main/default folder structure. Since the only change you made was creating the Sticker Manager permission set, that should be the only source component identified in the terminal's success message. When you click into the permissionsets folder, there should be a custom permission set file named Sticker_Manager.permissionset-meta.xml.

Modify XML
So far you've used a package.xml file to pull a list of metadata components, and pushed those metadata components to a scratch org. Next, let's update that package.xml file with the Sticker Manager custom permission set and deploy only that custom permission set to your Trailhead Playground. Selectively deploying only certain components is just one superpower of package.xml. This tool becomes especially helpful if you only need to deploy a quick change or update to a single component and not the entire application.
Next, update the package.xml manifest to identify what specific metadata to deploy. For this hands-on challenge, update the package.xml manifest file you created previously.
- In VS Code, open package.xml.
- Remove both the CustomObject and CustomTab element trees.
- Create a new element tree and fill in the API name for the Sticker_Manager custom permission set you just created.
<?xml version="1.0" encoding="UTF-8"?> <Package xmlns="http://soap.sforce.com/2006/04/metadata"> <types> <members>CUSTOM PERMISSION SET API NAME HERE</members> <name>PermissionSet</name> </types> <version>64.0</version> </Package> - Replace the CUSTOM PERMISSION SET API NAME HERE with
Sticker_Manager.
- Save package.xml.
Best Deployment Practices
Managing org deployments and coordinating development changes can be challenging. You need to keep an eye out for limits such as the maximum number of files that can be retrieved or deployed and the maximum number of scratch orgs that can be created at any one time. When you're not working with managed packages or unlocked packages, the best deployment practice is to deploy only what needs to be deployed.
The org limits you're working within depend on what edition of Salesforce your org is. For example, the default org limit for files that can be retrieved and deployed at once is 10,000 files. There may also be a number of test cases that are executed as part of each deployment. You can lower the number of files being deployed using package.xml with Salesforce CLI, keeping clear of org limits, reducing the number of test cases being executed during deployment, and making deployments run faster.
As you manage your metadata with package.xml and Salesforce CLI, it's a good idea to closely monitor your org limits to better coordinate deployments and development changes.
To see your org limits, run the following command:
sf limits api display -o DevHub
Deploy to Your Playground
Now that you have your metadata project set up and package.xml ready, let's push changes to your Trailhead playground. For this hands-on challenge, we don't need to push everything for a deploy. We need to push only the permission set we created.
In the terminal window in VS Code, deploy the new permission set by running the following command:
sf project deploy start -x ./package.xml -o DevHub -w10
Once the permission set has successfully deployed, you'll see an update in the terminal window.

Deploying selected metadata using package.xml is faster than most Trailblazers think. You shouldn't use this method to deploy all the metadata in your org or entire apps—that's what package development is for—but for quick updates and metadata changes, a package.xml manifest file sure is handy to have in your toolbelt.
Resources
- Salesforce Developer Guide: Special Behavior for Metadata Deployments
- Salesforce Metadata API Developer Guide: Package.xml Sample Manifest
- Salesforce Metadata API Developer Guide: Metadata Types
- Salesforce Developers: Salesforce CLI Command Reference
