Simplify Complex Processes with Omniscript
Learning Objectives
After completing this unit, you’ll be able to:
- Explain how Omnistudio Omniscripts streamline user interactions for complex tasks.
- Describe when to use Omniscripts.
- Describe the features of Omniscript Designer.

Before You Start
Before you start this module, consider completing this recommended content.
The Challenge of Complex Processes
Imagine that you're hiking and your goal is to reach the top of a mountain.
How do you get there? Do you take a direct line to the summit over boulders and through a thick forest? Why not get your climbing gear and head for the nearest rock face? Would you like to guess at the best route, wander around, and maybe get lost?
Well, if there’s a well-marked trail, you should take it instead. You know that a consistent, guided path is the easiest, surest way to reach your destination.

While less of a physical challenge, your business is full of situations where your users and customers can benefit from this same kind of guided path. A consistent experience can help reduce costly mistakes and delays. It can also bring together information in a way that gets the job done quickly.
For example, consider these situations.
- A service rep helps a customer file a warranty claim and schedule a repair for a product.
- A customer wants to determine which product is best for them based on their needs.
- A customer moves to a new home and wants to update their address, either on their own or with the help of a service rep.
Without a standard path, each of these situations could go poorly, costing your business time, money, and reputation. Don’t let these folks wander off into the wilderness!
Fortunately, Omnistudio Omniscripts help you guide users and customers through these types of common scenarios. The Omniscript Designer helps you quickly create guided interactions with drag-and-drop elements for fast, personalized, and consistent experiences. It works with Omnistudio Flexcards, Data Mappers, and Integration Procedures to make it easy to develop and deploy.
Check out this sample Omniscript in action, which guides a utility customer to set up their service when they move in.
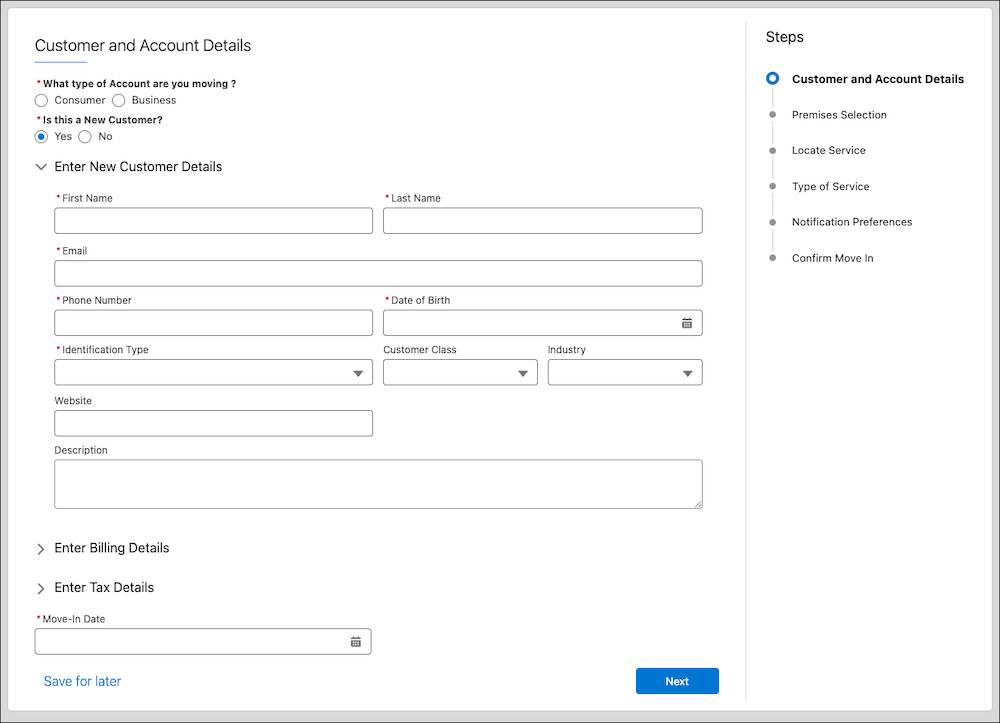
Notice that this is only the first step in a series. By organizing the form elements into manageable chunks and collapsible sections, the utility can guide the customer through an intuitive process to collect all the necessary information to start service.
Along with creating guided experiences for customers, Omniscripts help to simplify common internal processes for your staff.
In this module, you learn the basics of Omniscripts and discover how this solution can work for your organization.
In this unit, you start with some basics.
When to Use Omniscripts
Omnistudio Omniscript is your go-to tool for building consumer-quality guided processes for your customers, partners, and other external audiences, and your internal sales and services reps. You can build an Omniscript once, deploy it across channels, and reuse it in different contexts.
Omniscripts’ flexible design makes them perfect for situations where you need a custom design, theming, and branding. Show and collect complex hierarchical data using elements like data tables and type-ahead blocks. And create pixel-perfect experiences that match your brand, using custom styling with CSS.
Omniscripts can also perform advanced data operations and work with a mix of information from Salesforce and external systems. Prefill the information you have in input elements so that users can review it and save it back to where it’s stored. Connect data to Omniscripts using the other declarative capabilities included in the Omnistudio components that are covered in a later unit. Many of these data operations can be reused for different Omnistudio projects, adding efficiency to your development workflow.
Plus, an Omniscript can run in multiple languages using custom labels. That means you can create one guided process, then use translation features to run it in the best language for your reps and customers.
How do Omniscripts do all of this? Thanks to Omniscript elements. Elements are the foundational building blocks you use to create interactive workflows in the Omniscript Designer. Let’s explore that now.
Tour the Omniscript Designer
The Omniscript Designer is a declarative development tool that you can use without coding knowledge, especially to get the basics of your workflow setup.
To get to the designer from the App Launcher ( ), find and select Omniscripts. Alternatively, find and select Omnistudio in the App Launcher (
 ), then select Omniscripts from navigation. On the list view, either select an existing Omniscript or create one.
Now that you know how to find the design tool, let’s explore its features.
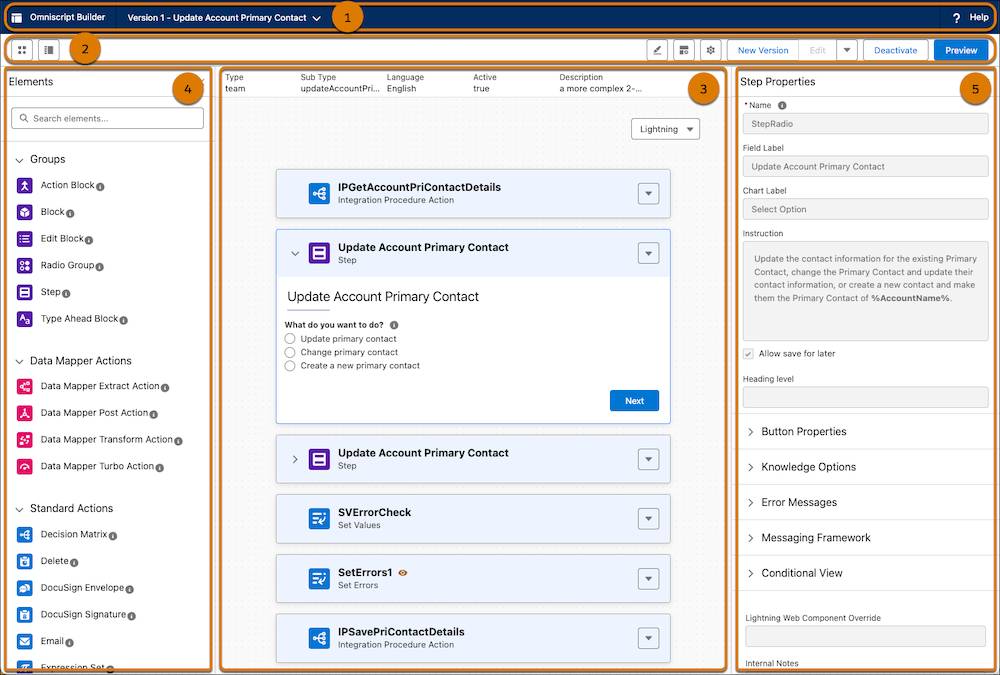
When you open an Omniscript, you see the basic tools you use to build an experience.
- The header (1) shows the Omniscript’s name and version. Select the dropdown to quickly switch between versions.
- The toolbar (2) includes options to show and hide panels in the designer. It also has buttons to create a new version, change the Omniscript's details, activate it, and switch to Preview mode. Though you don’t see it by default, you can open a List panel to view every element used in the Omniscript by selecting
 .
.
- The canvas (3) is where you build your Omniscript. Everything you see here is included in the the Omniscript. Modify and remove steps, input fields, actions, and other elements by selecting them in the canvas.
- The Elements panel (4) is where you find all of the elements that make up your Omniscript. Simply drag them on to the canvas and position them where needed to add them to the Omniscript.
- The Properties panel (5) is where you configure details about the elements on the canvas. Select an element on the canvas to view and change its properties. This same part of the page is also where the Omniscript setup panel or design assistant panel appears when you open it.
Those are the basic tools, but there are a few other features that help you design, test, and deploy your Omniscripts with confidence.
First is the Omnistudio Design Assistant, which you can open by selecting  . The Design Assistant provides real-time feedback, alerts, and reports on an Omniscript’s health, design quality, complexity, performance, and best practices during the design stage.
Second is Preview mode. Select Preview in the toolbar to check how your Omniscript will display and function.
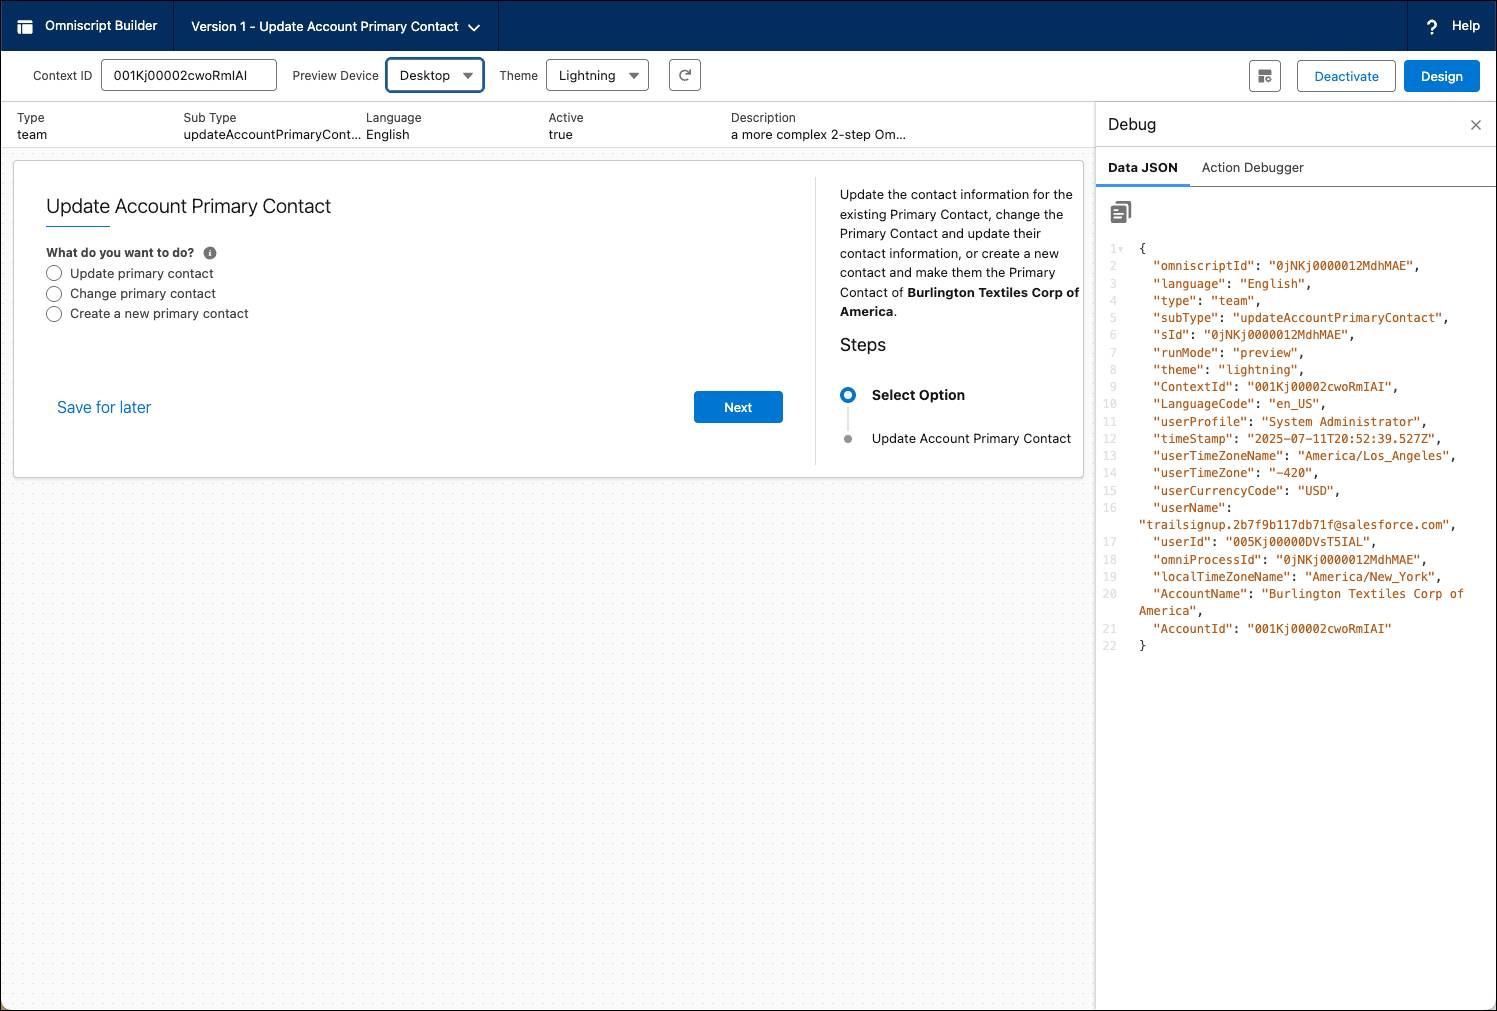
To test your Omniscript with real data in the preview, enter a value in the Context ID field. The Context ID typically identifies a record in your org and is shared with the data source that is pulling data into the Omniscript. You can change the preview device and see how it looks in either the Lightning or Newport theme.
The Debug pane shows you the Data JSON working behind the scenes—JSON is the underlying data format that defines an Omnistudio component. The pane also includes an Action Debugger to help you inspect response data and other details of client- and server-side action calls.
Now that you understand the basics of what an Omniscript is and how it works, let’s explore elements and how they work together. That’s the topic of the next unit.