Test Your JavaScript
Learning Objectives
After completing this unit, you'll be able to:
- Explain why behavioral-driven tests are unique.
- Identify the different elements used in a Jasmine testing script.
- Create a simple Jasmine test suite and run it stand-alone.
To Test or Not to Test?
Apex developers are already familiar with the concept of unit tests, since these are required. But for now, testing your JavaScript is entirely optional. Many of you may be asking, “Why even bother if you don't have to?” After all, most developers hate writing tests, almost as much as they hate writing documentation, or running over hot coals.
Here is the thing: Taking the time in the beginning of your project to write good unit tests can undoubtedly save you more time in the long run. You save time that would've been spent logging bugs, then tracking down and fixing said bugs. Followed, finally, by testing that the bug was actually fixed. Not to mention working with whatever release process you have set up.
Good unit tests help you to squash bugs before they are released into the wild. That has to be better, right?
Behavior-Driven Development
Behavior-driven development (BDD) is a process that was born out of Test-driven development (TDD). BDD involves organizing tests such that their behavior is tested, rather than their implementation. When designing these types of tests, think, “How can I describe, in sentence form, what this code does and what I should expect from it.”
You then use a behavior-driven tool to create a test script. The script should contain natural language sentences that essentially describe what the test is supposed to do. It should also contain assertions to see whether the test is working.
Which Tool Should You Use?
There is certainly no shortage of tools to choose from when testing your JavaScript, and the list seems to grow longer each day. One of the more popular behavior-driven tools is Jasmine. It is easy to set up and easy to use.
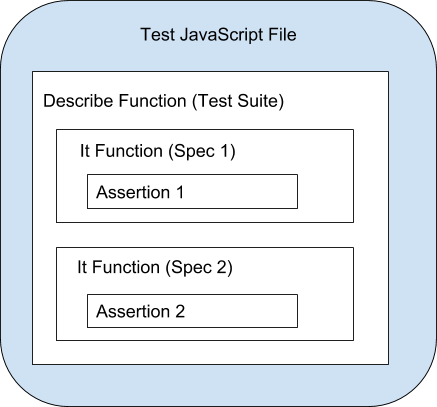
In Jasmine you use a describe function to create a test suite, but you're really just creating a JavaScript function. Inside of that function, use the it function to specify one or more specs (or tests), which are also just functions. Inside of the spec function, put assertions to check whether the test worked.
This is what a basic test suite looks like with both a positive and a negative test:
describe("A test suite is just a function", function() {
    it("This is a positive test", function() {
      expect(true).toBe(true);
    });
    it("This is a negative test", function() {
      expect(false).not.toBe(true);
    });
});
Jasmine includes global functions (beforeEach and afterEach) that can be used to execute code before and after each of your test specs have run. This is useful for when you have set up and tear down code that requires a lot of resources, like logging in and out as a certain user. There are also beforeAll and afterAll functions, but these are run only once for each describe block they are part of.
Using the Jasmine Testing Framework
The installation page for Jasmine provides a few different ways to install it. You can also run it stand-alone by downloading the latest version from the GitHub repo and then copying and unzipping the entire contents of the lib folder to your JavaScript project directory.
Once you have written your JavaScript test suite, you can reference this, along with the necessary Jasmine framework files from an HTML page to run the tests in your browser.
To see how it works, let's assume you want to create a Jasmine test suite to test the Parent/Child class code you saw in the Working with Classes unit. In case you don't remember, the code for the Parent class looked like this:
class Parent {
  constructor(name) {
    this.name = name;
  }
  getName() {
    return this.name;
  }
}
And the code for the Child class looked like this:
class Child extends Parent {
  constructor(name) {
    super(name);
  }
  getMessage() {
    return 'Hello ' + super.getName();
  }
}
Once you've downloaded and extracted the Jasmine lib folder, create a new folder on your local machine. Copy the lib folder you extracted into the folder you just created. This is also where you place the JavaScript code you want to test, which in this case is the parent and child classes.
You can add the JavaScript code for the Jasmine test suite to a separate file. It might look something like this:
describe("Test Parent Child Classes", function() {
  it("Get Message Test", function(){
      let someone = new Child('person');
      expect(someone.getMessage()).toEqual("Hello person");
  });
});
The only thing left to do is to create a simple index.html file that loads all the required Jasmine files, along with your JavaScript files. That markup code might look something like the this:
<!DOCTYPE html>
<html lang="en">
<head>
    <!-- Jasmine files to load -->
    <link rel="shortcut icon" type="image/png" href="lib/jasmine-3.2.1/jasmine_favicon.png">
    <link rel="stylesheet" href="lib/jasmine-3.2.1/jasmine.css">
    <script src="lib/jasmine-3.2.1/jasmine.js"></script>
    <script src="lib/jasmine-3.2.1/jasmine-html.js"></script>
    <script src="lib/jasmine-3.2.1/boot.js"></script>
    <!-- JS Files to Test -->
    <script src="Parent.js"> </script>
    <script src="Child.js"> </script>
    <!-- Jasmine Test Suite -->
    <script src="JasmineTest.js"> </script>
</head>
<body>
    <h1> Jasmine Parent Child Testing Demo </h1>
</body>
</html>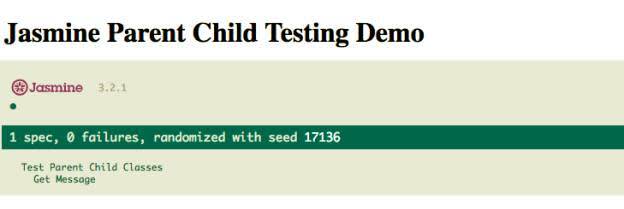
Running the Jasmine test suite is now as simple as loading the index.html file in your browser. You now have everything you need to start designing your own set of behavior-driven JavaScript tests.
Resources
- Wikipedia: Behavior-driven development
- Jasmine: Documentation
- Mocha: Documentation
- GitHub: Repo for Jasmine releases