Configure Service Level Agreements
Learning Objectives
After completing this unit, you’ll be able to:
- Explain the importance of Service Level Agreements (SLAs) in order fulfillment.
- Describe how SLAs help prevent fulfillment delays.
- Turn on and configure SLA rules for various fulfillment step types.
Before You Start
Before you start this module, consider completing this recommended content.
-
Simple Order Orchestration with Agentforce Revenue Management
-
Complex Order Decomposition and Orchestration with Agentforce Revenue Management

Deliver On Time, Every Time
In any organization, meeting service level agreements (SLAs) is critical to keeping fulfillment on track. SLAs help ensure that each step in the process is completed within defined timeframes, empowering teams to proactively manage performance, spot delays early, and maintain efficiency.
Within dynamic revenue orchestrator (DRO), you can assign SLAs to individual fulfillment steps. When a step exceeds the defined threshold, the system flags it, giving your team a chance to act before a delay cascades into downstream issues.
That’s exactly why InfinitraBytes, a tech solutions provider, relies on SLAs. With a growing customer base and a diverse product portfolio, the company needs greater control over the fulfillment process.
For InfinitraBytes’s Laptop Pro Bundle, Fulfillment Designer Julian Wang sets SLAs on manual steps such as Pick and Pack to avoid warehouse delays. He also applies SLAs to the activation steps to ensure timely service provisioning. This end-to-end SLA strategy helps InfinitraBytes deliver consistent, high-quality service and maintain customer trust as they scale.
In this unit, you learn how to configure and apply SLAs to keep order fulfillment on track and address potential delays before they become issues.
Key Concepts
To fully understand how SLAs function within DRO, here’s a breakdown of the key concepts that drive this process.
Concept |
Description |
|---|---|
Fulfillment Step Jeopardy Rules |
Define estimated duration for different step types, such as manual task, callout, and automated task. |
SLA Violations |
SLA violations occur when a step exceeds its estimated duration, triggering a jeopardy or violated state. |
Notifications and Escalations |
Configure SLA violations to automatically alert teams or escalate issues to managers. |
Now that you know the why behind SLAs, deep dive into the how. Follow Julian at InfinitraBytes as he configures SLA rules for manual tasks in the system. But first, set up your own Salesforce org.
Sign Up for a Developer Edition Org with Agentforce Revenue Management
To complete this module, you need a special Developer Edition org that contains Agentforce Revenue Management and our sample data. Get the free Developer Edition and connect it to Trailhead now so you can complete the challenges in this module. Note that this Developer Edition is designed to work with the challenges in this badge, and may not work for other badges. Always check that you’re using the Trailhead Playground or the special Developer Edition org that we recommend.
- Sign up for a free Agentforce Revenue Management Developer Edition org.
- Fill out the form.
- For Email, enter an active email address.
- For Username, enter a username that looks like an email address and is unique, but it doesn’t need to be a valid email account (for example, yourname@example.com).
- For Email, enter an active email address.
- After you fill out the form, click Sign me up. A confirmation message appears.
- When you receive the activation email (this might take a few minutes), open it and click Verify Account.
- Complete your registration by setting your password and answering the challenge question. Tip: Save your username, password, and login URL in a secure place—such as a password manager—for easy access later.
- You’re logged in to your Developer Edition org.
Now connect your new Developer Edition org to Trailhead and follow along.
- Make sure you’re logged in to your Trailhead account.
- In the Challenge section at the bottom of this page, click the playground name and then click Connect Org.
- On the login screen, enter the username and password for the Developer Edition you just set up.
- On the Allow Access? screen, click Allow.
- On the Want to connect this org for hands-on challenges? screen, click Yes! Save it. You’re redirected back to the challenge page and ready to use your new Developer Edition to earn this badge.
Build Index
Now that your org is connected, make sure it’s ready to use by building the index.
- From the App Launcher, find and select Product Catalog Management.
- On the Product Catalog Management home page, click the Index and Search Configuration tile.
Note that an error message sometimes appears because the system is trying to fetch the latest index snapshot details. An index build doesn’t exist yet though, because your Developer Edition is a brand-new org. In a real-world implementation, your system has snapshot details to gather. So for the purposes of this challenge, just close the banner and go to the next step.
- Click Create Full Index. If you don’t see this button, click Rebuild Index.
- Select Full Index Rebuild, then click Rebuild.
Sometimes, the index build takes a few minutes to complete. Refresh the page and confirm that the status shows Completed before proceeding.
Sync Pricing Data
Now sync the pricing data.
- From Setup, in the Quick Find box, find and select Salesforce Pricing Setup.
- Under the Sync Pricing Data section, click Sync.

- Confirm that you want to sync your org.
The pricing data sync takes a few minutes to complete, but you don't have to wait. Proceed to the next step.
Refresh the Decision Tables
Next, refresh the Product Qualification and Product Disqualification decision tables in your org.
- From Setup, in the Quick Find box, find and select Decision Tables.
- From the available decision tables list, select Product Disqualification.
- Click Refresh.
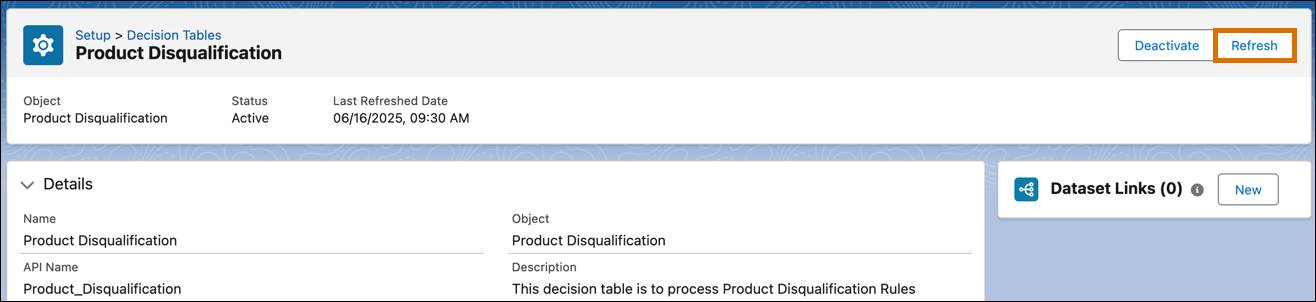
- Similarly, refresh the Product Qualification decision table.
You’re all set to start using your Developer Edition org.
Configure Fulfillment Step Jeopardy Rule
First, set up SLA for the Manual Task fulfillment step type in your Developer Edition org.
- From Setup, in the Quick Find box, find and select Fallout and SLA Settings.
- In the Service Level Agreement section, enable Service Level Agreement and then click Configure.
- Click
 , and select All Fulfillment Step Jeopardy Rules.
- Select the 000000001 fulfillment step jeopardy rule.
- Click Edit and update these details.
- Jeopardy Threshold:
1
- Jeopardy Threshold Unit: Minutes
- Jeopardy Threshold:
- Save your changes.

You have now defined that a manual task completes within 2 minutes, with an alert at the 1-minute mark to remind the user to make sure that the task completes on time.
Refresh the Decision Table
For your new SLA rule to take effect, refresh the corresponding decision table.
- From Setup, in the Quick Find box, find and select Decision Tables.
- From the available decision tables list, select Fulfillment Step Jeopardy Rule Entries.
- Click Activate or Refresh.
Julian does this every time he updates SLA thresholds, just like you’re doing now.
Test SLA Configuration
Time to test what you’ve set up.
Create an Order
Create an order for the Laptop Pro Bundle to see the orchestration plan in action.
- From the App Launcher, find and select Dynamic Revenue Orchestrator to use this app.
- From the App Launcher, find and select Quotes to go to the Quotes list view.
- Click New Quote.
- In the New Order window, add these details.
- Quote Name:
SLA Manual Task Test - Account for Quote: EdgeMX
- Quote Name:
- Save your work.
- Click Browse Catalogs.
- In the Choose Price Book window, if prompted, make sure Standard Price Book is selected, and click Save.
- In the All Catalogs list, select Hardware Catalog, and click Next.
- Under Categories, click Laptops.
- From the products list, select Laptop Pro Bundle.
- Click Add and Save Quote.
- Click
 , and select Create Order.
- Select Create Single Order and click Finish.
Hold on! The CPQ system is generating your order. You see your order in a few moments.
Submit an Order
Next, submit the order you created.
- Open the order you just created. Alternatively, click the Related tab in the Quote page and scroll down to the Orders section to find your new order.
- To make the order eligible for orchestration, activate it. Click
 , and select Activate.
- Click Activate.
- Click
 , and select Submit Order.
- Wait for the successful Submit Status message and click Finish.
Now that your order is submitted, follow Julian’s lead and monitor the SLA in action.
View Fulfillment Plan
Verify the fulfillment plan.
- In the order page, go to the Decomposition Details tab.
- Click View Orchestration Plan.
You can see your plan in action. Locate the Pick and Pack manual task in the Inventory Management lane. Initially, it's in In Progress or Pending state. If you view the orchestration plan within 1 minute, which is within the SLA violation limit you specified, the plan for your new order shows that the plan has not violated the SLA limits.
After 1 minute, it shows up as In Jeopardy.
Allow the Pick and Pack task to remain In Progress for longer than the 1 minute estimated duration you set in. You see the task is now in an SLA Violation state.

Click or hover over  to display the SLA Violation details, confirming that the step is overdue.
Julian uses this view to catch issues early and keep the warehouse running like clockwork.
Resolve SLA Violations in Run Time
Next, fix the delay and move the order forward as Julian has spotted a bottleneck.
- Complete the Pick and Pack step.
- In the Fulfillment Plan, on the Pick and Pack task, click
 and select Complete.
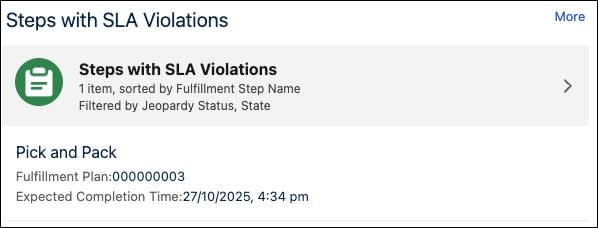
- You can also complete the task from the Dynamic Fulfillment Orchestrator Home page. In the Steps with SLA Violations section, find the manual task for your order with the subject Pick and Pack, change its status to Complete, and save your changes.
- In the Fulfillment Plan, on the Pick and Pack task, click
- Refresh the Fulfillment Plan page.
You see the remaining steps start progressing. Complete the Activate Subscription step as well. Wait until the plan status changes to Completed. Once it’s completed, you see Fulfillment Assets on the EdgeMX Account.
Next Steps
With SLA management in DRO, Julian, and now you, can keep fulfillment timelines in check. Instead of reacting to delays, you’re one step ahead. This level of operational agility translates directly to better customer satisfaction and scalable growth.
Ready to keep the momentum going? In the next unit, explore how fallout management works hand in hand with SLA monitoring to create a reliable and effective fulfillment strategy.