Create and Manage Custom Metadata Types
Learning Objectives
After completing this unit, you’ll be able to:
- Declaratively create custom metadata types.
- Create custom metadata type fields.
- Create metadata records.
Custom Metadata Types in Action
Acme Services offers different levels of support for accounts based on how much the account spends. Higher-level tiers are eligible for an extended warranty and extra discounts. As the Salesforce admin, you create an app configuration that defines which tiers are available. You also need to deploy this app to your production org with all of its configurations. Sounds like a job for custom metadata types, which include both the metadata definitions and records.
Let’s create a custom metadata type and add two custom fields on our type: a Minimum Spending field and a Default Discount field. The minimum spending determines how much a particular account needs to spend in order to qualify for a support tier. Default discount is the automatic discount applied to a specific tier.
After you create the type with all its fields, add custom metadata type records. The custom metadata type records store configuration data. For our example, you create a record for each support tier that’s relevant to your org.
Create Custom Metadata Types
Note: This unit includes steps for creating a custom metadata type named Support Tier. Don’t skip this exercise because you need this Support Tier later in this module.
- From Setup, enter
Custom Metadata Typesin the Quick Find box and select Custom Metadata Types.
- Click New Custom Metadata Type.
- For Label, enter
Support Tierand for Plural Label, enterSupport Tiers.
- Click Save.
After you save, you land on the Custom Metadata Type Support Tier page. This page includes the details of the custom metadata type. From here you can add custom fields, add records, create validation rules, and edit page layouts.

Add Custom Fields
We want our custom metadata type to associate each support tier with a minimum spending amount. We also want to include a default discount. Let’s create two custom fields. Adding a custom field to a custom metadata type is just like adding a custom field to a standard or custom object.
- In the Custom Fields section of the Support Tier page, click New.
- Select Percent, then click Next.
- For Field Label, type
Default Discount.
- For length, type
2.
- Click Next and then click Save.
- Create another custom field, this time using Number as the field type.
- For the Field Label, type
Minimum Spending.
- For Length, type
6.
- For Field Manageability, select Any user with the Customize Application permission (package upgrades won't overwrite the value).
- Click Next and Save.

By itself, a custom metadata type isn’t useful. Let’s keep up the pace and create some custom metadata records.
Create Records
You can create custom metadata type records from the current custom metadata type page.
- On the Support Tier page, click Manage Support Tiers.

- Click New.
- For the record label, type
Bronze.
- For the Support Tier Name, type
Bronze.
- For Default Discount, enter
0.
- For Minimum Spending, enter
0.
- Click Save & New.
- Repeat this process until you have all of these values:
Label
Default Discount (Custom Field)
Minimum Spending (Custom Field)
Bronze
0%
0
Silver
10%
1,000
Gold
15%
5,000
- After you save the Gold record, you can return to the list page by clicking Custom Metadata Types in the Setup window.
You see a list of all your custom metadata types.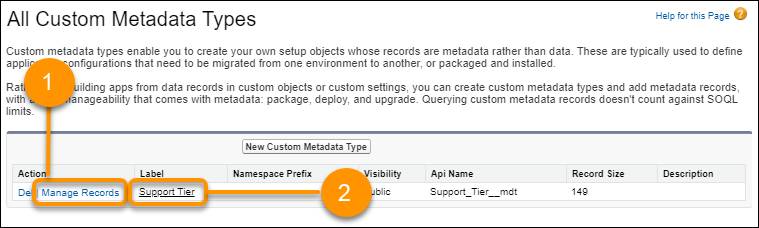
- To view or add records to the Support Tier custom metadata type, click Manage Records.
- To view the details of the Support Tier custom metadata type, click Support Tier.
If you’re a developer, after you create these individual records you can build custom functionality using SOQL and Apex to get your app working the way you need it to. We cover some more technical aspects of using custom metadata types in the next unit, so stay with us!
Later, you can package and install all of these components, including your records, in other orgs. To include more support tiers, add new records to your package.
Let’s see how to reference custom metadata type records in formulas, default values, and validation rules.