Create a Flow
The last business rule functionality to implement before testing your application is a rule to set the Out-of-State checkbox field on the Travel Approval object if out-of-state travel has been chosen. Salesforce offers workflow capabilities that provide a declarative, drag-and-drop design environment to build our business process logic.
Get Started with Flow Builder
You may have heard several terms used interchangeably when referring to flows. As a reminder, the official terms are:
-
Salesforce Flow: The product that encompasses building, managing, and running flows and processes.
-
Flow Builder: A point-and-click tool for building flows.
-
Flow: An application that automates a business process by collecting data and doing something in your Salesforce org or an external system.
In short, the Salesforce Flow product includes a couple of tools. One of them, Flow Builder, lets you create flows.
Flow Building Blocks
Every flow is made up of three building blocks.
-
Elements appear on the canvas. To add an element to the canvas, drag it there from the toolbox.
-
Connectors define the path that the flow takes at run time. They tell the flow which element to execute next.
-
Resources are containers that represent a given value, such as field values or formulas. You can reference resources throughout your flow. For example, look up an account’s ID, store that ID in a variable, and later reference that ID to update the account.
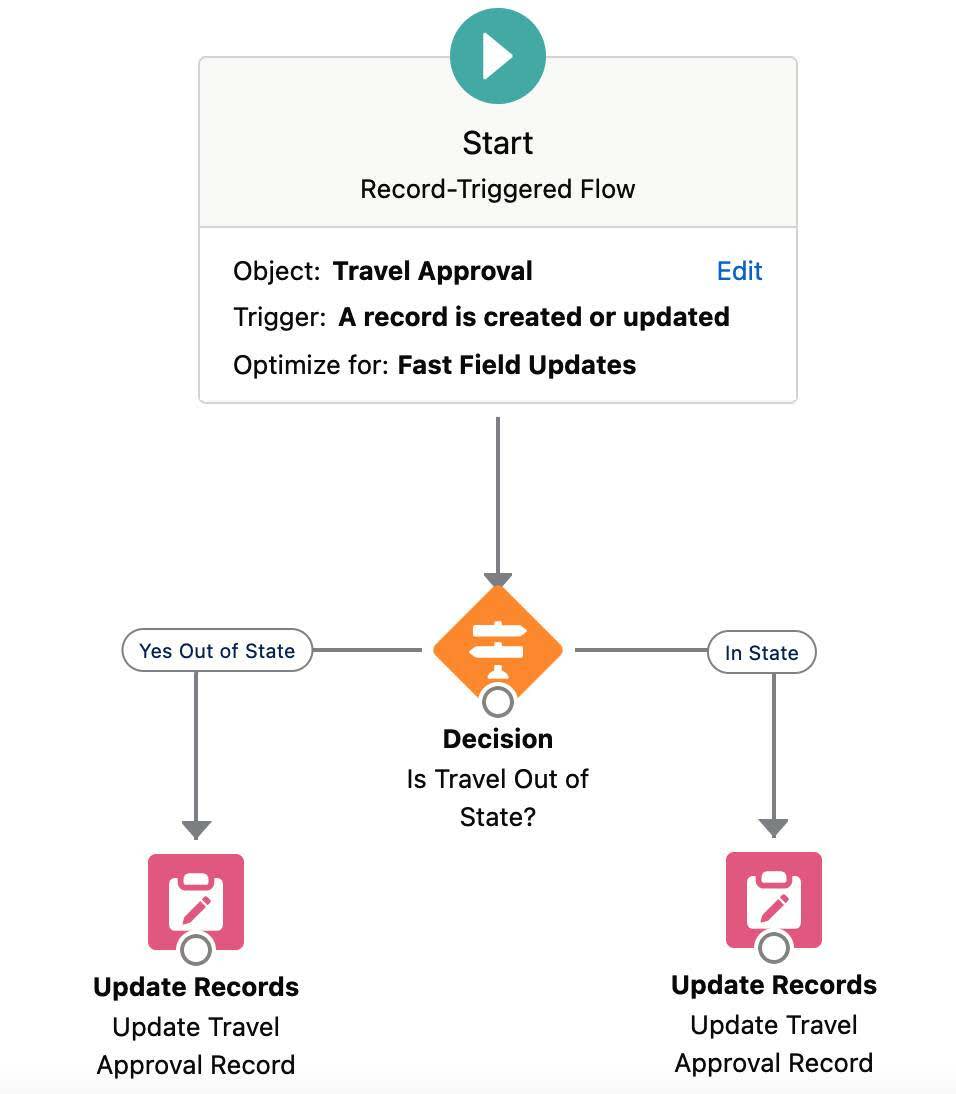
Now, create a flow that uses the Update Records element to set the out-of-state flag.
- Click the App Launcher (
 ).
).
- In the Search apps and items box, enter
autoand then select Automation.
- In the Flows panel, click New.
- Under Frequently Used, select Record-Triggered Flow.
- Enter these values.
- Object: Travel Approval
- Trigger the flow when: A record is created or updated
- Condition Requirements: None
- Optimize the Flow For: Fast Field Updates

- Object: Travel Approval
- In the button bar, change the Auto-Layout setting to Free-Form.

Add a Decision Element
- From the left-hand toolbox column, drag a Decision element onto the flow builder screen.
- Set the following parameters.
- Label:
Is Travel Out of State? - API Name:
Is_Travel_Out_of_State
- Description: leave blank
- Label:
- For the first outcome, set these parameters.
- Label:
Yes Out of State
- Outcome API Name:
Yes_Out_of_State(This automatically gets set when you tab out of the Label field)
- Condition Requirements to Execute Outcome: All Conditions Are Met (AND)
- Resource: Triggering Travel_Approval__c > Destination State
- Operator: Does Not Equal
- Value:
TX - When to Execute the Outcome: Only if the record that triggered the flow to run is updated to meet the condition requirements

- Label:
- Next to OUTCOME ORDER, click the
 button to add another outcome.
- Set these parameters:
- Label:
In State
- Outcome API Name:
In_State(This automatically gets set when you tab out of the Label field)
- Condition Requirements to Execute Outcome: All Conditions Are Met (AND)
- Resource: Triggering Travel_Approval__c > Destination State
- Operator: Equals
- Value:
TX - When to Execute the Outcome: Only if the record that triggered the flow to run is updated to meet the condition requirements
- Label:
- Click Done.

- Drag the white circle from the Start Flow element to the Decision element you just created to link the direction of the arrow.

Add Update Records Elements
- From the left-hand column, the flow toolbox, drag an Update Records element onto the flow screen.
- Set the parameters for the element:
- Label:
Update Travel Approval Record
- API Name:
Update_Travel_Approval_Record(This automatically gets set when you tab out of the Label field)
- How to Find Records to Update and Set Their Values: Use the record that triggered the flow
- Condition Requirements to Update Record: None—Always Update the Record
- Field: Out-of-State
- Value: True (start typing True and this value will come up)

- Label:
- Click Done.
- Drag the white circle from the Decision element to the Update Records you just created, and select the outcome Yes Out of State. Click Done.

To save time, you can simply duplicate the Update Records element you just created and update the criteria.
- Click the Update Records element and make sure it is highlighted in blue. In the top-left corner of the Flow Builder screen, find the and click the Duplicate button
 . Double-click on the new Update Records element just created. Note the API name has been automatically updated to Update_Travel_Approval_Record_0.
- For the Out-of-State field, change the Value to False.

- Click Done.
- Drag the white circle from the Decision element to the second Update Records you just created and select the outcome In State. Click Done.

Congratulations!! You’ve completed your first Record Triggered Automation Flow! Last but not least, make sure to save and activate the flow.
- Click Save.
- Flow Label:
Out of State Travel Flag. Flow API Name will auto populate to Out_of_State_Travel_Flag. Leave Description blank and advanced settings as is.
- Click Save.
- Click Activate.
Your flow is now active and you are officially an automation expert!
Flow is a powerful tool that you use to automate many actions within your Salesforce Applications. Next, learn how to build an approval process for any Salesforce record.