Modify Flows to Use Virtual Territories
Learning Objectives
After completing this unit, you’ll be able to:
- Modify flows to use virtual territories.
- Create actions to enable users to run flows.
- Test the modified flows.
Show Resources from a Virtual Territory
Matt must customize the flows used to book financial planning appointments such that the flows use the virtual territory. When users or customers select a virtual channel when booking appointments, the flow must skip the Select service territory screen and show service resources from the virtual territory.
Get Salesforce IDs
To customize flows, Matt gets the Salesforce IDs of certain records.
Matt is hardcoding Salesforce IDs to quickly demonstrate the functionality. It’s recommended that you avoid hardcoding Salesforce IDs. See Why You Should Avoid Hard Coding and Three Alternative Solutions.
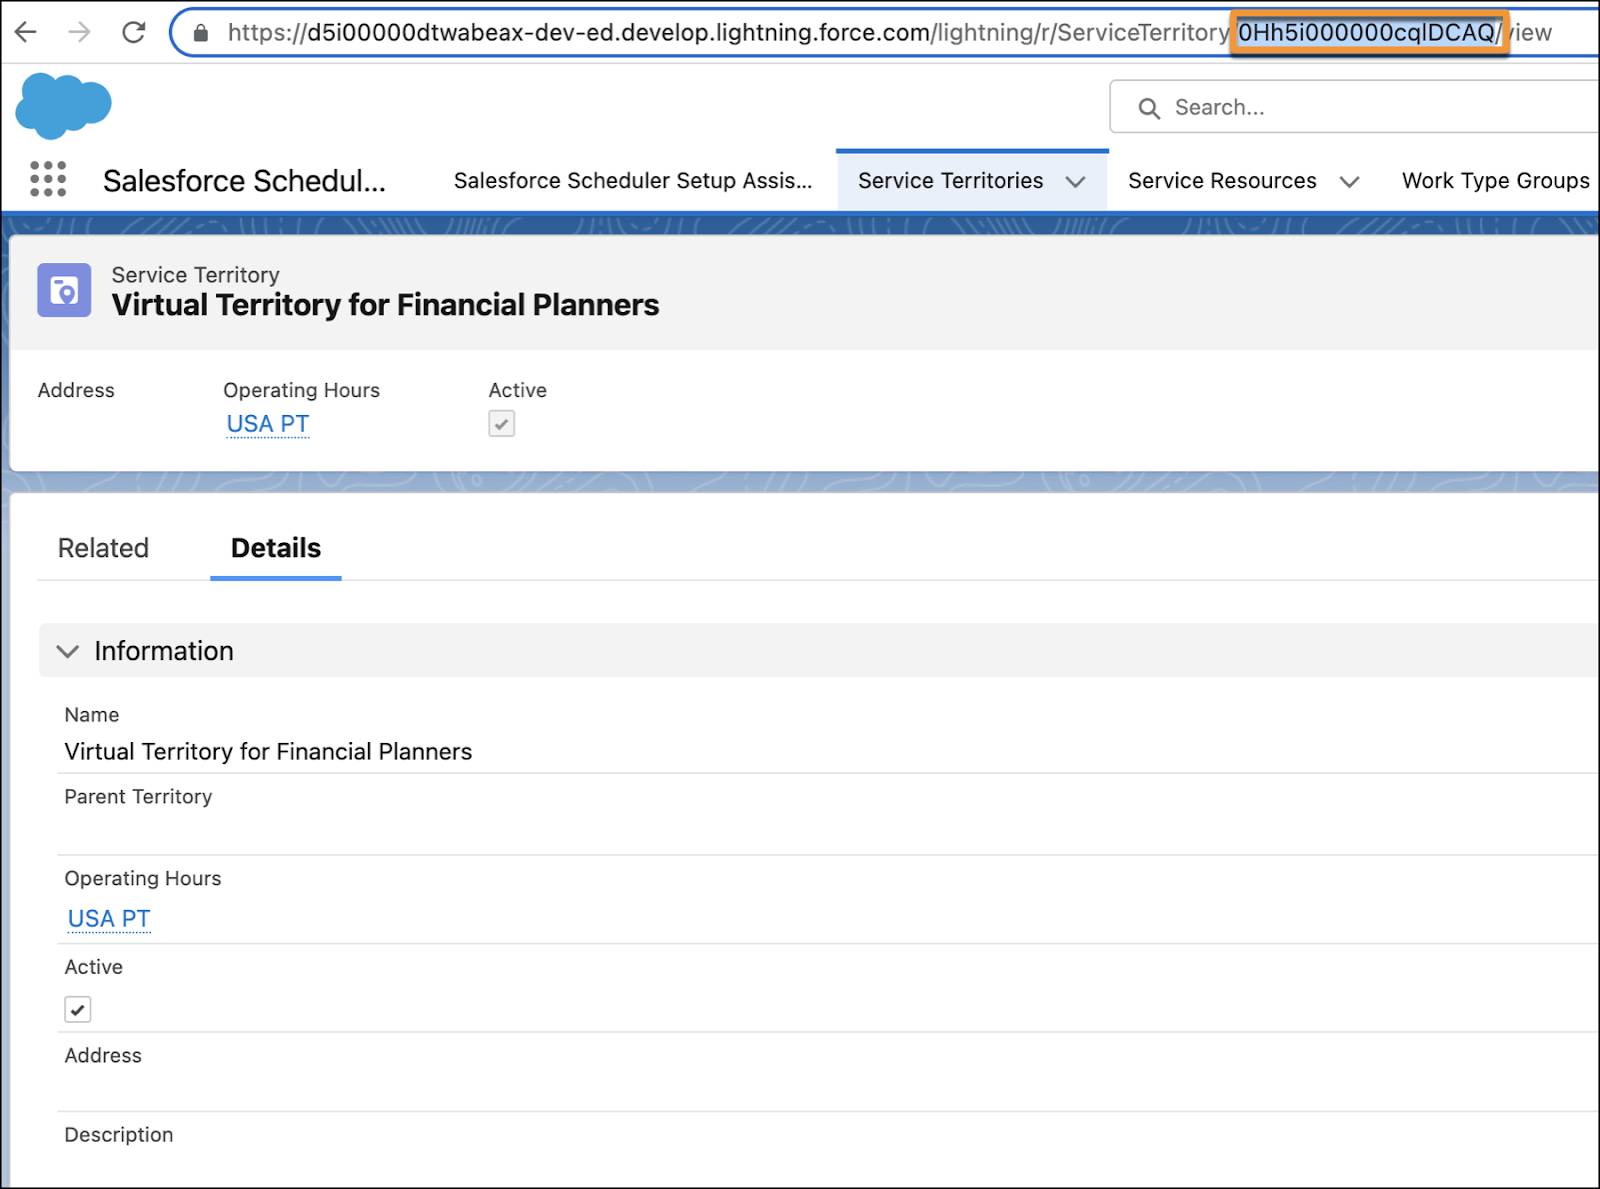
Here’s how Matt gets the Salesforce ID of the Virtual Territory for Financial Planners service territory.
- Click
 to open the App Launcher, find and select Service Territories.
- Click Virtual Territory for Financial Planners.
- From the URL, copy the Salesforce ID.

Similarly, Matt gets the Salesforce IDs of these records.
- The Financial Planning work type group
- The Phone Call engagement channel type
- The Video Call engagement channel type
After capturing the Salesforce IDs of the four records, he’s ready to customize the flow.
Customize Flows
Here’s how Matt customizes and clones the Outbound New Appointment flow template to use the virtual territory.
- Click the App Launcher (
 ).
).
- In the Search apps and items box, enter
autoand then select Automation.
- In the Flows panel, click New.
- In the Search automations bar, search for and select Outbound New Appointment.
- In the button bar, make sure the Auto-Layout setting is selected.
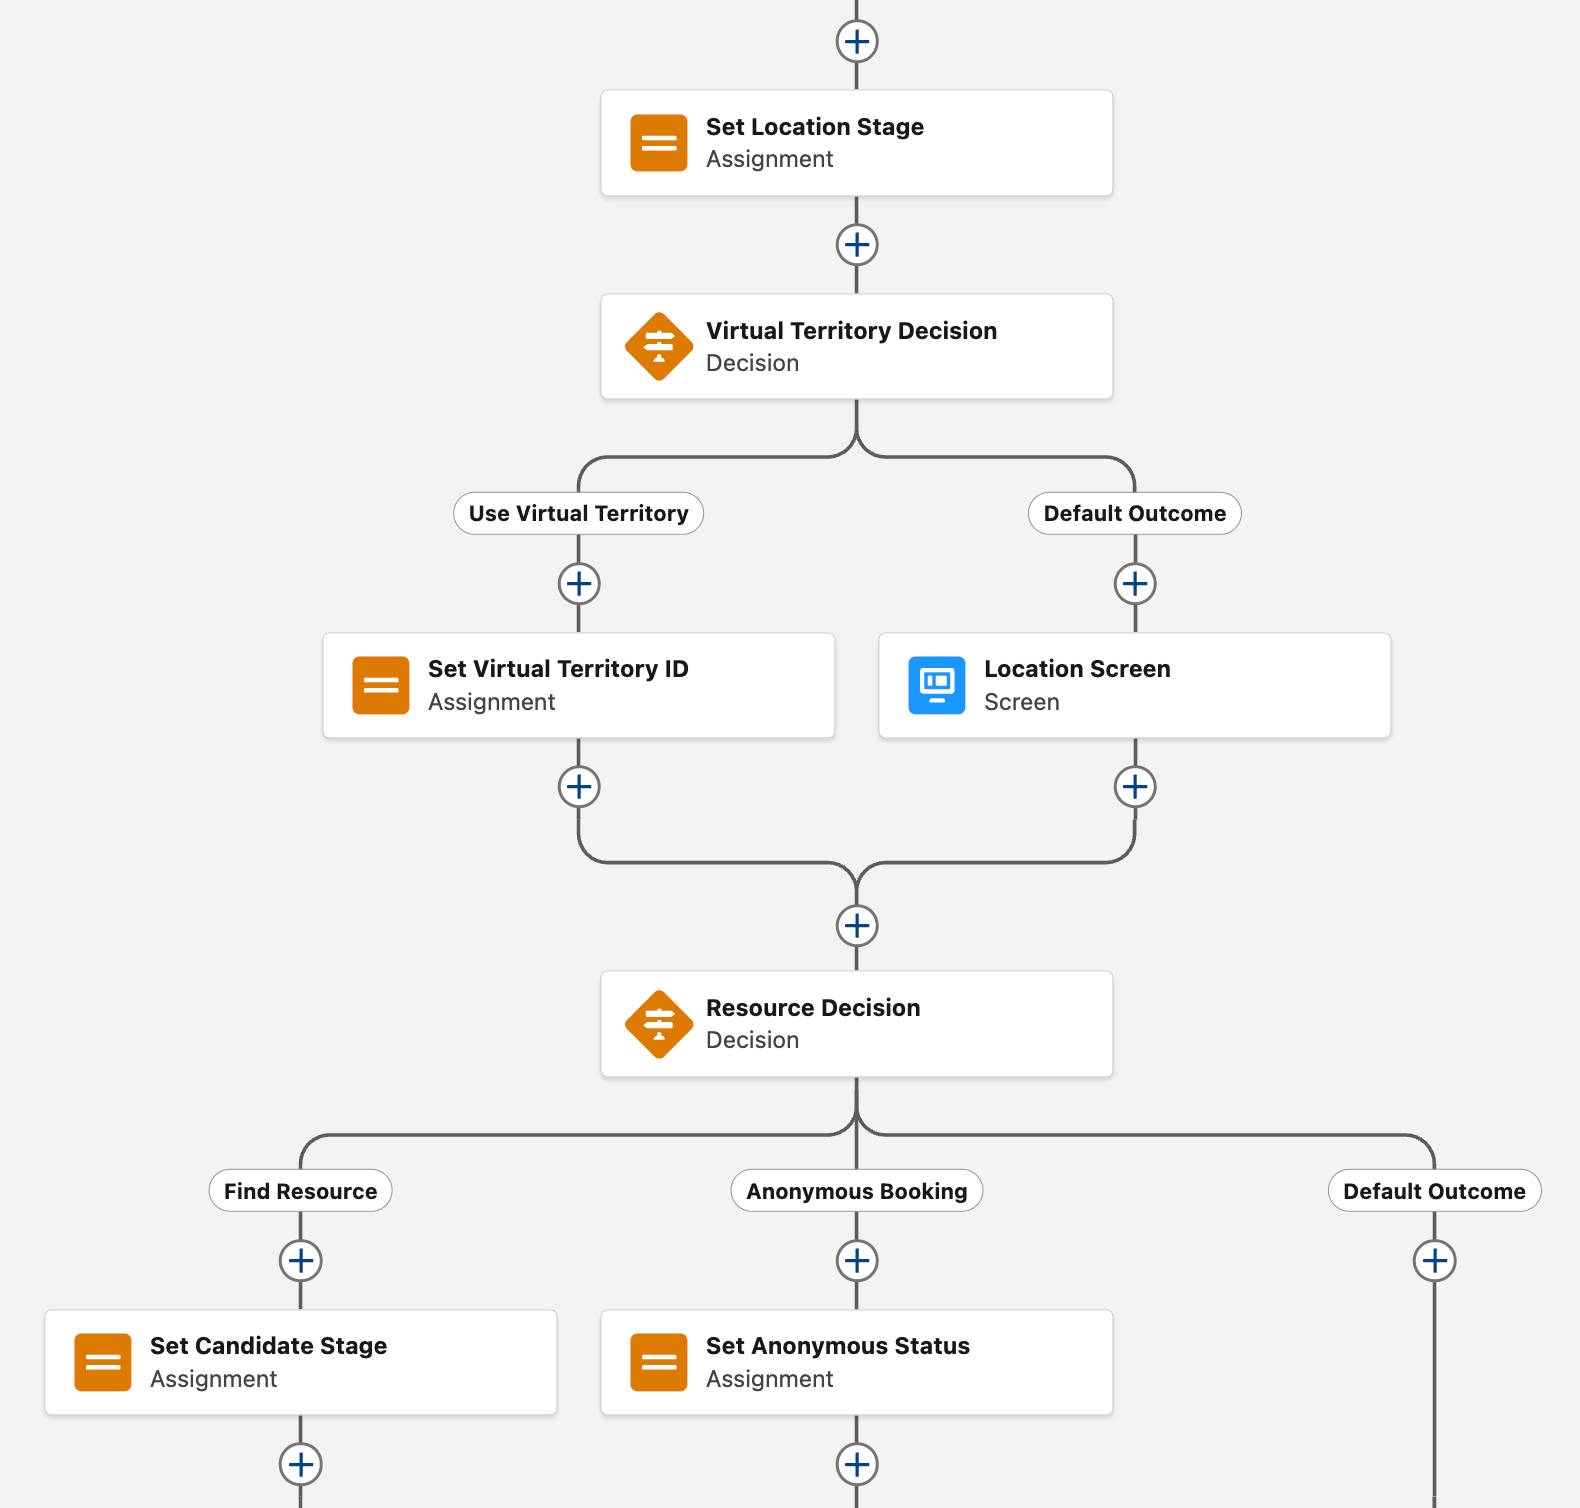
- On the path after the Set Location Stage element, click
 . Select the Decision element.
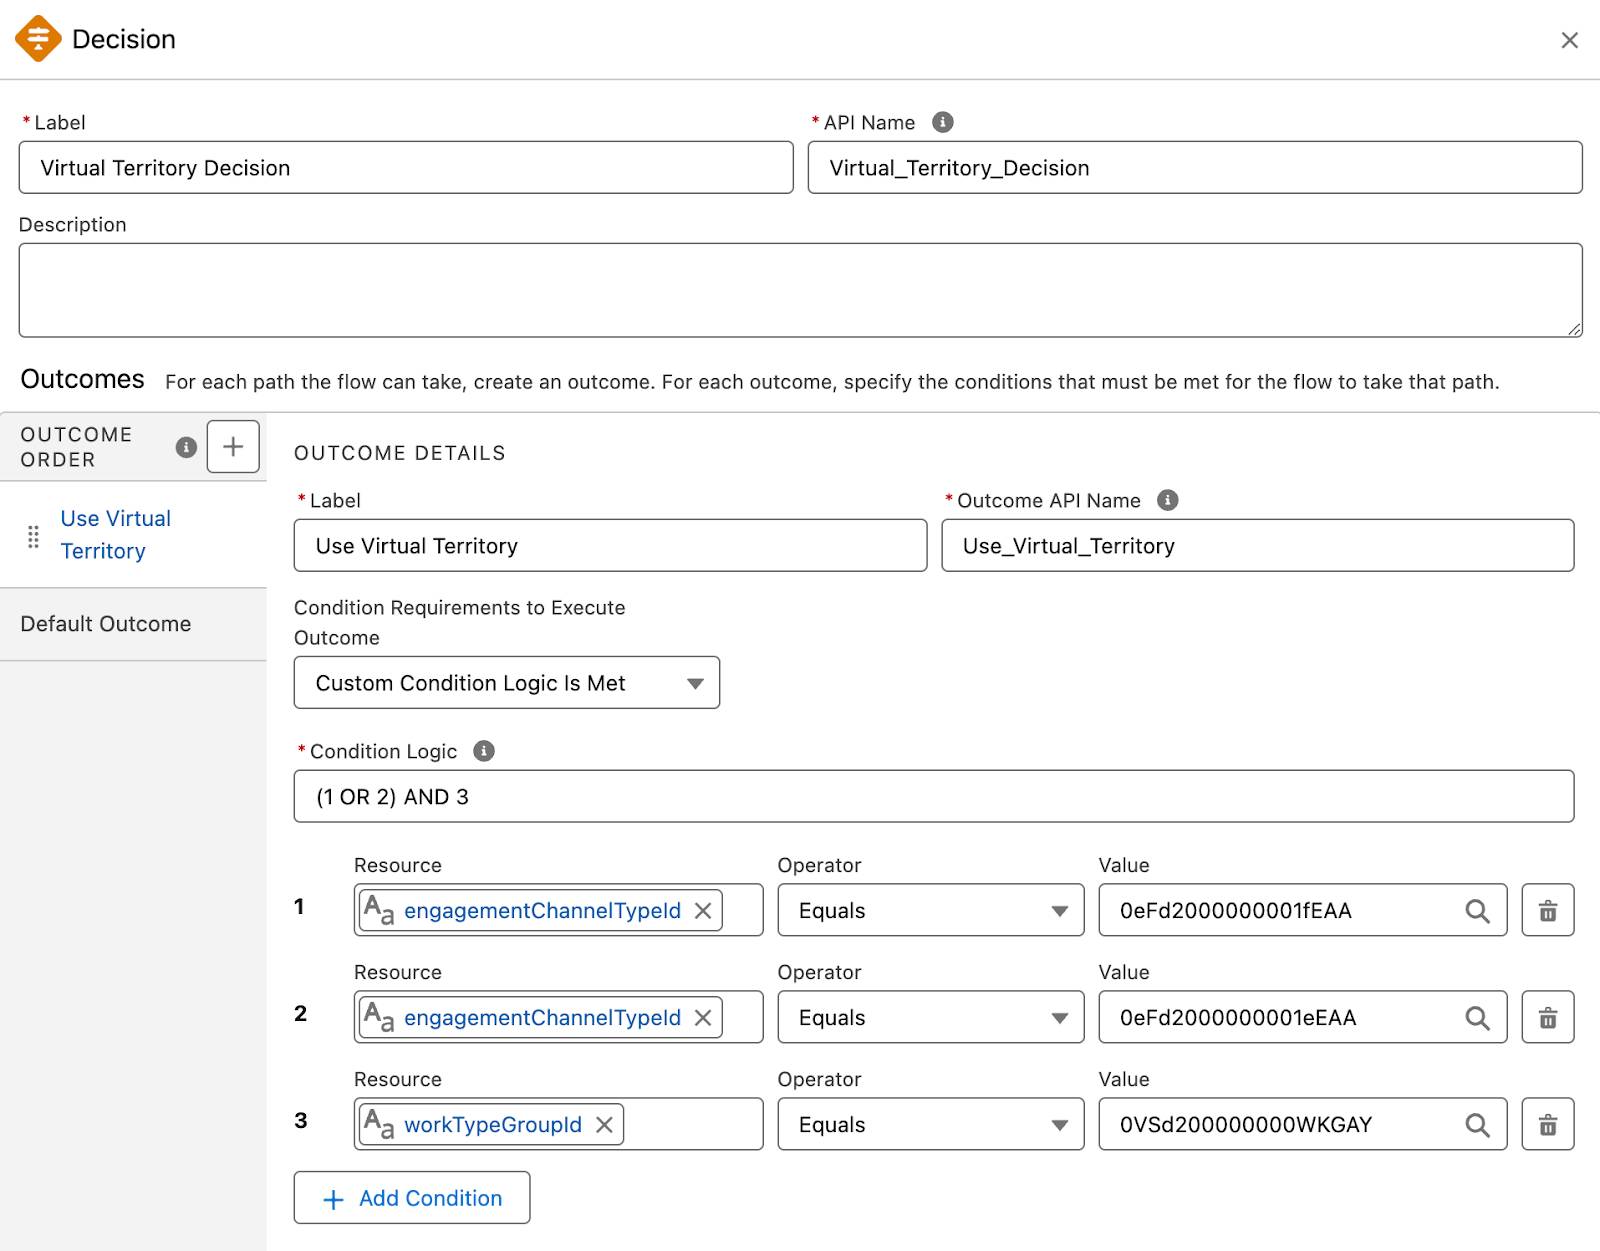
- In the Decision panel, enter these details.
- Label:
Virtual Territory Decision - API Name:
Virtual_Territory_Decision
- Label:
- In the OUTCOME DETAILS section, enter these details.
- Label:
Use Virtual Territory
- Outcome API Name:
Use_Virtual_Territory
- Condition Requirements to Execute Outcome: Custom Condition Logic is Met
- Add these conditions.
- Label:
- Condition 1
- Resource: engagementChannelTypeId
- Operator: Equals
- Value: enter the Salesforce ID of the Phone Call engagement channel type
- Resource: engagementChannelTypeId
- Condition 2
- Resource: engagementChannelTypeId
- Operator: Equals
- Value: enter the Salesforce ID of the Video Call engagement channel type
- Resource: engagementChannelTypeId
- Condition 3
- Resource: workTypeGroupId
- Operator: Equals
- Value: enter the Salesforce ID of the Financial Planning work type group
- Resource: workTypeGroupId
- Condition Logic:
(1 OR 2) AND 3

- On the Use Virtual Territory path, click
 . Select the Assignment element.
- In the Assignment panel, enter these details.
- Label:
Set Virtual Territory ID - API Name:
Set_Virtual_Territory_ID - In the Set Variable Values section, add these details.
- Variable: select ServiceAppointment then select Service Appointment ID
- Operator: Equals
- Value: enter the Salesforce ID of the virtual territory

- Hover over the Location Screen element and click
 .
.
- Select Cut Element.
- On the Default Outcome path, hover over
 and click
  . The Location Screen element should move to the Default Outcome path.
- Click Save As New Flow.
- In the Save as, enter these details:
- Flow Label:
Outbound New Appointment_With Virtual Territories - Flow API Name:
Outbound_New_Appointment_With_Virtual_Territories
- Flow Label:
- Click Save.
- Click Activate.
Add the Flow to the Person Account Page
To enable users to run the flow, Matt creates an action and then adds it to the person account page layout.
Here’s how Matt creates the action.
- Click
 , then select Setup.
- Click Object Manager.
- Click Account.
- Click Buttons, Links, and Actions.
- Click New Action.
- On the New Action page, provide the following details:
- Action Type: Flow
- Flow: Outbound New Appointment_With Virtual Territories
- Standard Label Type: None
- Label:
Schedule Appointment_IncludingVT - Name:
Schedule_Appointment_IncludingVT
- Click Save.
Here’s how he adds the action to the person account page.
- Click
 , then select Setup.
- Click Object Manager.
- Click Person Account.
- Click Page Layouts.
- Click Person Account Layout.
- In the palette, select Mobile & Lightning Actions. If you see a link to override the predefined actions in the Salesforce Mobile and Lightning Experience Actions section of the layout editor, click the link.
- Drag Schedule Appointment_IncludingVT to Salesforce Mobile and Lightning Experience Actions.
- Click Save.
Test the Flow
Matt created a flow that uses virtual territories and added an action that enables users to launch the flow. He demonstrates the functionality to Marianna.
- Click
 to open the App Launcher, find and select Accounts.
- Open the All Person Accounts list view.
- Click an account.
- Click Schedule Appointment_IncludingVT.
- Select By work type group, appointment type, or service territory.
- Select Financial Planning.
- Select In Person and click Next.
Observe that Salesforce Scheduler shows the Select service territory screen.
- Click Previous.
- Select Video Call or Phone Call, then click Next.
Observe that Salesforce Scheduler skips the Select Service Territory screen and directly shows the Select Service Resource screen.
Matt has successfully tested the flow that’s used for outbound appointments.
You must customize each flow that you want to use for virtual territories. Matt customizes the remaining flows, replaces existing flows with customized flows, and then meets Marianna to inform her about the changes. She’s amazed by his speed! She thanks him and asks if he needs anything or has any suggestions.
Improve Efficiency Using Appointment Distribution
Matt informs Marianna that the number of financial planners assigned to the virtual territory is 16. And that number is growing fast. He adds that checking calendars of more than 20 qualified service resources can slow down Salesforce Scheduler. Especially when it’s also checking external calendars.
So he proposes implementing appointment distribution. It allocates appointments quickly and evenly among service resources. It also improves speed by considering only the 20 least utilized resources at any given time. For more information, see Salesforce Scheduler Implementation Guidelines and Appointment Distribution with Salesforce Scheduler.
After discussing the nuances of how it works, Marianna agrees that it can add immense value due to how fast their teams are growing. She thanks Matt for being proactive and asks him to implement appointment distribution.
Virtual Territories Are Live
In this unit, Matt customized flows such that virtual appointments are assigned to bankers in virtual territories and in-person appointments are assigned to bankers working from branches.
Stay tuned! In the next unit, follow along as Matt configures a video conferencing software to make handling video appointments easier.
Resources
- Salesforce Help: Flow Builder
- Salesforce Help: Create and Manage Outbound Appointments in Salesforce Scheduler
- Salesforce Help: Appointment Distribution
