Manage Individual Stakeholders
Learning Objectives
After completing this unit, you’ll be able to:
- Explain how person accounts store information about individual stakeholders.
- Create a person account.
Understand How Person Accounts Work
Person accounts take fields from two Salesforce objects—Account and Contact—and combine them into one super-duper object that represents a person. Person accounts use fields from the Contact object to track details about an individual, such as their first name, last name, and gender identity. Your Salesforce admin enables person accounts for your Salesforce org. And, after you enable person accounts, they can’t be turned off.
When you create a person account, you create two new records at the same time: a person account and a contact. Both exist in Salesforce and, depending on your configuration, an individual can appear in Account and Contact list views. When you edit a person account, both the person account and contact are updated as needed. A person account record, though, is your single—and only—destination in Salesforce for all of the information about each individual’s program enrollments, donations, and more.
You can set up different record types for person accounts. Record types enable you to use different fields and page layouts for program participants, donors, volunteers, and others. For a full list of a person account’s capabilities, read Considerations for Using Person Accounts in Salesforce Help.
Person accounts can connect to the organization the person works for, their household, and other person accounts—like spouses, friends, and other connections using the records you learned about in the last unit.
Want to Get Hands-on with Nonprofit Cloud?
In this module, we show you the steps to manage stakeholders, households, accounts, and relationships in Nonprofit Cloud. We don’t have any hands-on challenges in this module, but if you want to practice and try out the steps, register for a free Nonprofit Cloud trial with sample data. A Trailhead Playground doesn’t have Nonprofit Cloud. Here’s how to get the free trial edition now.
-
Sign up for a free 30-day Nonprofit Cloud trial.
- Fill out the form completely.
- After you fill out the form, click Submit. A confirmation message appears.
- When you receive the activation email, open it and click Verify Account. (The email can take a few minutes to arrive.)
- Complete your registration by setting your password and challenge question. Tip: Save your username, password, and login URL in a secure place—such as a password manager—for easy access later.
You’re logged in to your trial org. Now add a related list to an account page layout for use in later steps.
- Click
 and select Setup.
- Click Object Manager.
- Find and select Account.
- Select Lightning Record Pages.
- Select OrgBusiness Fundraising Operations.
- Click Edit.
- Drag Related List - Single from the Components list to the page and place it below the Gifts related lists.
- In the Related List - Single settings, find and select Related Contacts in the Related List.
- Save your work.
- Click
 .
.
- From the App Launcher (
 ), find and select Fundraising Operations.
You’re ready to follow along with the steps in the module. Use the Fundraising Operations app for the rest of the module.
Create a Person Account
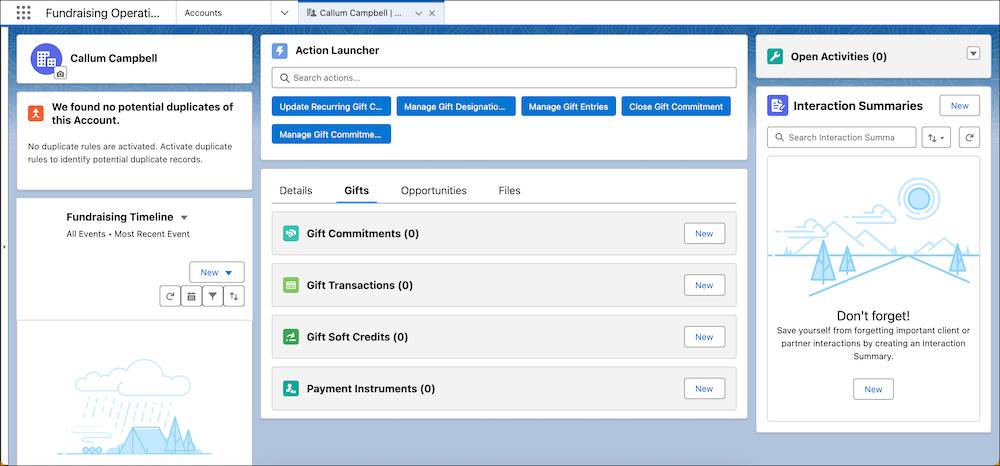
Imagine you have a promising new prospective donor named Callum Campbell. Start by creating a person account for Callum to track your relationship.
- From the App Launcher (
 ), find and select Accounts.
- Click New.
- Select Person Account.
- Click Next.
- Specify these details.
- First Name:
Callum
- Last Name:
Campbell
- Save your work.
You can add other details to a person account, such as the individual’s phone number, email address, physical address, salutation, and gender identity. By default, you must enter at least a last name for a person account, as you did a moment ago. The person’s name becomes the name of the account.

On the record, there are details about the person and related records. You can find many of the elements and related lists you need for fundraising operations and tracking gifts. Your Salesforce admin can customize this page and specify different page layouts for different apps.
For example, your fundraisers can use the Contact Point Address object and related list to track historical, seasonal, and other addresses for donors and prospects. Nonprofit Cloud can automatically sync a primary contact point address to the mailing address on a person account to ensure mailings always go to the correct address. See Manage Constituent Addresses in Salesforce Help for details.
You now have a person account for Callum, but what about the people that are important to him? For major donors, program participants, and other stakeholders it’s important to track their support network, families, or other connections. In those cases, grouping individuals into households is helpful.
In the next unit, you learn about households in Nonprofit Cloud.
