Build and Manage Service Catalog
Learning Objectives
After completing this unit, you’ll be able to:
- List the Service Catalog setup phases and point-and-click tools.
- Build catalog items, fulfillments, and categories.
- Explain how to manage your Service Catalog.
Nice work! You’ve just explored the basics of Service Catalog. In this unit, you learn the first steps to building your catalog. This unit assumes you know how to create a flow with variables, inputs, and data elements for autolaunched, orchestration, and screen flows. If you aren’t familiar with these concepts or need a refresher, make sure you complete these modules.
-
Autolaunched and Scheduled Flows
-
Flow Orchestration Basics
-
Screen Flows
-
Screen Flow Distribution
-
Workflow Automation for Service: Quick Look
Get Started with Service Catalog
Maria’s excited to set up an Ursa Major Service Catalog. Setup consists of three phases: Build, Manage, and Launch.
-
Build: Select your categorization method in Setup and create catalog fulfillments and items with point-and-click tools.
-
Manage: Use the Catalog Management page to organize, edit, and view items and categories. You can even monitor alerts for items, like when an item doesn't have an associated flow.
-
Launch: Use Experience Cloud to build a self-service site for customers to access and request catalog items.

Before Maria can build an Ursa Major Service Catalog, prerequisites are required. Let's follow along.
Unlock Access to Service Catalog
Service Catalog requires specific licensing for feature access. As the Service Catalog admin, Maria needs the Service Catalog Builder permission set. This permission set gives her access to all Service Catalog Setup pages, objects, and the ability to create and configure catalog categories, items, and fulfillments.
Because Maria wants to use Data Categories as the catalog categorization method, she needs to create and assign the Data Categories Builder custom permission set. This permission set has Customize Applications and Manage Data Categories system permissions enabled that grant her access to choose data categories as the categorization method and then create and manage data categories.
She can assign both permission sets to herself or split them up and assign one to a user who builds the catalog and another to a user who manages data categories. There’s flexibility in arranging permissions based on your organizational structure.
Knowledge Check
Let’s recap the permissions Maria assigned. This knowledge check isn’t scored—it’s just an easy way to quiz yourself. To get started, drag the Service Catalog Persona in the left column next to the matching Persona Role and Permissions on the right. When you finish matching all the items, click Submit to check your work. To start over, click Reset.
With permissions assigned, the initial prep work is complete. Next, Maria prepares for Service Catalog automation.
Get Flowin’ with Service Catalog Automation
Before Maria can benefit from the power of Service Catalog automation, she needs to build a flow for catalog item processing. Then, she uses a fulfillment to provide enhanced catalog item automation that maps additional inputs and fields to the flow. Fulfillments are the key to Service Catalog automation.
Maria is a flow expert, and she quickly spins up a simple screenflow for a Technician Appointment catalog item she’ll create.

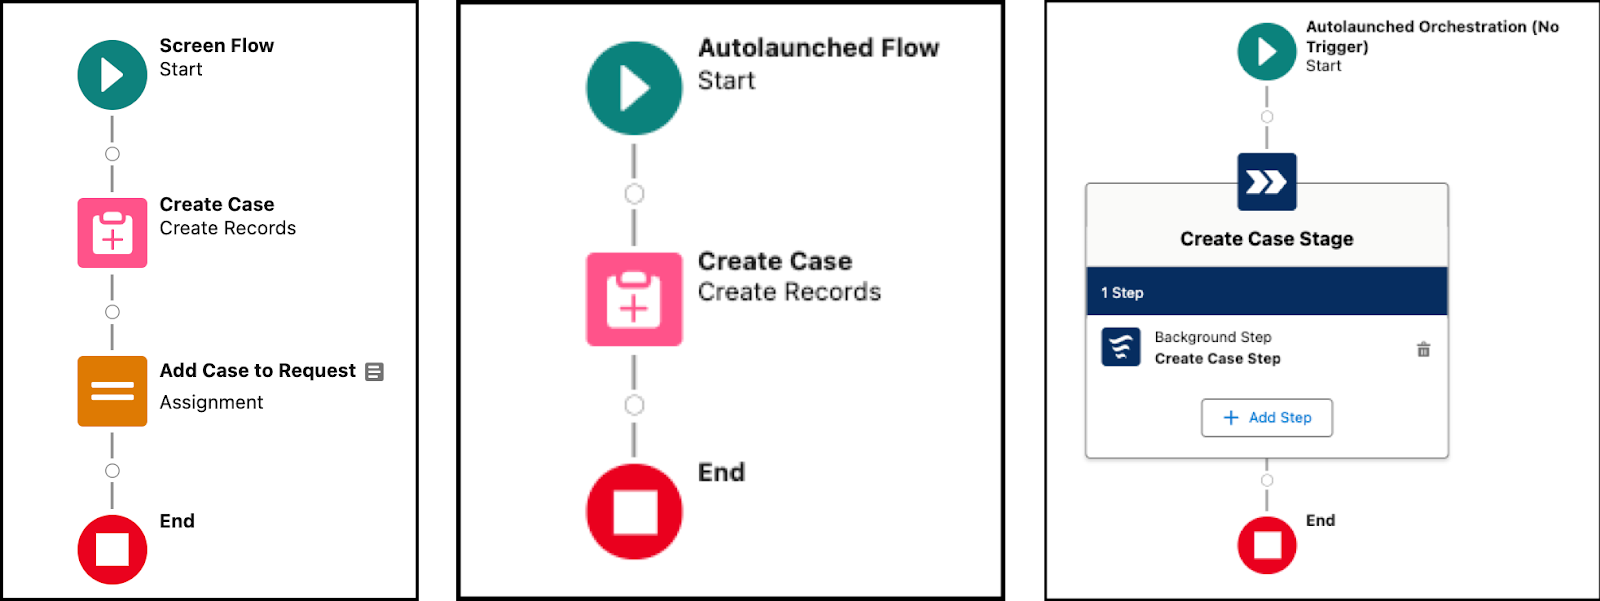
However, Maria can use two other flow types based on what works best for Ursa Major: Autolaunched and Orchestration. Compare all three.
|
Flow Type
|
What It Is and Example
|
|---|---|
|
Screen
|
An interaction in the Experience Site that presents information and asks your customers questions. When customers need maintenance or repairs, service requests initiate with a screen flow. The flow captures information such as the issue, location, and preferred appointment times, ensuring that requests are properly documented. The screen flow can have multiple steps and uses CRM data to adjust according to the customer answers. |
|
Autolaunched
|
An automation that runs when a button is clicked. For Ursa Major, an Autolaunched flow enables customers to enroll in the company's newsletter by prompting them to select a Confirm Subscription button, which initiates and processes the request. |
|
Orchestration
|
An automation with stages, steps, and decisions to execute business processes. Orchestrations offer Ursa Major a customer-facing solution that allows customers to efficiently schedule appointments for services, receive automated reminders and notifications, and provide service feedback. This streamlines the entire process and enhances customer experience. |
Here are examples for each flow type used in Service Catalog.

The prerequisites are complete. Maria’s ready to build a Service Catalog.
Build Service Catalog
Maria leaves the world of flows and heads to Service Catalog in Setup. Here’s a rundown of the Service Catalog Setup pages. Maria uses these setup pages to build a Service Catalog.
|
Setup Page
|
Purpose
|
|---|---|
|
Catalog Settings
|
A landing page for Service Catalog where you choose the categorization method: Catalog Categories or Data Categories. |
|
Catalog Fulfillment
|
An automation hub where you create and manage fulfillment automations that wrap your flows. |
|
Catalog Eligibility
|
Create visibility rules for catalog items to control who sees them. |
|
Service Catalog Builder
|
A point-and-click tool that makes it easy to create catalog items and catalog categories, set your fulfillments configuration, and configure access to catalog items. |
Setup requires four ordered steps that Maria executes in no time using point-and-click tools.
- Choose a categorization method.
- Create a category.
- Create a catalog fulfillment.
- Create a catalog item and configure its fulfillment.
Here’s how she completes the setup for a Technician Appointment catalog item.
Step 1: Choose a Categorization Method
Maria heads to the Catalog Settings page to select the categorization method.
- Click Setup
 , and go to the Catalog Settings page.
- From the Catalog Categorization dropdown, select Data Categories.
- Confirm the selection.
Next, Maria needs to build categories for her catalog item.
Step 2: Create a Category
Maria clicks Categories Builder to get to the Data Categories Setup page.
From here, she can create a parent category for the Technician Appointment catalog item. Here’s how she does it.
- From Data Categories Setup, under Category Groups, click New.
- Enter
Maintenance Servicesin the group name field.
- Enter a description for the group name.
For example:Parent grouping for all product maintenance services - To activate the data category group, under Inactive Category Groups, hover over Maintenance Services and click
 .
.
If needed, Maria can later add sibling and child categories to the Service Appointment parent category. She’s now ready to set up the other Service Catalog building blocks.
Step 3: Create a Fulfillment
With a flow ready, Maria can create a fulfillment for the Technician Appointment catalog item that she'll create later.
- From Setup, in the Catalog Fulfillments page, click New Fulfillment.
- Select the Technician Appointment screenflow automation, and click Next.
- Name the Fulfillment:
Technician Appointment - Provide a description. Maria enters:
Fulfillment for creating technician appointment cases for contacts - Click Next
- From the New Fulfillment page, add input fields for the fulfillment, and click Done.
Maria maps two inputs created as part of her flow to her fulfillment.
- From Input Variables, Maria sets a fulfillment input mapping using the flow's original input types (1). To do so, she can use the fulfillment field name and input type fields to modify the flow’s inputs(2).

- Save the fulfillment.
All done! Maria created a fulfillment in a few simple clicks. She can later define these inputs as Included or Customer-defined to collect additional information from customers when they request a catalog item.
Step 4: Create a Catalog Item and Assign a Fulfillment
Maria easily created her fulfillment automation and heads to Service Catalog Builder to create an item for it.
- From Setup, in the Catalog Management page, click New Catalog Item.
- From Item Details, in the Name field, enter
Technician Appointment.
- Add a description and image.
The item is saved in a draft state.
- To activate the item, click Activate.
- From the Categories tab, select the categories to associate with the item.
- From the Eligibility Access tab, set access restrictions to everyone, groups, or specific rules.

That’s it! Maria creates a catalog item in less than a minute with point-and-click ease. Maria heads to the Fulfillment Configuration tab to add a fulfillment for the catalog item. Every catalog item must have a fulfillment.
- From Fulfillment Configuration, click + Select Fulfillment.
- Select Technician Appointment, and then click Select.
- From Included Inputs, set a default status for the Priority input (1).
For example, Case Priority is set to Medium.
- For the Subject (2), select Customers Define Input.
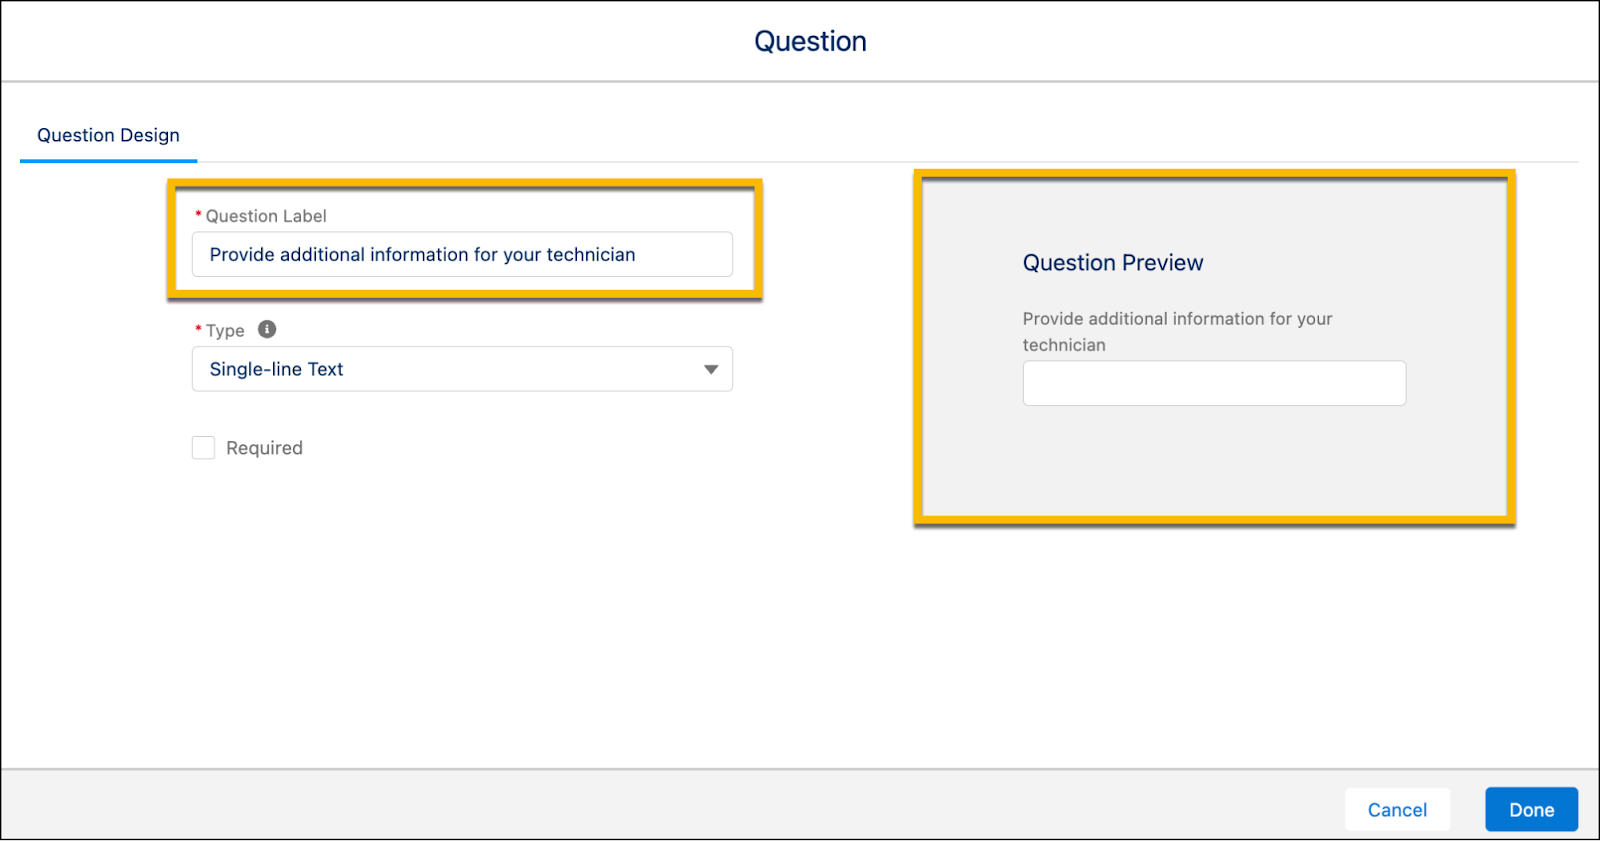
- In the Customer Inputs section, click
 . This takes you to the question editor.
- Provide a Question Label. For example:
Provide additional information for your technician.

- Click Done.
- Save your work.
Maria quickly configured her flow's default input mappings from her flow to get more detailed information from customers. She’s excited that she can re-use this fulfillment across catalog items.
Maria’s setup of Service Catalog is complete. She heads back to Setup to view and manage all that she’s created.
Manage Service Catalog
Maria created her catalog items, fulfillments, and eligibility rules. The process was so simple that she created multiple catalog items using the same fulfillment. For easy and centralized access to these catalog items, Maria heads to the Catalog Management page in Setup.
Here, all catalog items, categories, and eligibility rules are shown in one place. All items are listed on the page, and each item contains a dropdown where Maria can edit, clone, and delete the items. She can also choose to mark an item as Featured (1), which displays it prominently on the self-service site.

To find items quickly, Maria uses the Alerts and Featured filters or the catalog item search (2). Alerts display when the input field mappings for the item’s fulfillment are added, updated, or removed (3). Maria views the left-hand panel to see an index of all catalog items, categories, and their hierarchies (4).
Resources
- Salesforce Help: Create a Data Category Group
- Salesforce Help: Create a Catalog Item
- Salesforce Help: Catalog Fulfillments
- Salesforce Help: Create a Catalog Fulfillment
- Salesforce Help: Catalog Requests
