Create a Formula Field
Learning Objectives
After completing this unit, you’ll be able to:
- Create a custom formula field.
- Use the Advanced formula editor.
- Outline at least one use case for formula fields.
- Create basic formulas.
Get Ready to Get Hands-on with Formulas
Launch your Trailhead Playground now to follow along and try out the steps in this module. To open your Trailhead Playground, scroll down to the hands-on challenge and click Launch. You also use the playground when it’s time to complete the hands-on challenges.
Basic Formula Fields
Let’s jump in and get hands on by building a couple of basic formulas. Your sales team wants to know at a glance what their commissions are for the opportunities they are working on. To calculate commissions, we multiply the Amount on the opportunity record by the current commission rate. Then we round that number to the nearest two decimals.
Let’s start by creating the custom field.
- From Setup, open the Object Manager and select Opportunity.
- Select Fields & Relationships.
- Click New.
- Select Formula and click Next.
- For Field Label, enter
Commission.
- For Formula Return Type select Currency.
When you select Currency a new Option appears for Decimal Places.
- Leave Decimal Places set to 2.
- Click Next.
Now let’s build the formula. You add the Amount field from the opportunity. Then add a multiply operator followed by the amount of the base commission.
- Select Advanced Formula.
- Click Insert Field.
- Select Amount.
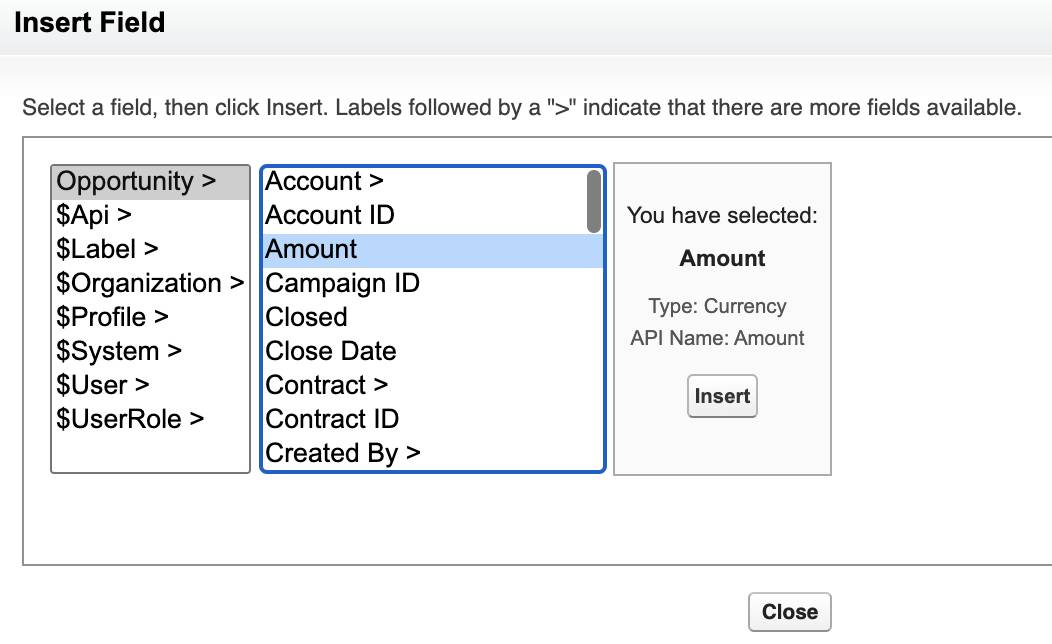
- Click Insert.
Amount appears in the formula editor.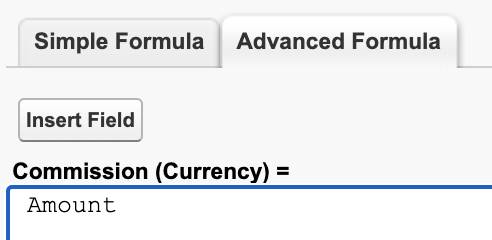
- Click Insert Operator and select * Multiply.
An * (asterisk) appears next to Amount in the formula editor.
- Click into the editor after the * and enter
0.06after the * as the 6 percent commission.
Your formula should be:Amount * 0.06.
- Click Check Syntax.
The message next to the button says “No syntax errors in merge fields or functions. (Compiled size: 31 characters)”
- For Description enter
Base commission for Amount of opportunity.
- Leave Treat blank fields as zeroes selected.
Because the formula is using numbers, we want to be sure that any blank fields that we use are set to zero instead of blank.
- Click Next.
Finally, as you do any time you add a field to an object, establish field-level security and add to page layouts.
- Accept the defaults and click Next.
- Accept the default page layouts and click Save.
Congratulations! Your first formula and formula field is in the books. Let’s go look at the new data insights.
- From App Launcher (
 ), search for Opportunities and select Opportunities.
- Select the All Opportunities list view.
- Click List View Controls (
 ) and select Select Fields to Display.
- Move Commission over to the Visible Fields box.
- Click Save.
Look at all those Commission fields populated with just a simple formula field. Even simple formulas can provide valuable information.
Cross-Object Formulas
Let’s do another. This time you pull information from a parent object. A formula that spans two related objects (through a lookup relationship) and references merge fields on those objects is called a cross-object formula. For more info on how objects relate to each other, check out Salesforce Object Relationships Overview.
The sales team is truly inspired by seeing the commissions on opportunities. Now they want to see the account industry on the contact record, so they don’t have to pull up the account record when they’re talking to a contact. You got this.
- Return to the Object Manager and select Contact.
- Select Fields & Relationships.
- Click New.
- Select Formula and click Next.
- For Field Label, enter
Account Industry.
- For Formula Return Type select Text.
- Click Next.
And the formula is…
- Select Advanced Formula.
- Click Insert Field.
- Select Account.
- Select Industry.
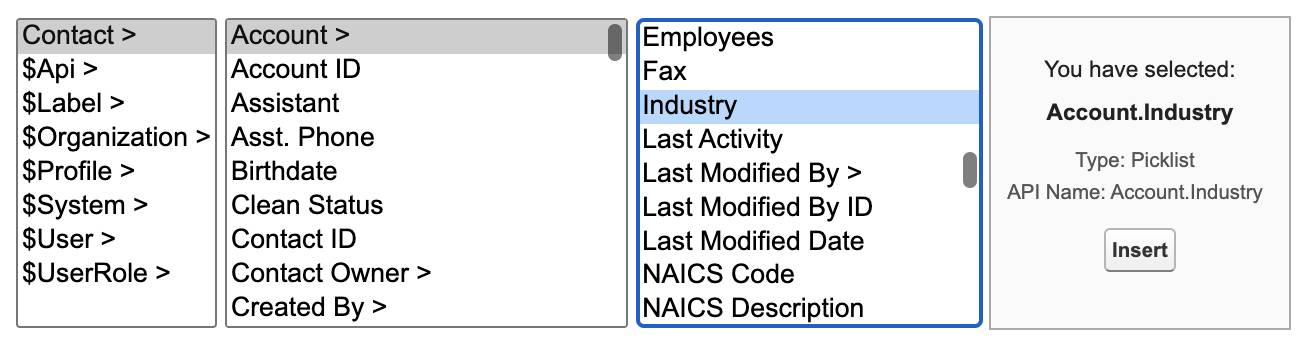
- Click Insert.
Your super simple cross-object formula should now look like this:Account.Industry.
- Click Check Syntax.
Wait, there’s an error! Error: Field Industry is a picklist field. Picklist fields are only supported in certain functions.
Ah yes. Industry is a picklist. In order to use it in the formula we have to convert it to text. Remember those Text Functions? Let’s use one of them.
- Back in the formula editor, place the cursor immediately before
Account.Industry.
- In the Functions list, type
tand then scroll down and select TEXT.
- Click Insert Selected Function.
The formula is nowTEXT(value) Account.Industry. You just need to insert Account.Industry for the value.
- Highlight
value(the TEXT parameter) and delete it.
- Highlight
Account.Industryand move it inside the parentheses, so it reads:TEXT(Account.Industry) - Click Check Syntax. No errors now.
- For Description, enter
Contact’s Account Industry.
- Select Treat blank fields as blanks.
The field we’re using isn’t a number so if it’s blank, that’s okay.
- Click Next, Next, and Save.
Pull up a contact and view the Details. See the Account Industry field displayed for them? The sales team rejoices!

Time for Dates
The service team leadership heard about the great things you’ve done for the sales team. They’re wondering if you could add a field to show how many days a case has been open. Of course you can!
- From Setup, open the Object Manager and select Case.
- Select Fields & Relationships.
- Click New.
- Select Formula and click Next.
- For Field Label, enter
Days Open.
- For Formula Return Type select Number.
- For Decimal Places select 0.
- Click Next.
Let’s build the formula. But first, remember getting an error because your formula expected text from the Industry picklist? In this new formula, you want to return a number of days, but the format of the Date/Time Opened field is date/time. Let’s format that field to a date value.
- Select Advanced Formula.
- From Functions, select TODAY.
This gives you the current day as a date value.
- Click Insert Selected Function.
- From Insert Operator, select - Subtract.
- From Functions select DATEVALUE.
- Click Insert Selected Function.
You now haveTODAY() - DATEVALUE(expression).
- Delete
expression(the DATEVALUE parameter) inside the parentheses.
- Click Insert Field.
- Select Date/Time Opened.
- Click Insert.
TODAY() - DATEVALUE( CreatedDate ) - Click Check Syntax.
- For Description, enter
Number of days the case has been open.
- Keep Treat blank fields as zeroes selected.
- Click Next, Next, and Save.
Now, when you check some cases, you see the Days Open field is populated.
The service team is singing your praises—or are they? After looking at the new field data, you realize there’s an issue. You tackle that in the next unit using some logic functions.