Get to Know the Root Product
Learning Objectives
After completing this unit, you’ll be able to:
- Describe how to add child specs to a root product.
- Summarize how to override child spec attributes.
- Explain how to set up multiple instances of insured parties or items.
- Identify how to specify a rating procedure for a root product.
Add Child Specs
A root product record shares some tabs with child specs, such as the Attributes and Details tabs. However, a root product record also includes the following tabs for adding child specs.
-
Coverage: For adding coverage specs
-
Insured Items: For adding insured item and insured party specs
-
Rating Facts: For adding rating fact specs
To add a child spec, choose the tab for that type of child spec and click Add New. Select the checkbox for one or more child specs, and click Select.

[Alt text: The Add New option to add child specs.]
Here, Justus adds Flexible Spending Account coverage to a healthcare product.
Added child specs appear on the tab along with their attributes. If needed, there’s a Remove choice on each added child spec. Be careful, though. There’s no confirmation when you choose Remove.

Override Attributes on Child Specs
Each added child spec lists its attributes. You can override child spec attribute properties for this root product. The properties available to override depend on the type of child spec.
-
Rating Facts: Select Rating and change the rating mapping.
-
Insured Items or Parties: Select Rating, and change the rating mapping. Also, set attributes rules.
-
Coverages: Select the attribute and see its properties. This is similar to when you assign attributes. Here you can override rating, rating mapping, and attribute rules. Plus, you can update the attribute, and Read Only and Is Hidden checkboxes. Be aware that if Is Configurable is deselected in the child spec, then you can’t select the attribute to make any changes.
At Cumulus, Justus selects a coverage spec with a picklist attribute that contains six values. When adding that coverage spec to a root product, he decides he only wants three of those values available to the end user.
To achieve this, simply select the attribute and deselect Available for the values you don’t want available.

[Alt text: The Available checkbox highlighted on the Select Attribute page.]
An asterisk (*) shows beside each overridden attribute in the list. If you see an asterisk for an attribute and wonder what the overrides are, select the attribute and click View JSON in the properties to see a side-by-side comparison.
View JSON shows the difference between the Original Spec JSON from the child spec and the Product Spec JSON of the root product. Red key-value pairs contain differences between the specs.
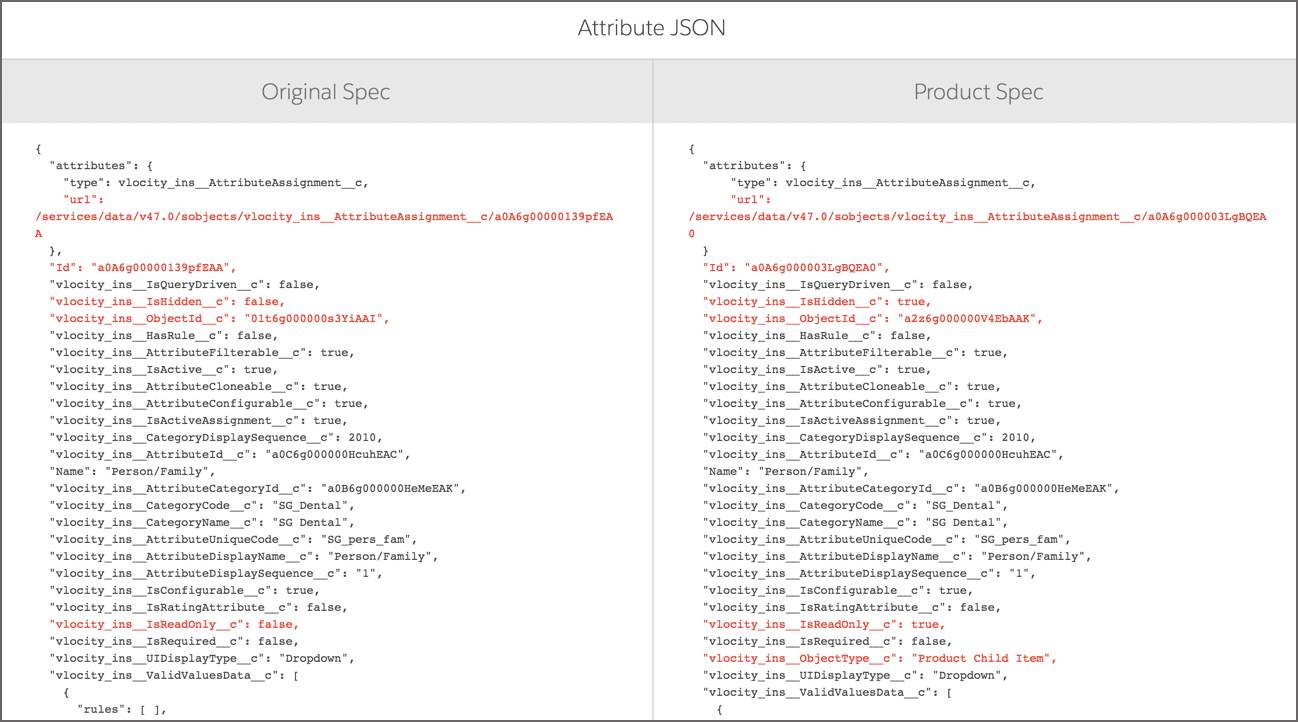
[Alt Text: The Attribute JSON screen showing the JSON for Original Spec and Product Spec.]
Use Revert to remove overrides and return to the original child spec configuration.
Set Up for Multiple Instances of Insureds
You can have one insured spec become multiple runtime instances.
At Cumulus, Justus adds one insured party spec to an individual dental plan. At run time, such as when creating a quote, the spec can instantiate for more than one person, each customized individually with their own coverages and attribute values.
To track multiple instances for rating and labeling, each instance needs a unique instance key.
For this insured party, the instance key is first name plus last name. There are two instances: John Smith and Amy Smith. They each get their own set of plan coverages. Both have a base coverage and a deductible, but John has additional extended coverage. Plus, John has a $75 deductible while Amy has $150.

[Alt Text: The relationship between the insureds and their coverages.]
So, how do you configure the specs for multiple instances? You define the instance key and set up the coverage for multiple instances.
Configuration for Instance Key
The instance key defines how to uniquely identify each instance. You define it with a formula.
To set the desired instance key, edit the details of the child spec record and enter the key for Instance Key Formula. The formula uses the syntax of ProductCode.AttributeCode.
Consider the dental insured party dental example with first name, a space, and last name. INDIV is the product code of the insured party, and the attribute codes storing the name are firstName and lastName. For the Instance Key Formula, Justus enters: INDIV.firstName + " " + INDIV.lastName.
Configuration for Multiples of Coverages
What about coverages? If the insured has multiple instances, how do you configure coverage for each insured instance? Simply choose that insured spec from the PARENT INSURED ITEM dropdown for that coverage.

[Alt text: The Coverage tab in a Root Product record page with the Parent Insured Item highlighted.]
For Base Coverage, Justus selects Person as the Parent Insured Item, ensuring that a distinct base coverage can be selected and configured for each insured person added to the policy.
Relationships for Insured Specs
You can have zero, one, or many specs on the Insured Items tab. If there’s more than one, and you want to define a hierarchical parent-child relationship between them, drag one spec to nest within its parent.
Here’s how Justus configures an auto policy.

[Alt text: A child spec dragged into parent spec.]
This auto insurance product contains two insureds: an Auto Driver insured party spec and an Auto insured item spec. Justus drags Auto Driver to nest inside Auto, making Auto the parent insured item.
If the child spec is an insured party, it’s only stored once across multiple instances. So, one driver across multiple vehicles is still stored as one person. However, if the child spec is an insured item, it’s stored multiple times. For example, a painting added as an insured item at two homes is treated and stored as two paintings.
You can build complex product model structures, including hierarchical structures with grandchild-level insureds and coverages mapped at the grandchild level.
Optional Coverage Specs
On the Coverage Spec tab, select OPTIONAL on any coverage to make it optional for that root product. This offers you a choice as to whether to include the coverage. For example, you can define a life insurance plan with accidental death and dismemberment coverage as an optional add-on.
Link Root Product to Rating
Linking the product to a rating procedure is a crucial step. Edit the product and specify two fields.
-
Rating Procedure Type: Set this field to either Expression Set or Integration Procedure.
-
Rating Procedure Name: If the type is Expression Set, then set this field to the name of the expression set. If the type is Integration Procedure, then set this field to a string based on the Type_SubType of the integration procedure and not its name.
However, the setup and testing of rating goes beyond just referencing the procedure's name. Carefully coordinate the rating information on the product with the setup of the rating procedure.
Excellent work! You now know all about the modeling of insurance products and their components. The next step is to see how rating plays a central role in the quoting process. To learn about building and implementing a rating procedure, check out Rating Procedures for Insurance Quoting.
Want to Learn More?
If you’re a Salesforce customer, check out these learning journeys to discover how to skill up on our suite of digital transformation tools and industry applications.
-
Digital Insurance Platform Consultant Learning Journey
-
Digital Insurance Platform Developer Learning Journey