Create a Product Bundle
Learning Objectives
After completing this unit, you’ll be able to:
- Explore product bundles.
- Create a product bundle.
- Add products to bundles.
Explore Product Bundles
Product bundles simplify purchases and often save customers money by grouping related items. Using Product Catalog Management, product designers create these bundles, defining their product hierarchy and specifying required or optional components. For example, a tablet bundle can include a required tablet and optional accessories like a back cover or keyboard.
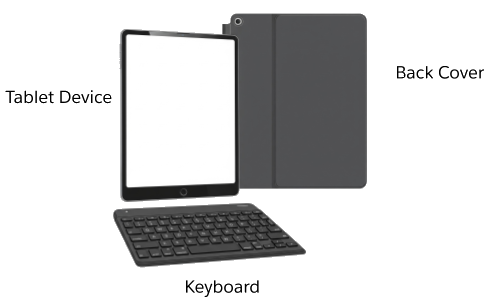
In the product bundle shown here, while the tablet device is a required component of the bundle, the keyboard or the back cover can be optional.
Static and Configurable Bundles
Bundles can be static or configurable. Customers cannot customize static bundles, while configurable bundles allow customization during purchase. For instance, a configurable tablet bundle lets customers choose a tablet variant, protection plan, and data plan, but a static tablet bundle consists of a tablet, charger, and back cover that can’t be customized.
Static and Configurable bundles differ in the way customers can modify them during runtime.
Capability |
Static Bundles |
Configurable Bundles |
|---|---|---|
Design Time | ||
Include static simple products or static bundle products. |
Yes |
Yes |
Include configurable simple products or configurable bundle products. |
No |
Yes |
Run Time | ||
Modify included quantities or product attributes. |
No |
Yes |
Add or remove optional products and alter quantities and attributes. |
No |
Yes |
Cannot add or remove child products, alter product quantities, or configure product attributes at run time. |
No |
Yes |
Product Bundle Page Overview
Let’s look at some of the details you specify while creating a product bundle. Click each tab to learn more.
Create a Product Bundle
Follow along in your Developer Edition org as Manoj creates WiFi Tablet Bundle.
- From the App Launcher, find and select Product Catalog Management.
- On the Product Catalog Management home page, click the Products tile.
- Click New.
- In the New Product window, select Commercial.
- Click Next, and add the details:
- Product Name:
WiFi Tablet Bundle - Code:
PROD003 - Active: Selected
- Product Type: Bundle
- Product Description:
WiFi Tablet bundle; includes WiFi Tablet, accessories, and value adds.
- Confirm these details:
- Configure During Sales: Allowed
- Is Assetizable: selected
- Configure During Sales: Allowed
- Click Save.

Awesome! You’ve created a WiFi Tablet bundle.
Define Product Bundle Structure
The product bundle structure depicts all products within the bundle and their logical relationship.
These characteristics of a bundle product structure make it a versatile tool that product designers like Manoj can use to design tailor-made product bundles.
Let’s look at the Wifi Tablet Bundle structure to understand its components. Click each tab to learn more.
Now that you know about product bundles, let's structure it.
- In the Product | WiFi Tablet Bundle page, go to the Structure tab. You can see the WiFi Tablet Bundle root product in the canvas.
- Click the + symbol below the root product group and select Product Group in the Add Component box.
- Add these details:
- Group Name:
Tablet Device - Code:
PRODGRP1 - Sequence:
1
- Group Name:
- Click Save.
- Switch to the WiFi Tablet Bundle Product record.
- In the Structure tab, under Tablet Device, click the + symbol, and select Product in the Add Component box.
- In the Add components to WiFi Tablet Bundle window, search for the Standard WiFi Tablet product, and select it.
- Click Next.
- In the Specify component details for WiFi Tablet Bundle window, add the details:
- Require this component: selected
- Include component by default: selected
- Allow quantity changes: not selected. This ensures that the Standard WiFi Tablet product is added as an included option with a fixed quantity.
- Require this component: selected
- Click Save. The product is displayed as a child component of the Tablet Device product group.
- Repeat the steps to create product groups under the root product with these details:
Group Name |
Code |
Sequence |
Component Products |
Component Product Details |
|---|---|---|---|---|
Accessories |
PRODGRP2 |
2 |
|
|
Value Added Components |
PRODGRP3 |
3 |
|

The basic structure of your product bundle is now ready. Now, let's define granular details of the bundle. First, let's see how to override the product attributes.
Override Component Attributes
Manoj has defined attributes for each product and in some cases, default values too. For example, White for the Tablet Color attribute.
In a bundle, the product designer can override these attributes to specify a different value, such as a specific color for the tablet.
- With the Product | WiFi Tablet Bundle page open, click the Structure tab.
- Under the Tablet Device product group, click the Standard WiFi Tablet product. Note that if you click the product name, the product details are displayed in a new tab. If you click the product component box, it will show the product component in the group.
- Click the Attributes tab.
- Select the dropdown next to the Tablet Color attribute and then, click Create Override.

- In the New Product Attribute Definition window, select Black for the Default Value field.
- Click Save.
- Click the WiFi Tablet Bundle tab and then, click the Structure tab.
- Click the Tablet Device product group and then, click the Standard WiFi Tablet product.
- Click the Attributes tab. Observe that for the Tablet Color attribute, the Overridden column shows Yes. If the attribute is not displayed, click Refresh.

Well done! You have now learned how to override an attribute for a product within the bundle.
Configure Product Cardinality
Product cardinality defines the number of components that can be added to a bundle during purchase. In Product Catalog Management, you can set these limits using local and group cardinality:
- Local Cardinality: defined at a component level and indicates whether a component is required, is included in the bundle by default, and whether customers can alter product quantity during purchase.
- Group Cardinality: defined at the group level and indicates the minimum and maximum number of products that customers can purchase as part of a bundle.
As a product designer, this lets Manoj define how many products a customer can purchase as part of the bundle.

Shown here is the cardinality setting for the Tablet Device product group in the WiFi Tablet bundle.
Configure Local Cardinality
Follow along as Manoj defines the local cardinality for a product in the bundle.
- With the Product | WiFi Tablet Bundle page open, click the Structure tab.
- Under the Accessories product group, click the Tablet Keyboard product.
- In the right panel, click More and then, select Cardinality.
- Click Edit.
- Select the Require this component and Include component by default checkboxes.
- Click Save.

You’ve now edited the local cardinality of the product component.
Configure Group Cardinality
Now, let’s set up the group cardinality for the Accessories product group.
- Now, click the Accessories product group.
- In the right hand side panel, click Cardinality.
- Click Edit.
- Enter
4in the Max Number of Components field.
- Enter
4in the Min Number of Components field.
- Click Save.

You’ve defined the local and the group cardinality for selected products in the bundle. Now, it's time to validate this product bundle to ensure configurations are accurate.
Validate Product Bundle
As you keep adding products and defining product bundles, it's important to make sure that the bundle configurations are valid. An invalid product bundle configuration will result in a frustrating experience for the customer, resulting in lost orders. Common errors in bundle configuration include:
- Mismatch between number of products in a group and the minimum number of components in a group. For example, the minimum number of components in a group is 5, but the group has only 4 products.
- Mismatch between number of required products and the maximum number of components defined in a group. For example, you have defined 5 products in a group as ‘required’. However, the group has only 4 components.
To ensure the integrity of a product bundle, Manoj runs the product bundle validation.
- On the product record page, from the quick action menu, select Validate Product Definition.

The Validation results window indicates that you need to fix the min and max number of components in the Accessories product group.
- Close the Validation results window.
- Repeat steps 1 to 6 in Configure Group Cardinality. But this time, enter
1in the Min Number of Components field.
- Click Save.
- Repeat step 1 to validate the bundle again. This time, the validation is success. Close the Validation results window.
So far, you've created a bundle product, added products to it, defined the product cardinality, and validated the bundle.
Define Bundle Pricing
Now it’s time to attach pricing details to this bundle.
- With the Product | WiFi Tablet Bundle page open, click the Related tab.
- In the Product Selling Model Option section, click New and add details:
- Product Selling Model: One Time
- Product Selling Model: One Time
- Click Save.
- Go back to the Product | WiFi Tablet Bundle page and click the Related tab.
- In the Price Books section, click Add Standard Price and add the details:
- List Price:
1499 - Product Selling Model: One Time
- List Price:
- Click Save.
- Go back to the Product | WiFi Tablet Bundle page and click the Related tab.
- In the Categories section, click Assign.
- In the New Product Category Product window, search for and select the WiFi Tablets category.
- Save your changes.
Well done! Your bundle product is now ready with pricing. Customers can now search for and order this product. But, before that you need to take a few more steps to make sure that these changes appear in the runtime view.
Sync Pricing and Rebuild the Index
 To ensure that all the decision tables reflect the latest pricing data and runtime systems have access to up to date product data, you must sync your data and rebuild the index.
- In Setup, go to the Salesforce Pricing Setup page and click Sync Pricing.
[Alt text: Sync Pricing Data section highlighting the Sync button.]
- On the Product Catalog Management home page, click the Index and Search Configuration tile.
- Click Rebuild Index, select Partial Index Rebuild, and click Rebuild.

Build a Quote and Add Products
As a customer or a sales rep, you can now browse the product catalog, select the product bundle from the appropriate category, and add it to a quote.
- Open the Tablets Purchase quote that you created earlier.
- Explore the categories in the Hardware catalog and select the WiFi Tablets subcategory under the Tablets. You will see the WiFi Tablet Bundle listed.

Note that you can also search for the products using the product name by entering the full or partial product name in the ‘Search for products’ box.
- Select
 next to WiFi Tablet Bundle.
- All of the product groups you added to the bundle are displayed as tabs. Click each tab, select or deselect the products, and change quantities as needed. The product component settings and cardinality rules apply.
- After you have configured the product as per your need, click Save & Exit.
- Close the Browse Products window.
The WiFi Tablet Bundle that you selected appears as a quote line item in the quote. Observe the pricing that you specified for the product.
Congratulations! You have completed the final step in defining your product catalog by creating a product bundle. Your catalog is fully ready for customers and sales reps.