Get Started with Salesforce CPQ Price Rules
Learning Objectives
After completing this unit, you’ll be able to:
- Describe how price rules extend out-of-the-box CPQ pricing.
- Identify the objects related to price rules and how they contribute to business logic.
- Sign up for a CPQ-enabled Developer Edition org.
- Enable the CPQ Advanced Calculator.
Pricing for Your Specific Business
If you plan to sell something, whether you’re a business selling textiles, or just someone trying to get a few dollars for an old mobile phone, you need to come up with a price for the thing you’re selling. In many cases a fixed price per unit works just fine. But a lot of businesses want the ability to do more sophisticated pricing. For example, your business might have a negotiated contract with a specific customer so they can buy printers at a reduced price. Thankfully Salesforce CPQ has a lot of out-of-the-box tools for making these kinds of pricing adjustments. You can learn all about them in these three badges.
-
Pricing Methods for Salesforce CPQ
-
Discounting Tools in Salesforce CPQ
-
Subscription Pricing in Salesforce CPQ
However, these pricing tools have their limits and can’t meet every conceivable pricing requirement. Fortunately, Salesforce CPQ has a way of handling the pricing use cases that go beyond the out-of-the-box tools: Price Rules.
Price Rules are extremely powerful. They allow admins to conditionally update the value of just about any field on the quote line, the quote line group, or the quote record itself. So for example, if you want to change the list price of the WidgetPro product for first-time customers who ship to North America during the month of December, you can do that!
Price Rules follow an if/then format. IF something is true, THEN do something about it.
- IF New Customer AND in North America AND it’s December AND is WidgetPro
- THEN update the list price field to 90% of original price
The IF portion of the rule can evaluate lots of different data that lives on the quote or related records. The challenge is to be specific enough so that prices change only when you want them to.
The THEN portion of the rule tells CPQ what fields to change and how to change them. This involves replacing the field value with something calculated, or even a simple static value.
Basic Price Rule Structure
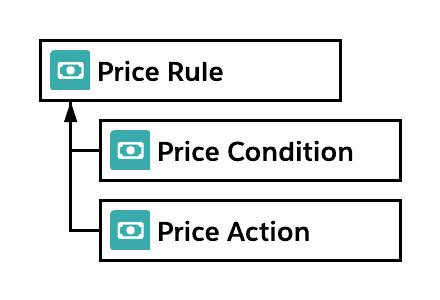
With the if/then format in mind, let’s look at the structure of a price rule, which typically involves three related records.

At the top is the Price Rule record itself. It contains some basic information about how the price rule operates, but it leaves the bulk of the work to the two other records.
The Price Condition record is the IF portion of the if/then combo. The price condition looks at the quote and its related records to decide IF the rule needs to run. It’s like a test that can only pass or fail. If it passes, then CPQ springs into action.
The Price Action is the THEN portion of the if/then combo. It tells CPQ exactly which field needs to change, and how to change it.
In this module you learn how to construct price rules that can meet all sorts of unique pricing use cases. You also learn how to coordinate multiple price rules with the out-of-the-box pricing tools so that they don’t conflict with each other.
Sign Up for a Developer Edition Org with Salesforce CPQ
To complete this module, you need a special Developer Edition org that contains Salesforce CPQ and our sample data. Get the free Developer Edition and connect it to Trailhead now so you can complete the challenges in this module. Note that this Developer Edition is designed to work with the challenges in this badge, and may not work for other badges. Always check that you’re using the Trailhead Playground or special Developer Edition org that we recommend.
- Sign up for a free Developer Edition org with Salesforce CPQ.
- Fill out the form.
- For Email, enter an active email address.
- For Username, enter a username that looks like an email address and is unique, but it doesn't need to be a valid email account (for example, yourname@cpq4ever.com).
- After you fill out the form, click Sign me up. A confirmation message appears.
- When you receive the activation email (this might take a few minutes), open it and click Verify Account.
- Complete your registration by setting your password and challenge question. Tip: Write down your username, password, and login URL for easy access later.
- You are logged in to your Developer Edition.
Now connect your new Developer Edition org to Trailhead.
- Make sure you’re logged in to your Trailhead account.
- In the Challenge section at the bottom of this page, click the playground name and then click Connect Org.
- On the login screen, enter the username and password for the Developer Edition you just set up.
- On the Allow Access? screen, click Allow.
- On the Want to connect this org for hands-on challenges? screen, click Yes! Save it. You are redirected back to the challenge page and ready to use your new Developer Edition to earn this badge.
Great, now you're ready to learn all about Price Rules.