Set Up Bundle-Based Pricing
Learning Objectives
After completing this unit, you’ll be able to:
- Define a bundle-based adjustment to calculate discounts for products being sold as a bundle.
- Add a Bundle Based Price element to a pricing procedure.
- Simulate and test the pricing procedure
Discover Bundle-Based Pricing
Bundle-based pricing is a strategy that combines a group of products or services into a single offering for sale. A bundle typically provides a price advantage over buying separate items. For example, a software company might offer a bundle of CRM, marketing automation, and customer support tools at a better price than if sold individually.
Bundle-based pricing benefits businesses as well as customers.
-
Cost Savings: The most common appeal of bundles is that they often offer a lower price than buying each product separately.
-
Increased Sales Volume: Bundling can encourage customers to purchase more products or services than they initially intended. They might be attracted by the perceived value of the bundle and buy items they wouldn’t have considered otherwise.
-
Higher Average Order Value: By selling multiple items in a single transaction, businesses can increase the average revenue generated per sale.
-
Inventory Management: Bundling can help businesses move slow-moving inventory by including it in a more attractive package with popular items.
Bundle-based pricing helps businesses drive sales and revenue. It also provides value and convenience for customers. When implemented effectively, it’s a win-win strategy that aligns business goals with customer needs.
In this unit, team up with Richa, the pricing admin, as she uses Salesforce Pricing to implement this pricing strategy.
Create a Bundle-Based Adjustment
InfinitraBytes is enhancing its product offerings with the new Laptop Pro Bundle, a comprehensive package designed for power users. This new bundle includes many important products, including their popular Printer Bundle. While customers can still purchase the Printer Bundle separately, InfinitraBytes believes that offering a special discounted price on the Printer Bundle when it's selected as part of the Laptop Pro Bundle will significantly incentivize customers to opt for the larger, more profitable Laptop Pro Bundle.
Richa takes the lead on setting up bundle-based pricing for the Printer Bundle with these goals:
- Offer the Printer Bundle at a lower price when purchased within the Laptop Pro Bundle, compared to buying it standalone.
- Encourage customers to select the comprehensive Laptop Pro Bundle, thereby increasing sales of both laptops and printers.
- Further simplify the purchasing process for customers looking for a complete office solution.
She sets to work. Follow along on your Developer Edition org.
- On the Price Management home page, click the Price Adjustment Schedules tile.
- Change the list view to All Price Adjustment Schedules. All the standard out-of-the-box price adjustment schedules are listed here.
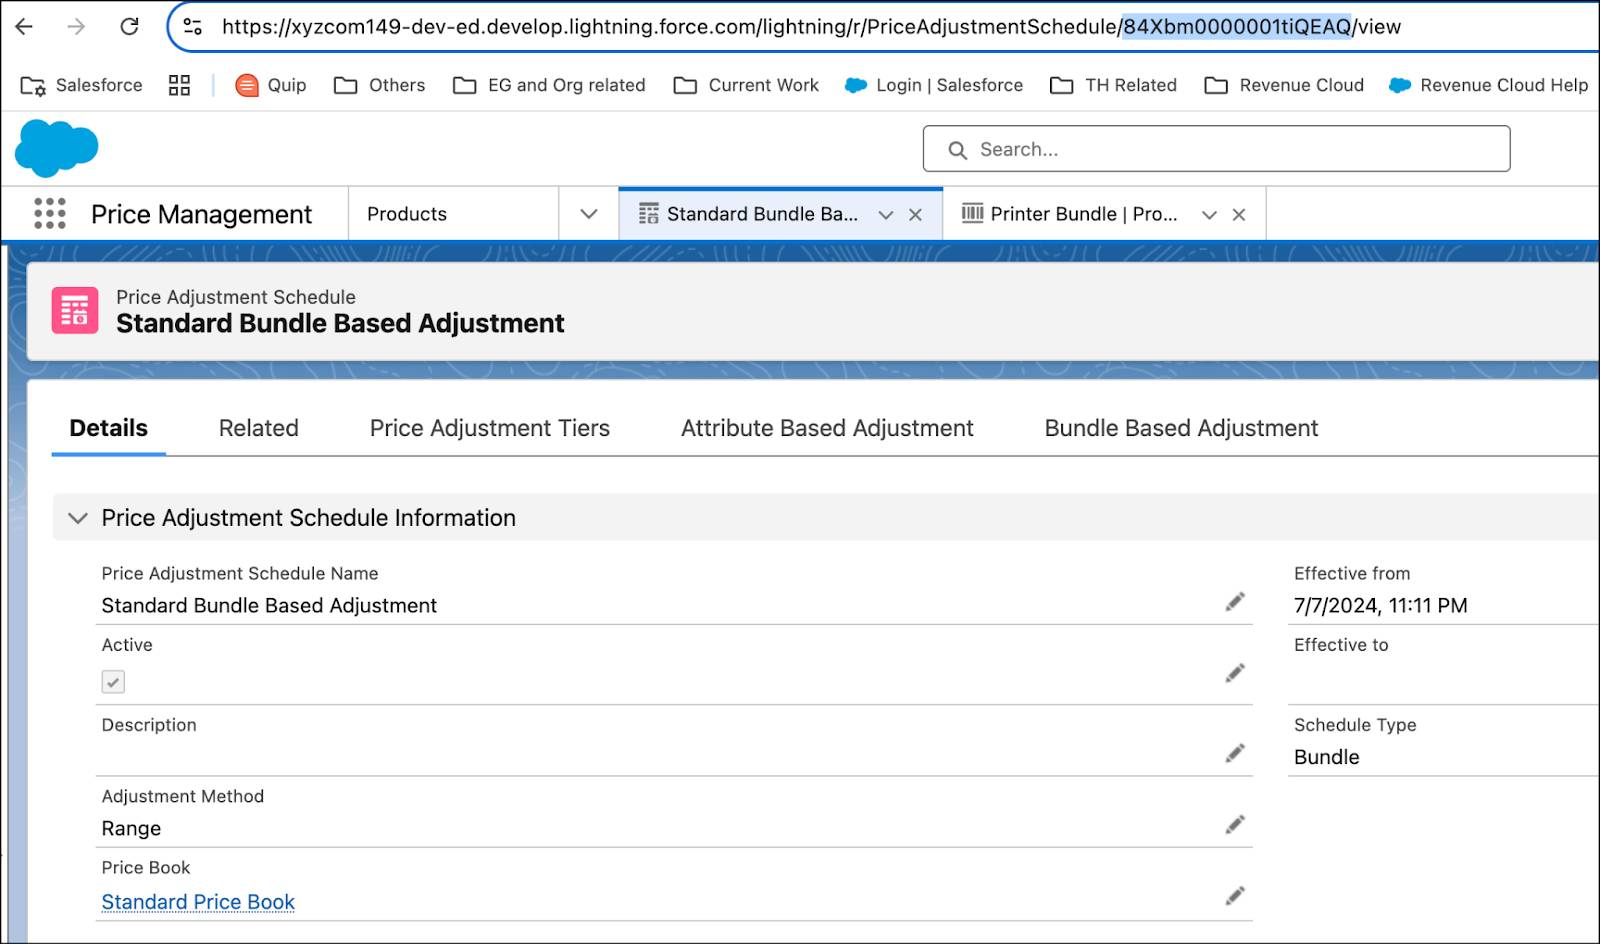
- Click Standard Bundle Based Adjustment.
- In the Details tab, uncheck the Active checkbox. Salesforce Pricing doesn’t support adding new bundle based adjustments to an active price adjustment schedule.
- Click the Bundle Based Adjustment tab.
- Click New.
- Add these details:
- Root Bundle: Laptop Pro Bundle
- Root Bundle Selling Model: One Time
- Parent Product: Laptop Pro Bundle
- Parent Product Selling Model: One Time
- Product: Printer Bundle
- Product Selling Model: One Time
- Adjustment Type: Percentage
- Adjustment Value: 20
- Effective From: Today’s date
- Price Adjustment Schedule: Standard Bundle Based Adjustment

- Click Save.
- Close the newly created Bundle Based Adjustment.
- On the Price Adjustment Schedule page, navigate to the Details tab.
- Next to the Active checkbox, click the Edit icon.
- Select the Active checkbox, and click Save.
The bundle-based adjustment for the Printer Bundle is now in place. Next, refresh the Bundle Based Adjustment Entries decision table in your org. Follow the same steps that you used earlier.
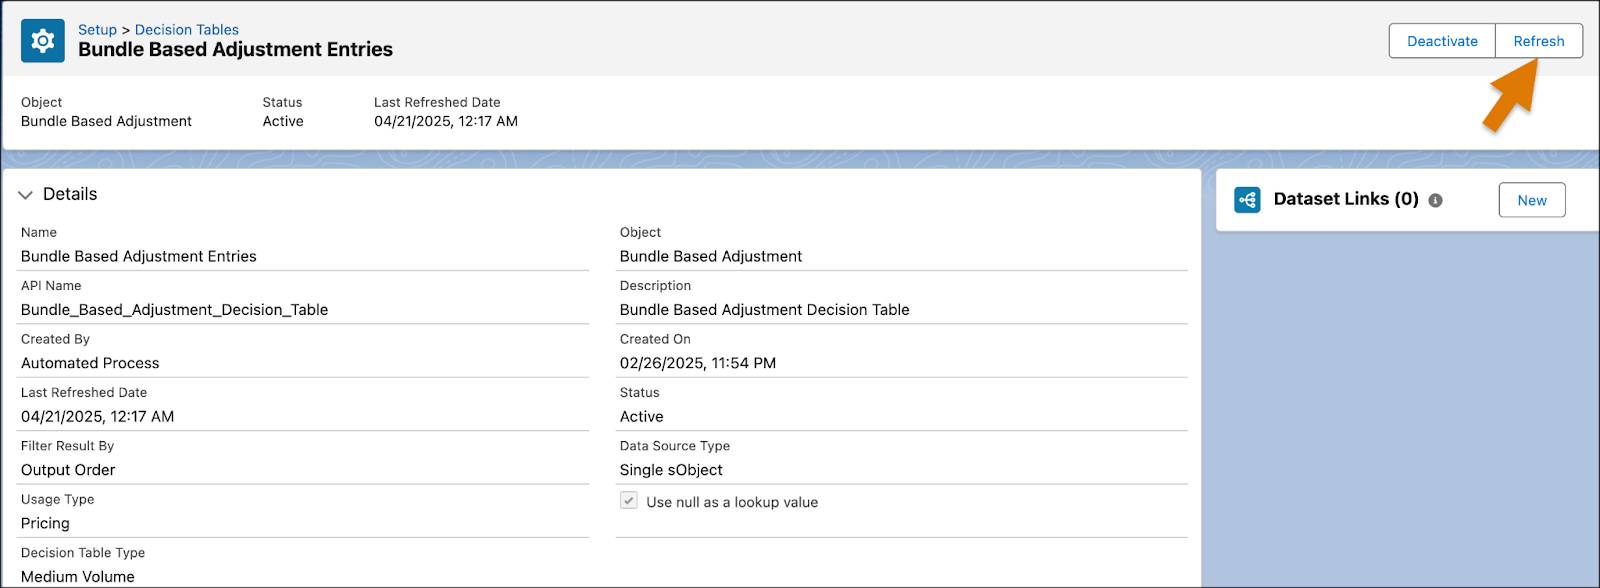
This ensures that the latest pricing data is available in the Bundle Based Adjustment Entries decision table. You can validate this by navigating to App Launcher and opening the Lookup Tables page. Here, search for and open Bundle Based Adjustment Entries.
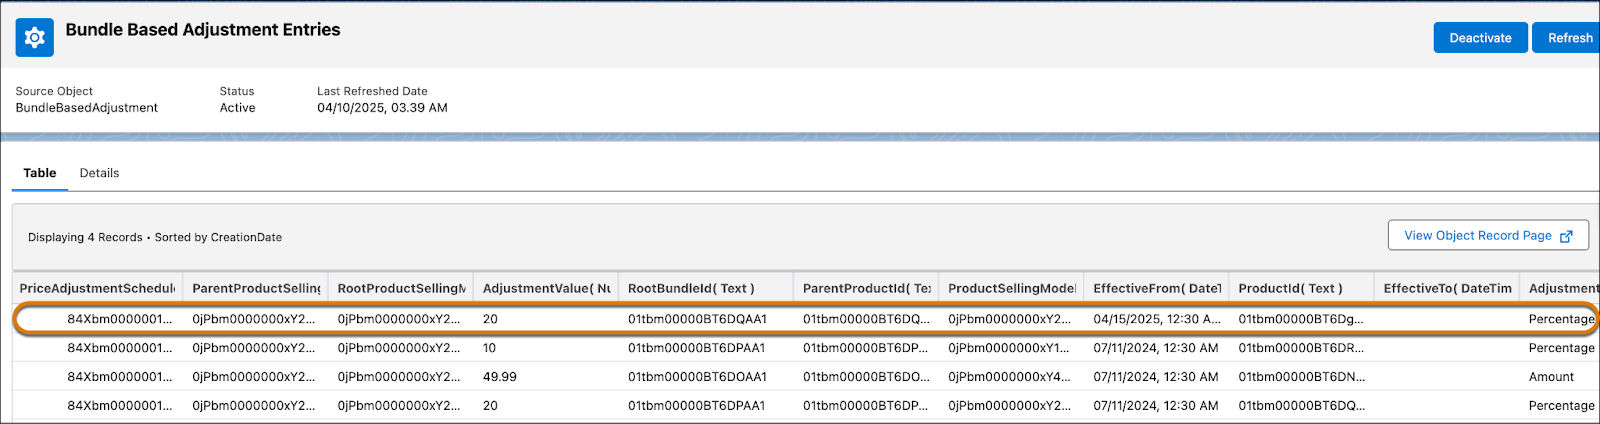
Notice that your newly created bundle based adjustment is now populated in this table. The Bundle-Based Price element uses this lookup table for its price calculations.
Add the Bundle-Based Price Element
After defining the bundle-based adjustment, Richa’s next task is to add the Bundle-Based Price element to the previously created pricing procedure. Follow along on your org.
Create a Constant
Start by creating a constant to store the Id of the price adjustment schedule, which is the Standard Bundle Based Adjustment. Pricing procedures typically use constants to define elements not included in the context definition.
- Open the same pricing procedure you used in the last unit.
- Under Pricing Procedure Versions, click Pricing Procedure Demo V1.
- Click the Deactivate button on the Pricing Procedure Builder.
- On the left panel of the Pricing Procedure Builder, click
 .
.
- Click Add Resource.
- In the Add New Resource window, add these details:
- Resource Type: Constant
- Resource Name:
BundleBasedAdjustmentId - Data Type: Text
- Default Value: Enter the price adjustment schedule Id from your org browser, as shown here.
- Select Done.
Add the Bundle-Based Price Element
Your pricing procedure currently contains these five pricing elements: Pricing Setting, List Price, Volume Discount, Manual Discount, and Attribute Based Price. Next, add the Bundle Based Price element to it.
- Under the Attribute-Based Price element, click the + symbol.
- Search for and select Bundle-Based Price from the Add Element menu.
- Under Lookup Table Details, search for and select Bundle Based Adjustment Entries.
- Expand the Input Rule Variables section and map the variables to these context tags:
- Price Adjustment Schedule:
BundleBasedAdjustmentId - Product Selling Model:
ProductSellingModel - Effective From:
EffectiveFrom - Effective To:
EffectiveFrom - Product:
Product - Parent Product:
MainItemProduct - Parent Product Selling Model:
MainItemProductSellingModel - Root Bundle:
RootItemProduct - Root Bundle Selling Model:
RootProductSellingModel
- Next, expand the Input Variables section and map the variables to these context tags:
- Inclusive Price:
InclusivePrice - Quantity:
LineItemQuantity - Input Unit Price:
NetUnitPrice
- On the left panel of the Pricing Procedure Builder, click
 .
.
- Select the Include in Output checkbox.
- Then, click
 .
.
- Under Rank, enter
1.
- Click Save.
- Click Activate.
Here’s how your Bundle-Based Price element should look.
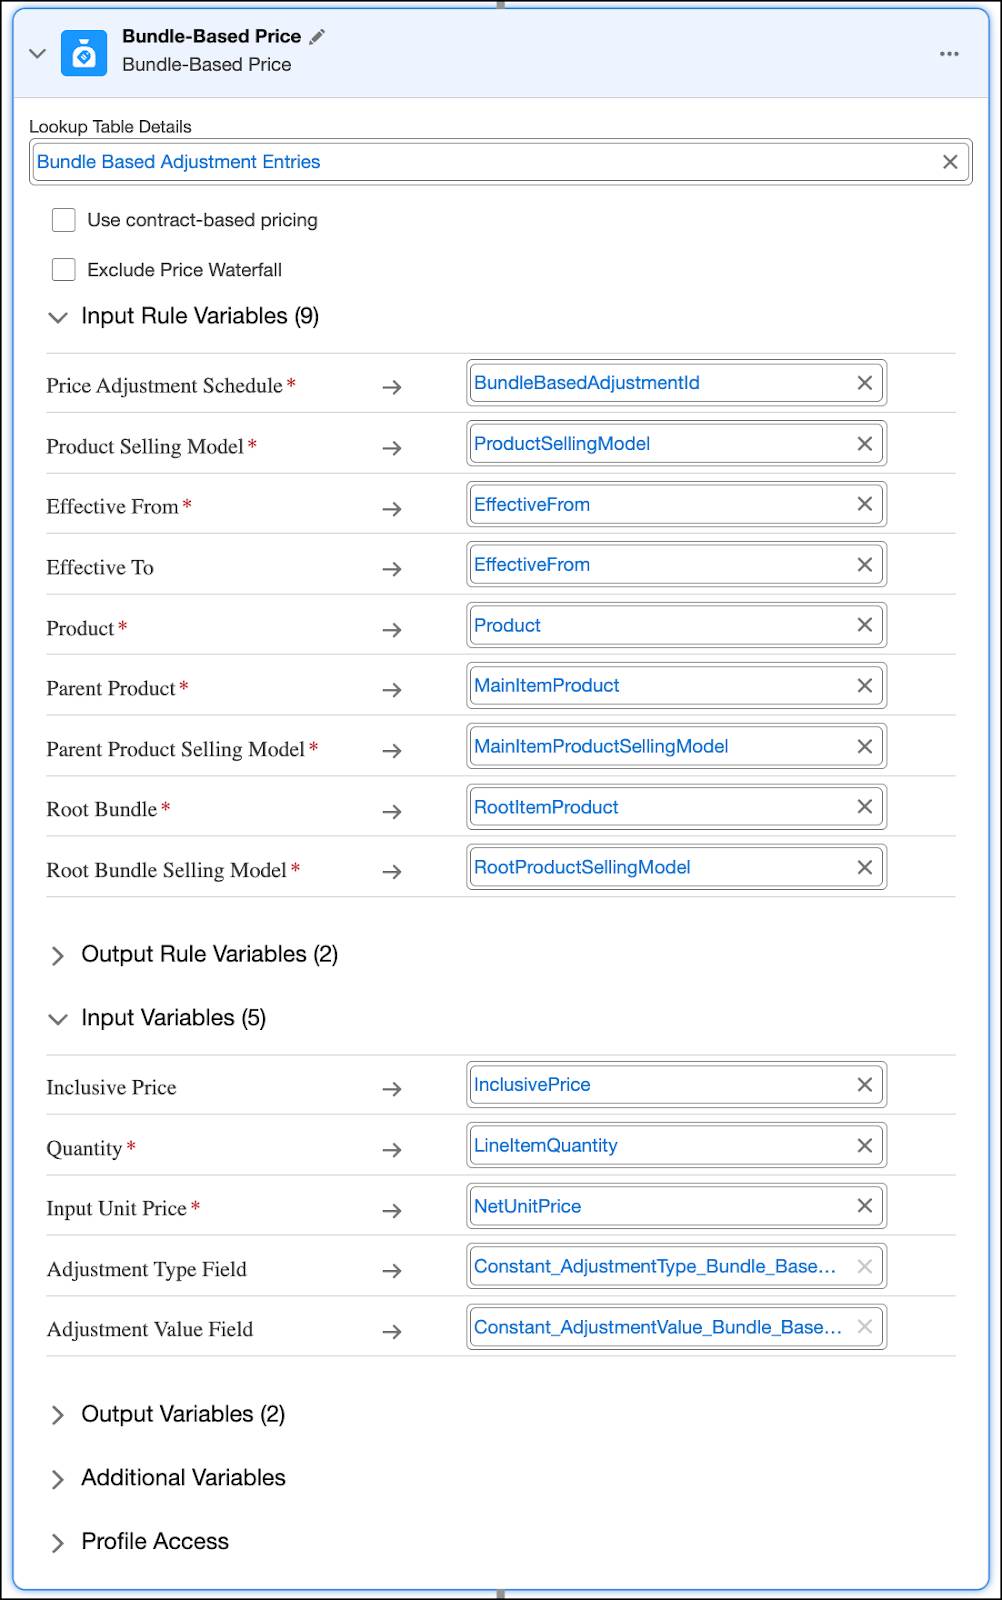
Excellent work! The Bundle-Based Price element is now part of your pricing procedure.
Wrap Up
Congratulations! You’ve completed this module and now have a solid understanding of Salesforce Pricing, from volume discounts to bundle-based pricing. You’re well-prepared to use your newfound pricing knowledge. Want to dive deeper? Even more advanced features in Salesforce Pricing await you in another module. But for now, take a moment to celebrate your achievement!