Add Volume and Manual Discounts
Learning Objectives
After completing this unit, you’ll be able to:
- Describe the three types of price adjustment schedules.
- Add a Volume Discount pricing element to a pricing procedure.
- Include a Manual Discount pricing element in a pricing procedure.
Explore Price Adjustment Schedules
Think of a price adjustment schedule as a magical rulebook for pricing. Instead of manually tweaking prices, you can set up rules that automatically adjust prices and offer discounts based on different conditions, such as:
-
Quantity: Buy more, save more.
-
Product Configuration: Different features, different prices.
-
Purchase Timing: Special seasonal offers or limited-time deals.
-
Bundles: Buy multiple products together to get amazing discounts.
With this, you can categorize and organize your price adjustments, making it a breeze to manage even the most complex pricing strategies.
Types of Price Adjustment Schedules
Price adjustment schedules come in three flavors, each designed for a specific pricing purpose.
-
Price Adjustment Tiers: This adjustment schedule gives you the flexibility to set different prices based on the number of items purchased. Use it to implement tactics like volume discounts. For example, you can set a tier that gives customers a 10% discount when they buy 10 items or a 20% discount if they buy 50 items. It’s a great way to encourage customers to buy more.
-
Attribute Based Adjustment: Use this schedule type to customize prices based on a product’s attributes or configuration. For example, if a product comes in different colors, you can vary the price based on the color the customer chooses. Similarly, if a computer has different memory sizes, the price may vary based on the amount of memory selected.
-
Bundle Based Adjustment: This adjustment schedule lets you adjust prices when products are sold as part of a predefined bundle. Imagine a Tech Bundle that includes a laptop, a mouse, and a printer, all at a discounted price compared to the items sold separately. This is a great way to encourage customers to buy more products and increase your sales. It also helps clear out an inventory of slow-moving products.
Salesforce pricing includes three predefined price adjustment schedules as shown in this image.
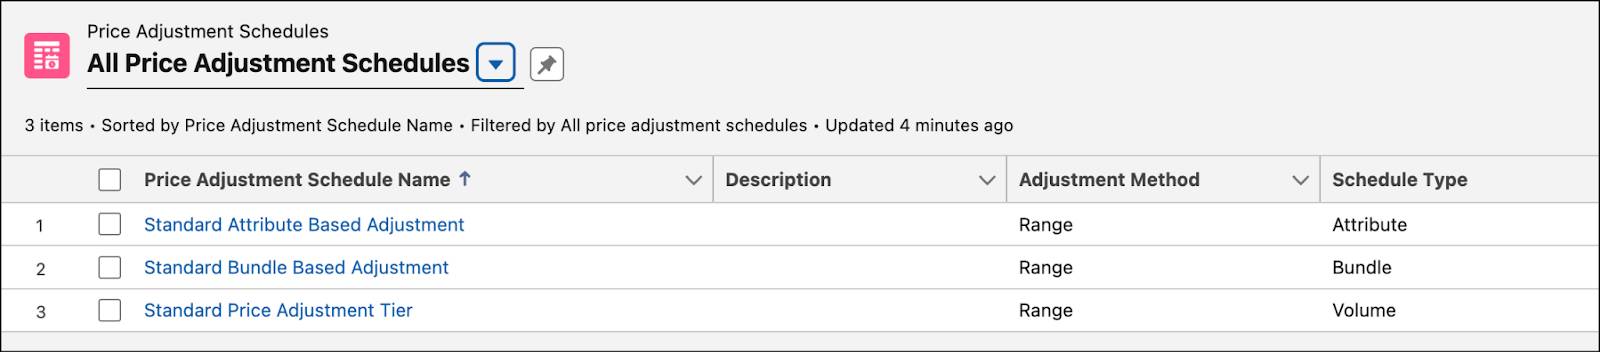
Use a predefined schedule or create your own custom price adjustment schedule to suit your business needs.
In this unit, you continue to get hands-on by defining price adjustment tiers that automatically apply discounts based on order quantities.
Create Price Adjustment Tiers
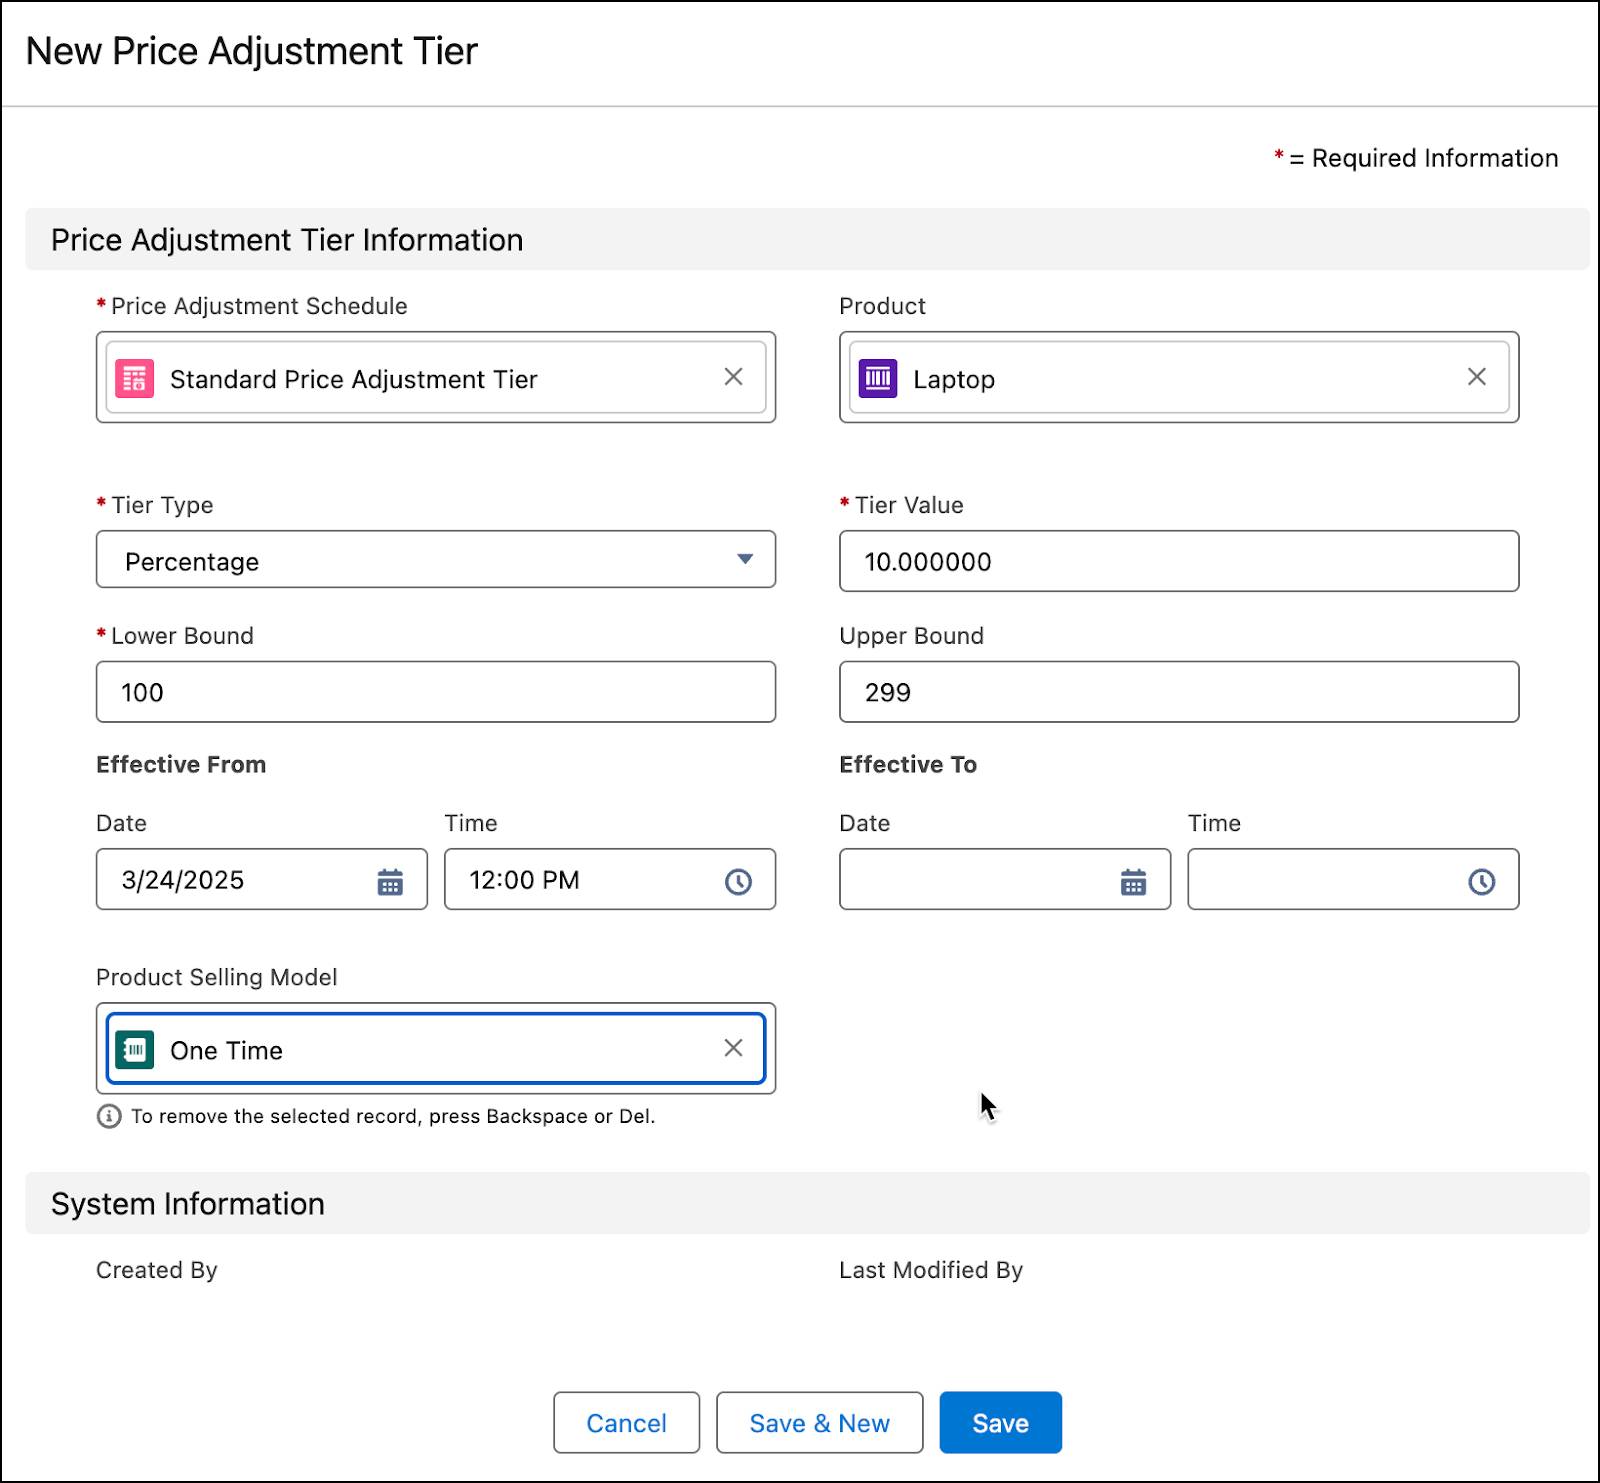
InfinitraBytes notices a recent drop in laptop sales. To turn things around, they offer discounts for bulk orders. This new strategy focuses on attracting large orders from corporate clients and educational institutions. Here are the details.
- A 10% discount on orders of 100 to 299 laptops
- A 25% discount on orders of 300 or more laptops
Ready to roll out this new strategy, Richa gets to work.
Follow along in your Developer Edition org to create new price adjustment tiers.
- On the Price Management home page, click the Price Adjustment Schedules tile.
- Change the list view to All Price Adjustment Schedules. All the standard out-of-the-box price adjustment schedules are listed here.
- Click Standard Price Adjustment Tier.
- In the Details tab, ensure the Active checkbox isn’t selected. Salesforce Pricing requires deactivating a price adjustment schedule before adding new tiers.
- Click the Price Adjustment Tiers tab.
- Click New.
- Add these details:
- Price Adjustment Schedule: Standard Price Adjustment Tier
- Product: Laptop
- Tier Type: Percentage
- Tier Value:
10 - Lower Bound:
100 - Upper Bound:
299 - Effective From: Today’s date
- Product Selling Model: One Time
- Price Adjustment Schedule: Standard Price Adjustment Tier
- Click Save & New.
- Add these details for the second tier:
- Price Adjustment Schedule: Standard Price Adjustment Tier
- Product: Laptop
- Tier Type: Percentage
- Tier Value:
25 - Lower Bound:
300 - Effective From: Today’s date
- Product Selling Model: One Time
- Click Save.
- Close the tabs for the new price adjustment tiers you just created.
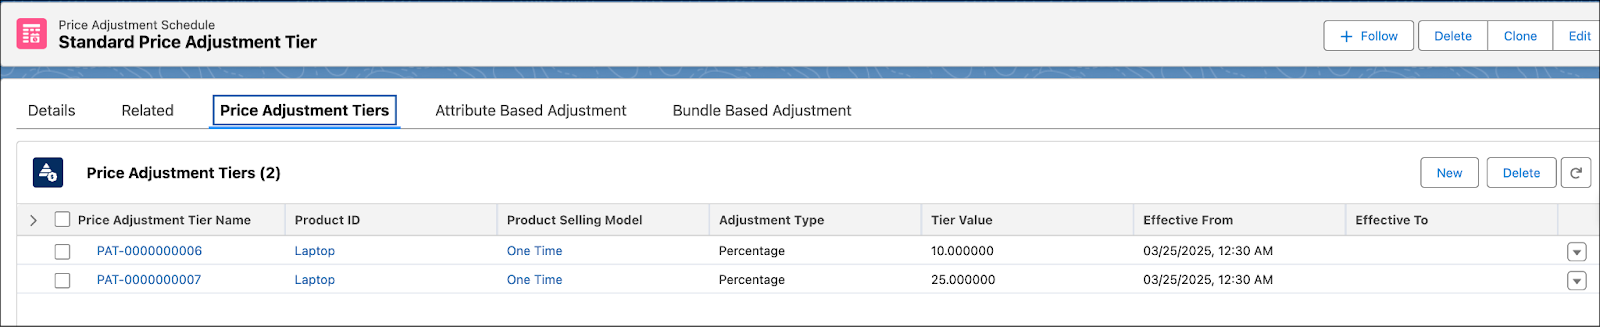
- Refresh the page. You can see the two newly created price adjustments tiers.

- On the Price Adjustment Schedule page, navigate to the Details tab.
- Next to the Active checkbox, click the Edit icon.
- Select the Active checkbox, and click Save.
You’ve successfully created two price adjustment tiers for the Laptop product within the Standard Price Adjustment Tier.
Refresh the Decision Table
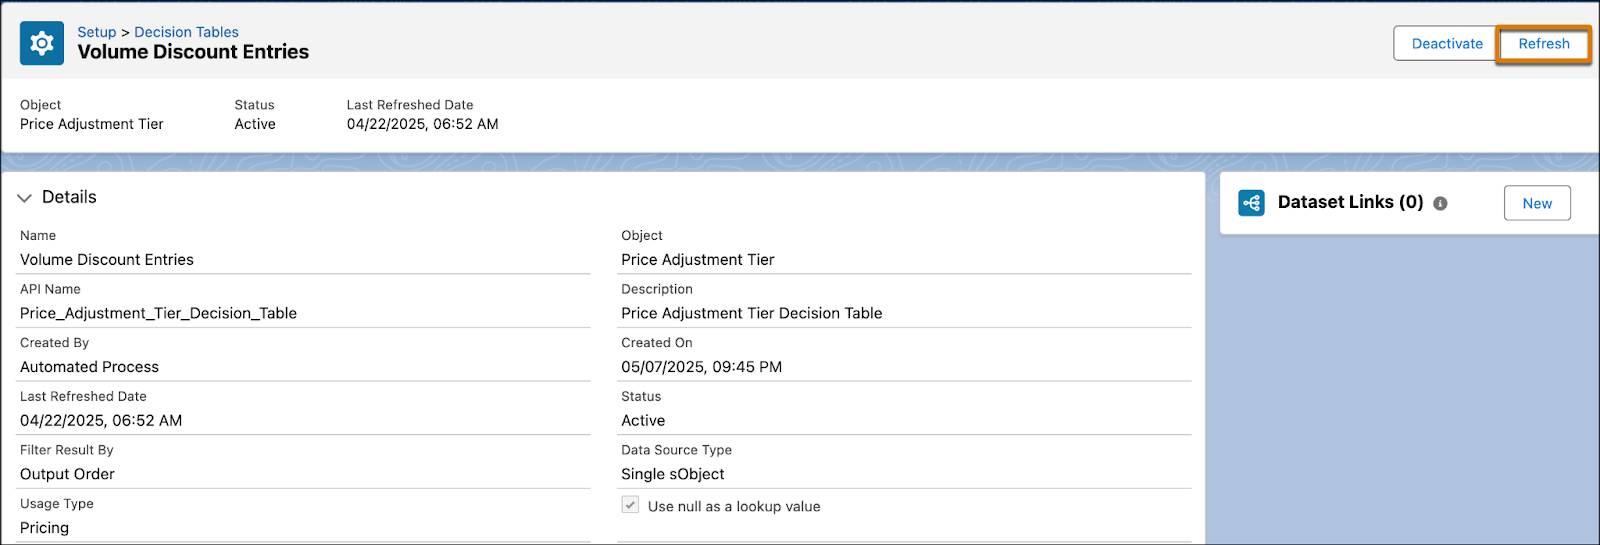
To ensure that the latest pricing data is available in the Volume Discount Entries decision table, refresh it.
- From Setup, in the Quick Find box, search for and select Decision Tables.
- From the available decision tables list, click Volume Discount Entries.
- Click the Refresh button.
Next, validate that this decision table has the latest pricing data.
- From the App Launcher, search for and open Lookup Tables.
- Change the list view to All Decision Matrices.
- Find and select Volume Discount Entries.
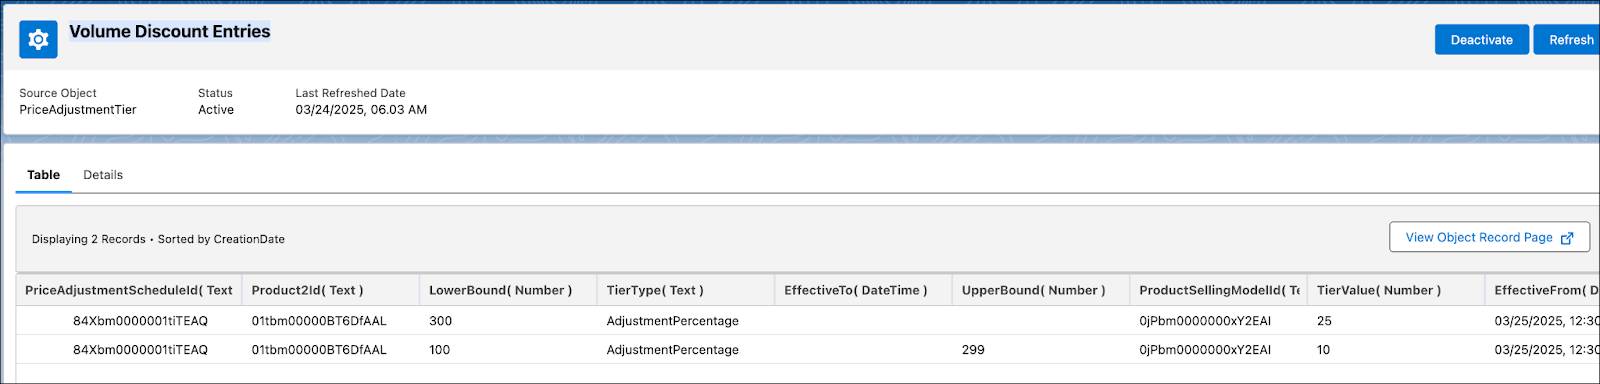
Notice that the input ranges from your newly created price adjustment tiers are populated in this table. The Volume Discount pricing element uses this lookup table for its price calculations.
Add the Volume Discount Pricing Element
Having defined the price adjustment tiers, Richa starts her next task, which is to add the Volume Discount pricing element into the previously created pricing procedure. Follow along on your Developer Edition org.
Create a Constant
Start by creating a constant to store the Id of the price adjustment schedule, which is the Standard Price Adjustment Tier. Pricing procedures typically use constants to define elements not included in the context definition.
- Open the pricing procedure you created in the last unit.
- Under Pricing Procedure Versions, click Pricing Procedure Demo V1.
- On the left panel of the Pricing Procedure Builder, click
 .
.
- Click Add Resource.
- In the Add New Resource window, add these details:
- Resource Type: Constant
- Resource Name:
VolumePriceAdjustmentScheduleId - Data Type: Text
- Default Value: Enter the price adjustment schedule Id from your org browser, as shown here.
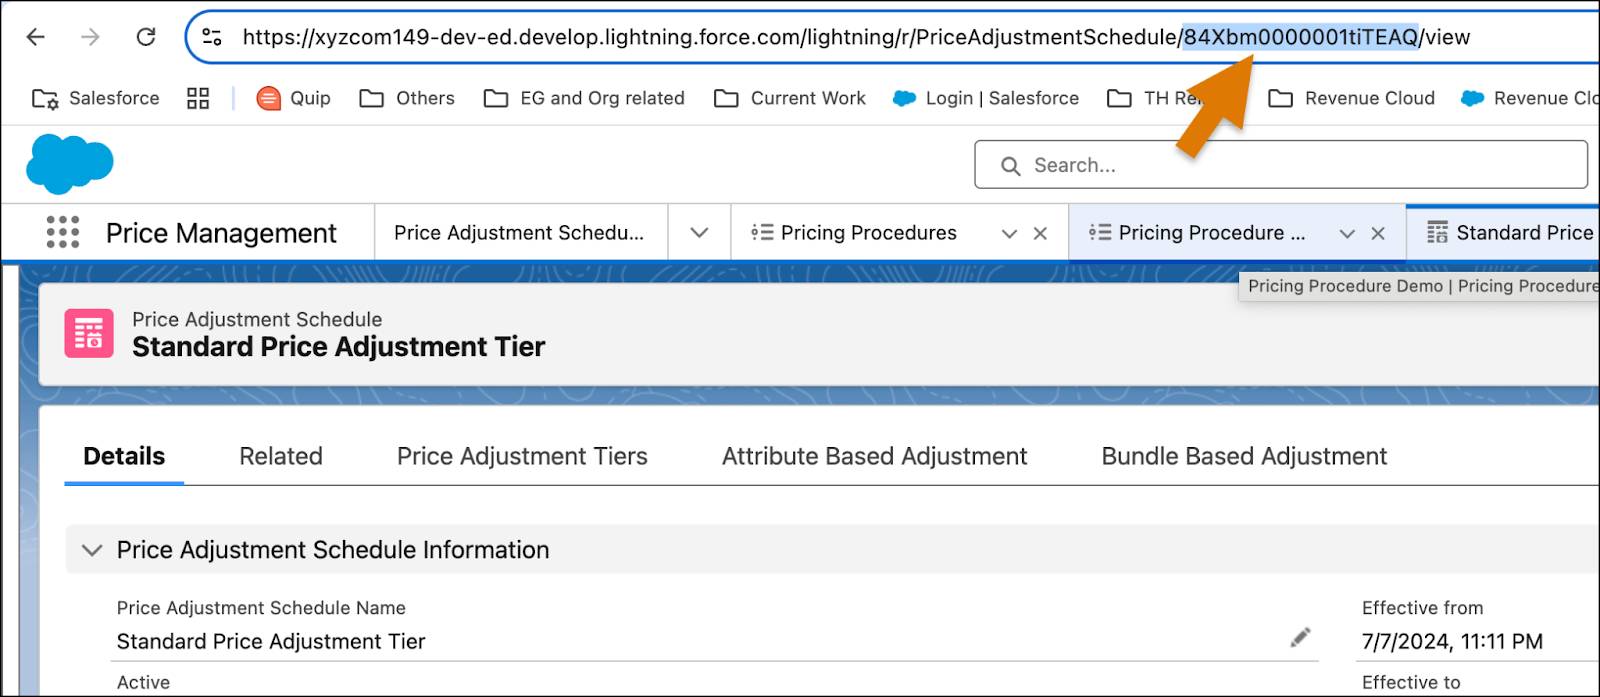
- Click Done.
Add the Volume Discount Pricing Element
Your pricing procedure currently contains the Pricing Setting and the List Price elements. Next, you add the Volume Discount pricing element to it. This element calculates the product price by applying discounts based on the purchased quantities, as defined in the price adjustment tiers.
- Under the List Price element, click the + symbol.
- Search for and select Volume Discount from the Add Element menu.
- Under Lookup Table Details, search for and select Volume Discount Entries.
- Expand the Input Rule Variables section and map the variables to these context tags:
- Price Adjustment Schedule:
VolumePriceAdjustmentScheduleId - Lower Bound:
LineItemQuantity - Upper Bound:
LineItemQuantity - Product:
Product - Product Selling Model:
ProductSellingModel - Effective From:
EffectiveFrom - Effective To:
EffectiveFrom
- Next, expand the Input Variables section and map the variable to this context tag:
- Quantity:
LineItemQuantity - Input Unit Price:
ListPrice
- On the left panel of the Pricing Procedure Builder, click
 .
.
- Select the Include in Output checkbox.
- Click
 and for Rank, enter
 1.
- Save your work.
Here’s how your Volume Discount element should look.
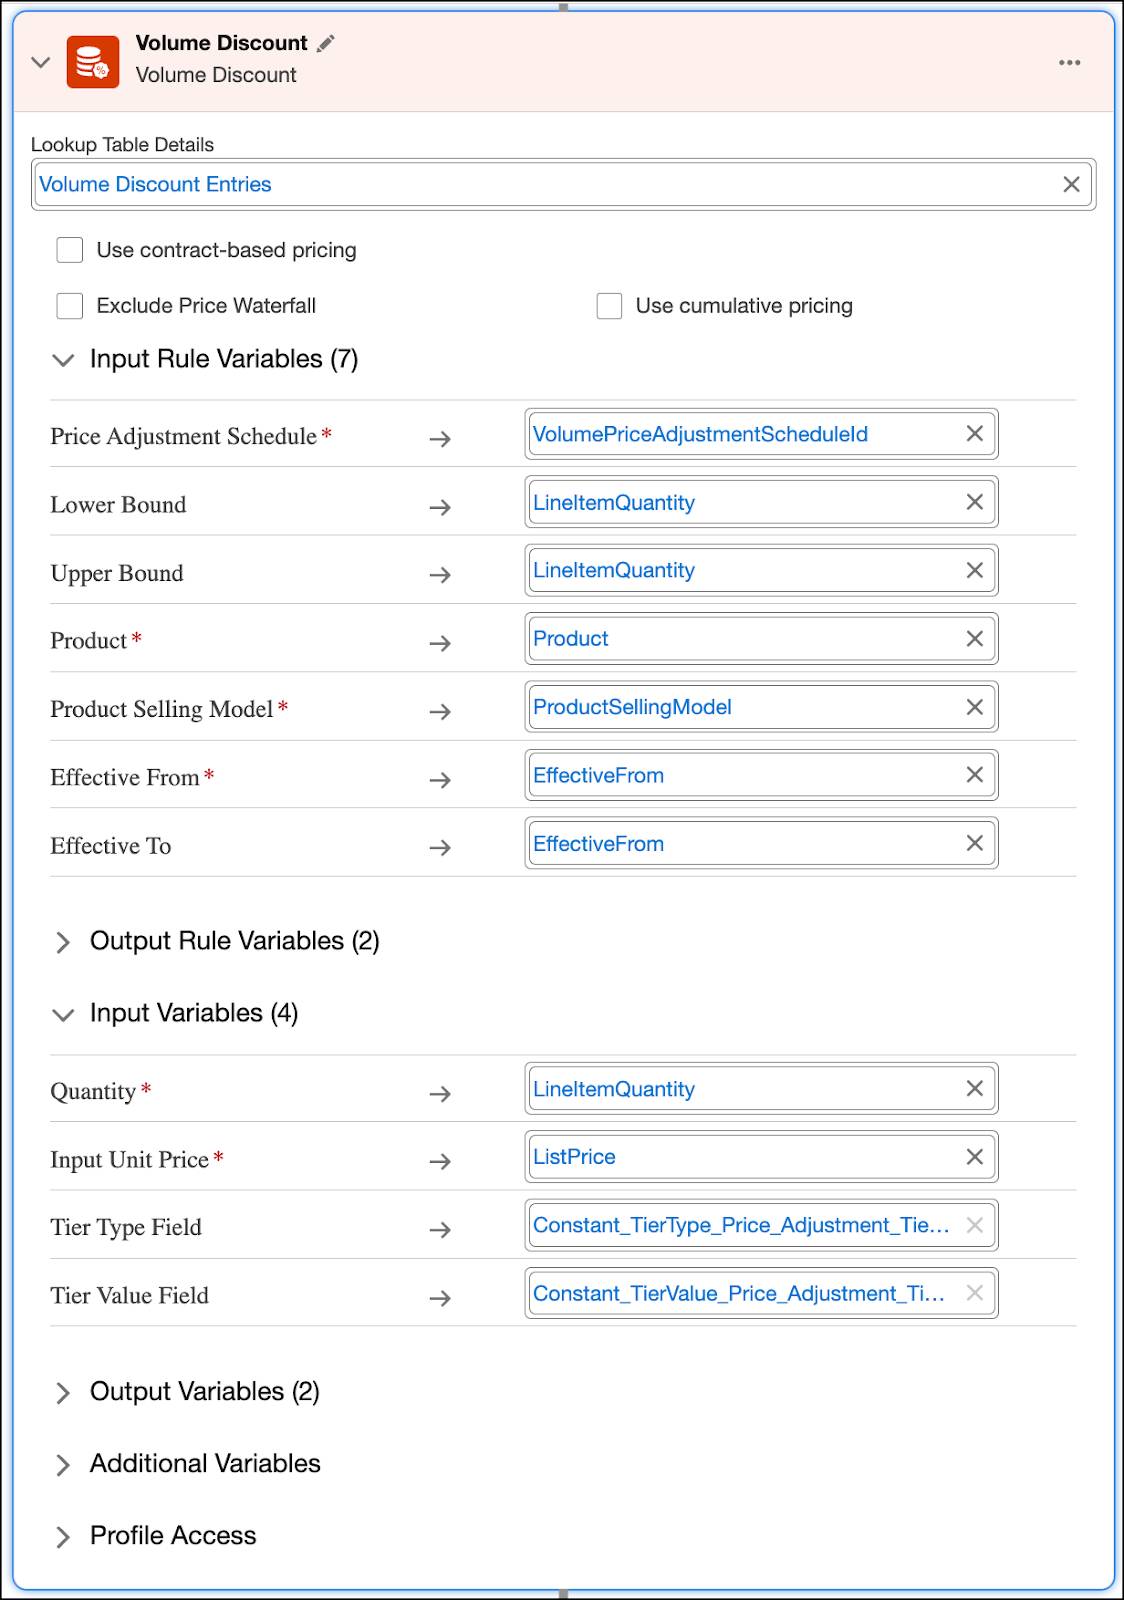
You’ve successfully added the Volume Discount element to your pricing procedure.
Apply Manual Discounts
In addition to pre-defined discounts, sales reps need the flexibility to offer manual discounts to support individual customers and to secure sales. To this end, Richa knows the Manual Discount pricing element is especially important for scenarios with large orders or for strategic accounts.
Follow along in your org to add the Manual Discount element to your pricing procedure.
- Under the Volume Discount element, click the + symbol.
- Search for and select Manual Discount.
- Expand the Input Variables section and map the variables to these context tags:
- Adjustment Type:
AdjustmentType - Adjustment Value:
AdjustmentValue - Quantity:
LineItemQuantity - Input Unit Price:
NetUnitPrice
- On the left panel of the Pricing Procedure Builder, click
 .
.
- Select the Include in Output checkbox.
- Click
 .
.
- Under Rank, ensure the value is
1.
- Save your work.
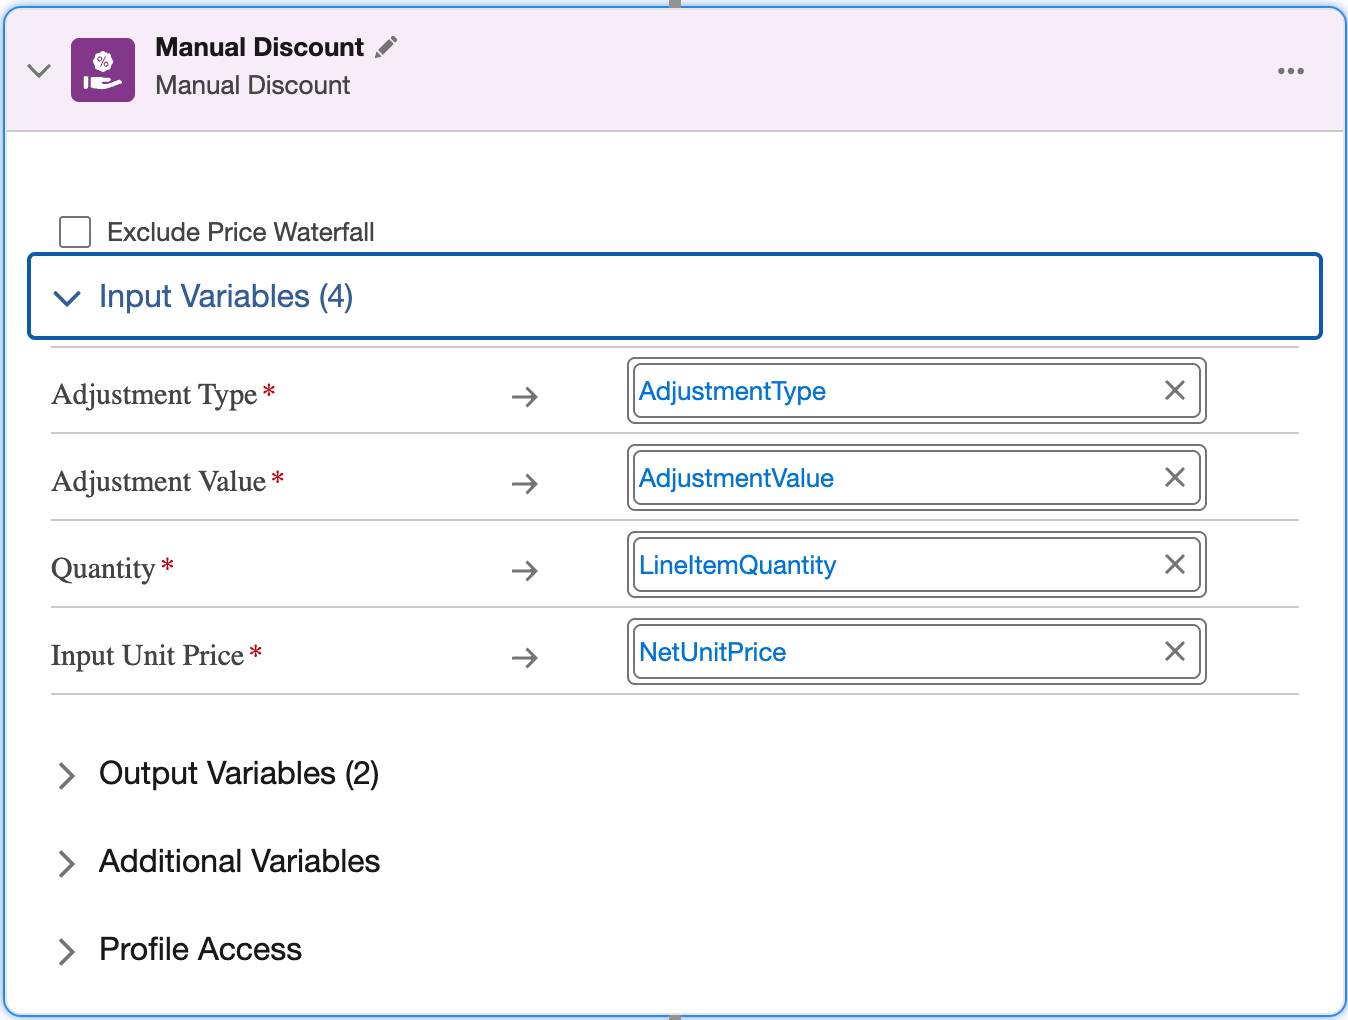
Well done! You successfully added the Manual Discount element to your pricing procedure. You’ll test this and see it in action using a quote in the upcoming unit.
Next Up
In this unit, you explored price adjustment schedules and created price adjustment tiers to vary prices based on purchase quantity. You also added the Volume and the Manual Discount elements to your pricing procedure. In the next unit, you work with a new pricing element, Attribute-Based Price. Onward!