Explore Offer Creation and Product Modeling
Learning Objectives
After completing this unit, you’ll be able to:
- Describe how to create offers with Product Designer.
- Explain the purpose of product modeling.
One Step at a Time
With the reusable components of Product Designer, Devi now has all the powerful and flexible tools he needs to create any type of product configuration. He can’t wait to jump head-first into the world of product design. Before he does, he needs to explore the recommended workflow for creating offers in Shared Catalog and learn about product models, which he’ll use to guide his work.
Offer Creation in Product Designer
The key to using Product Designer is to follow a bottom-up approach to design products. You start by configuring the smaller components, like picklists, attributes, and object types, and use them to build out multiple products and bundles in your catalog. Because these granular entities are reusable, setting them up early greatly streamlines the creation of new offers.
The diagram shows the standard bottom-up process.

The standard offer-creation workflow shown above is just one way to create products in Product Designer.
Here are the steps for configuring new products:
- Create picklists. Picklists make attribute values selectable in the Cart.
- Create attribute categories and attributes. Attributes are the qualities that define a product. You organize them into categories in Product Designer.
- Create object types. Object types contain layouts of attributes and fields and act as reusable templates for creating products.
- Create products. Products contain design-time and runtime attributes, prices, attachments, and more.
Let’s explore this process in more detail and follow Devi as he brainstorms how to build a new smartwatch product, the Infiwatch.
Create Picklists
Picklists are the smallest component in Product Designer. Using the bottom-up approach, picklists are the first components you create when building out new products. This diagram shows a Band Color picklist with picklist values of Purple, Yellow, and Green.

The diagram represents the relationship between the Band Color picklist and the associated picklist values for Smartwatch colors. As you design products for your business, you create picklist values that your customers can choose from as they configure products for purchase.
Create Attribute Categories and Attributes
Once you’ve created picklists for a product type, you create any necessary attribute categories. Use attribute categories to organize similar attributes in Shared Catalog. With these categories in place, you’re ready to configure the design-time and runtime attributes of the product. Then you connect any runtime attributes to the associated picklists to make their values selectable in the Cart.
To begin, Devi sketches a diagram showing all the attributes that he’ll use to build a reusable Smartwatch object type, like brand, capacity, and band color. For attributes that customers need to configure, like band color, he creates picklists that he’ll connect to those specific attributes.
Devi knows that customers may request all sorts of wacky colors if left to their own devices. Because of this, he makes sure to limit picklist values according to the product colors available.

Just think–without attributes, Devi would need to build an entirely new product instance for every smartwatch color option like black, blue, and white. With Product Designer, Devi can create one smartwatch product with a Band Color attribute that stores all of the color options. He can even reuse this attribute to create any number of similar products.
Create Object Types and Subtypes
Once you’ve created picklists and attributes for a product or line of products, it’s time to set up object types. Object types are the reusable templates for building offers.
Remember, any subtypes of the object type that you create automatically inherit the layout of fields and attributes from the parent object type. Because of this inheritance, object types follow a hierarchical structure, with the most basic object types at the top and most complex subtypes at the bottom.
Before setting up this hierarchy, it’s best practice to create a base product object type for your catalog that stores the fields relevant to all of your products, such as product code. Then you’re ready to create subtypes to inherit the information from the base product.
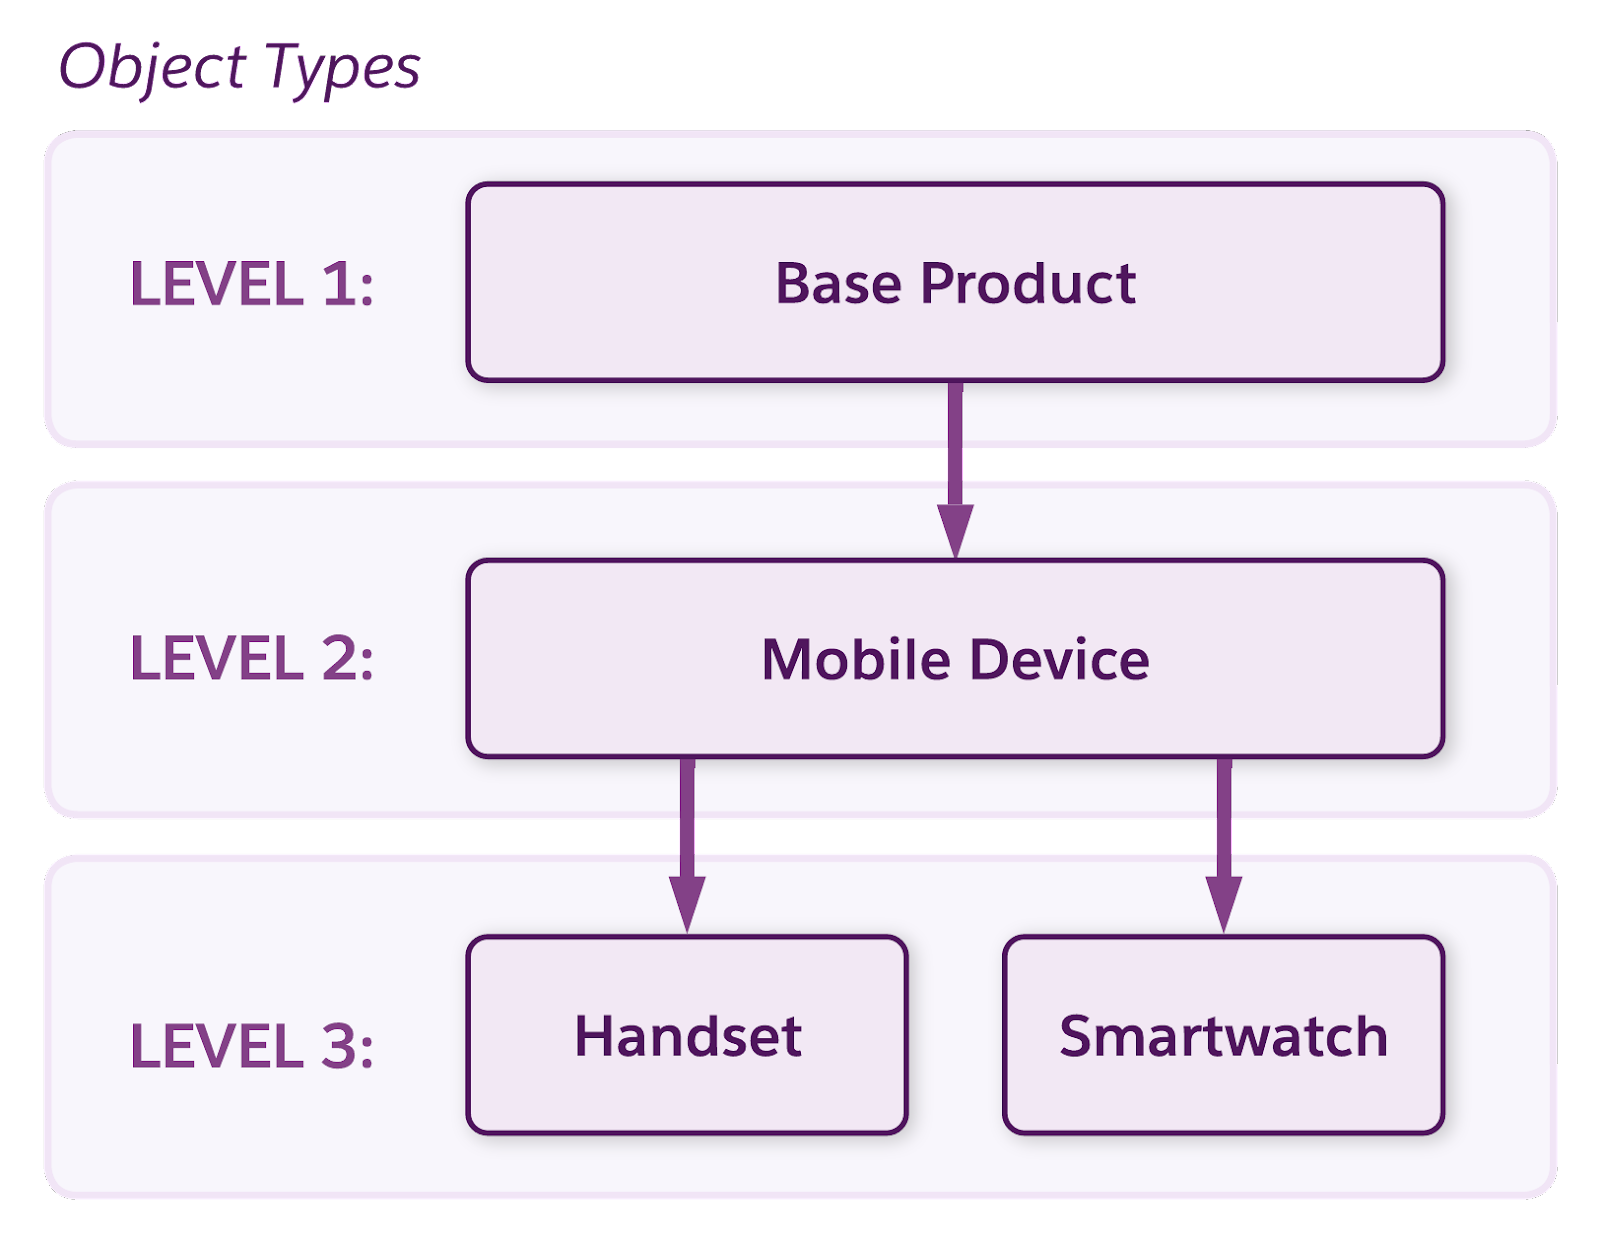
For example, along with his new smartwatch, Devi knows he’ll need to set up a new line of smartphones. He thinks through how to employ object types and subtypes to save time. Devi decides to create a Mobile Device object type that contains a layout of all the attributes and picklists common to each product, such as brand, capacity, and color. Then, he creates object subtypes called Handset and Smartwatch that inherit the common Mobile Device characteristics.
This diagram shows the flow of inheritance in three levels of object types.

In Level 2, the Mobile Device subtype inherits the attributes and fields from the Base Product object type in Level 1. It then passes this and any additional metadata down to its subtypes, Handset and Smartwatch in Level 3.
Create Products
The moment of truth! Devi creates the Infiwatch product instance and, with just a few clicks, sets it to inherit all the metadata from the Smartwatch object subtype. His new product now automatically includes the layout of attributes and picklists contained within both the parent object type, Mobile Device, and subtype of Smartwatch. He then sets a price to make the Infiwatch available to customers.
By using this object inheritance model to his advantage, Devi speeds up the product-creation process, and he can launch the new product line to market in record time. It’s easy for him to repurpose the components for future product configurations. He can even group the Infiwatch product with other offers to create bundles. Pretty cool!
TM Forum SID and Offer Realization
Your specific industry or company may employ different strategies to best organize commercial and technical products in the catalog. For instance, if you’re in the communications industry, you’ll likely align your model to TM Forum SID standards.
Under this design paradigm, you’ll create and define product specifications from object types. These reusable entities contain all of a product’s metadata, which you can use to streamline the creation of several offers with different pricing through a process known as offer realization.
Keeping It Simple
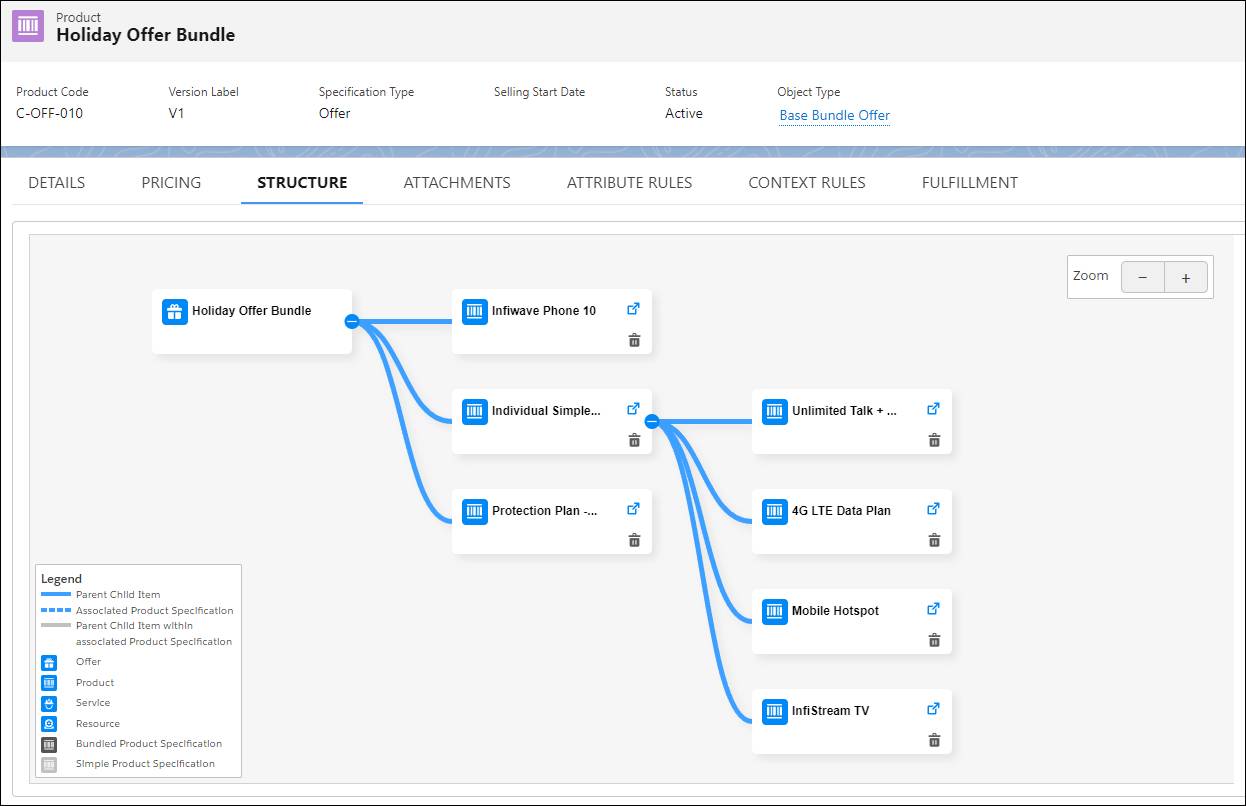
When building out his complex product configurations, Devi can keep track of how they’re composed using the Structure workspace for the product entity. This example screen shows the composition of a product, including its parent-child relationships and associations with other products, in a simple visual format.

In the example screen, Holiday Offer Bundle includes Infiwave Phone 10, Protection Plan, and Individual Simple Choice Plan bundle, which contains its own child products.
From the Structure tab, you can drag products onto the structure to quickly create relationships between them.
Also, view all the rules, attachments, and fulfillment options, such as the order management settings, associated with your product directly from its configuration screen in Product Designer.
Product Modeling
Creating a logical, manageable, and cohesive catalog of product data requires thoughtful planning. That’s where the art of product modeling comes in. Before you begin building out your catalog, you should explore data models, workflows, best practices, and customizations that are commonly used in your industry. Then brainstorm ways to use Shared Catalog to meet your company’s unique needs.
To achieve effective digital transformation, you should examine your past product models and processes in legacy systems to identify areas for improvement. Then, explore ways to use the powerful and flexible Shared Catalog components to better meet your business goals.
After Devi’s collected all the requirements, he uses this information to produce a diagram that maps all the product definitions and catalog entities to the flow of Infiwave’s business processes. This document will guide his catalog construction and make sure that all his team members are on the same page when working with Shared Catalog data.
Now that you’ve explored the offer-creation process and product modeling, let’s take a look at the powerful pricing capabilities of Shared Catalog. Use pricing components to tailor offers that align perfectly with your marketing and sales goals.