Explore Product Prices
Learning Objectives
After completing this unit, you’ll be able to:
- List the three places to view a product’s price in Enterprise Product Catalog (EPC).
- Explain how the Cart displays prices.
- Describe how to open and navigate Pricing Designer.
- Locate a price list and price list entry.
- Explain how price lists work.
A Tour of Product Pricing
Ada grabs a coffee and launches EPC to explore how pricing works. She wants to understand where pricing is stored on products, how prices are displayed in the Cart, and what a price list looks like in Pricing Designer.
In EPC, you can view a product’s price in these three places.
- In the Pricing tab of the product in Product Designer
- On the product listing in the Cart
- In its associated price list in Pricing Designer
Product Pricing in Product Designer
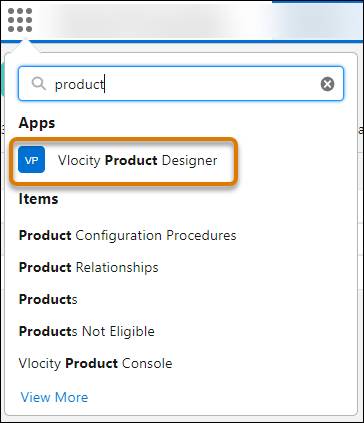
An EPC product entity contains all of the pricing information, and you can assign one or more prices directly on a product’s Pricing tab. To view a product’s price, start by searching for and selecting Vlocity Product Designer from the App Launcher.
In Product Designer, choose Products from the navigation menu. Select All Products from the Products list view. Then select a product to open its configuration screen. For example, this screen shows the DSL Modem product.

With the product now open, you can view its price.
On the Pricing tab (1), you can view all the Prices (2), Promotions & Offers (3), and Costs (4) assigned to the product. Notice the New Price button (5), which is for creating a new price list entry. There’s also a Quick Add panel (6) for assigning rules and rule sets to pricing components.
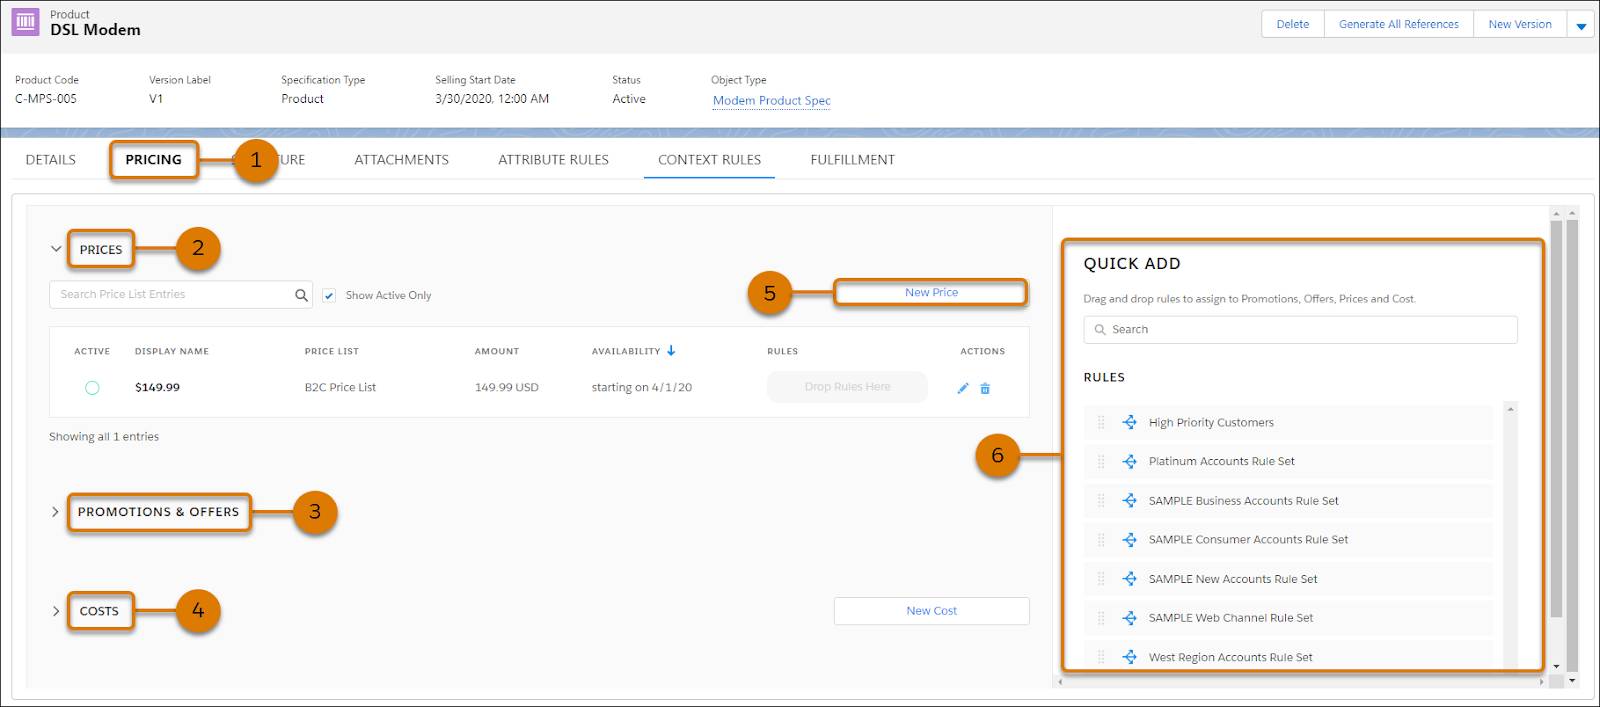
The DSL Modem product already has one price list entry.

This price entry shows an Active status (1), Display Name (2) for the price that’s visible in the Cart, the Price List (3) to which the entry belongs, the Amount (4) and currency, Availability dates (5), and any associated Rules (6) that control the price. Use Actions (7) to edit or delete the price.
As mentioned earlier, a single product may contain multiple prices. For example, Ada can include one price from a business price list and a separate price from a consumer price list for individual customers. She can also apply additional prices that are active only during certain time periods.
Product Pricing in the Industries CPQ Cart
Now that Ada’s seen where a product’s price is set on the backend, she checks how her customers and sales reps will see those prices in the Cart. Each product in the Cart shows the price list entry’s display name from the price list that’s set for the order. Products appear in the Cart only if they’re set to Active and Orderable and have an assigned and active price.
Create a test order, and set its price list to B2C. Then add the DSL Service product.
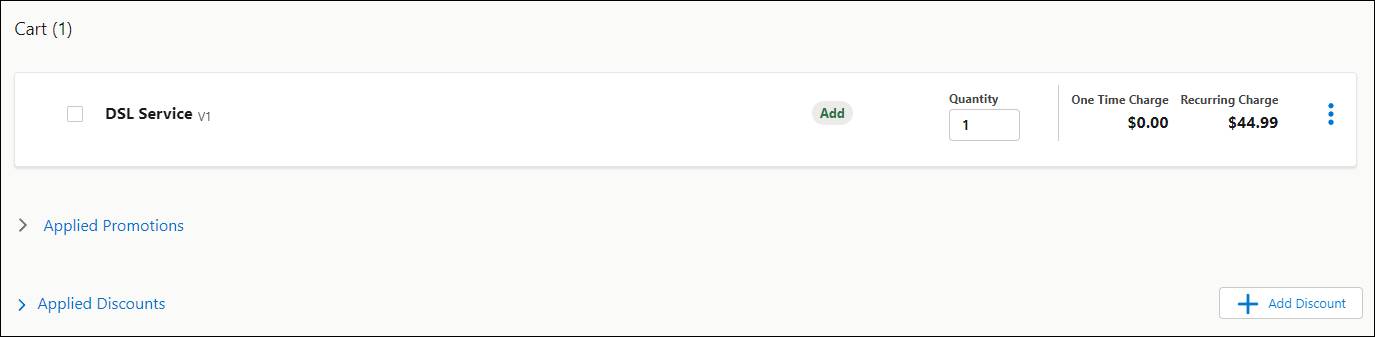
Notice the product has a one-time charge of $0.00 and a recurring charge of $44.99.
Now, find the Internet Solution product bundle in the catalog.
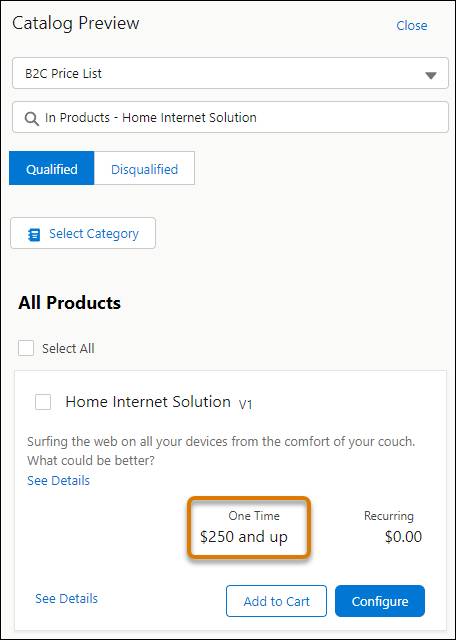
Notice that the one-time price shows “$250 and up.” Why this ambiguity? It’s because the bundle’s configuration affects the price. The bundle may contain optional or add-on products, or it can allow the customer to order more than one of a certain child item. This is why the display name of a price is so helpful: It lets you communicate a price range rather than just a fixed number.
Add the bundle to the Cart and take a look at the prices of the child products.
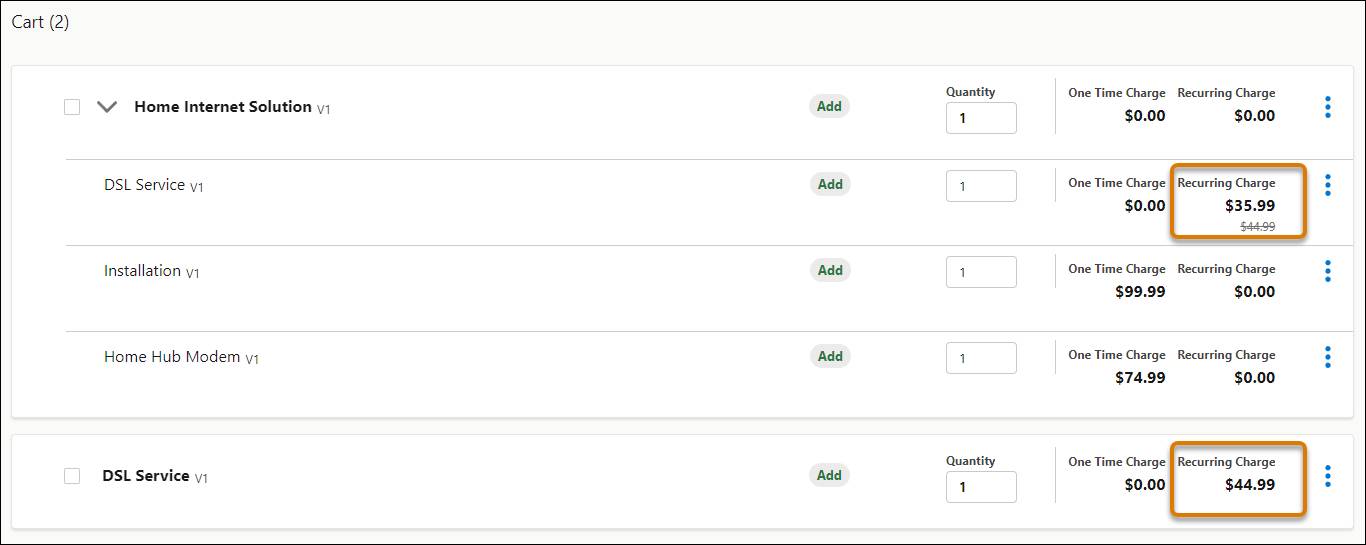
The recurring charge for the DSL Service product is $35.99 when it’s part of this bundle, but the price of the standalone, non-bundled product is still $44.99.
Next, open the DSL Service product in Product Designer to investigate. Click the Pricing tab to see exactly what’s going on.
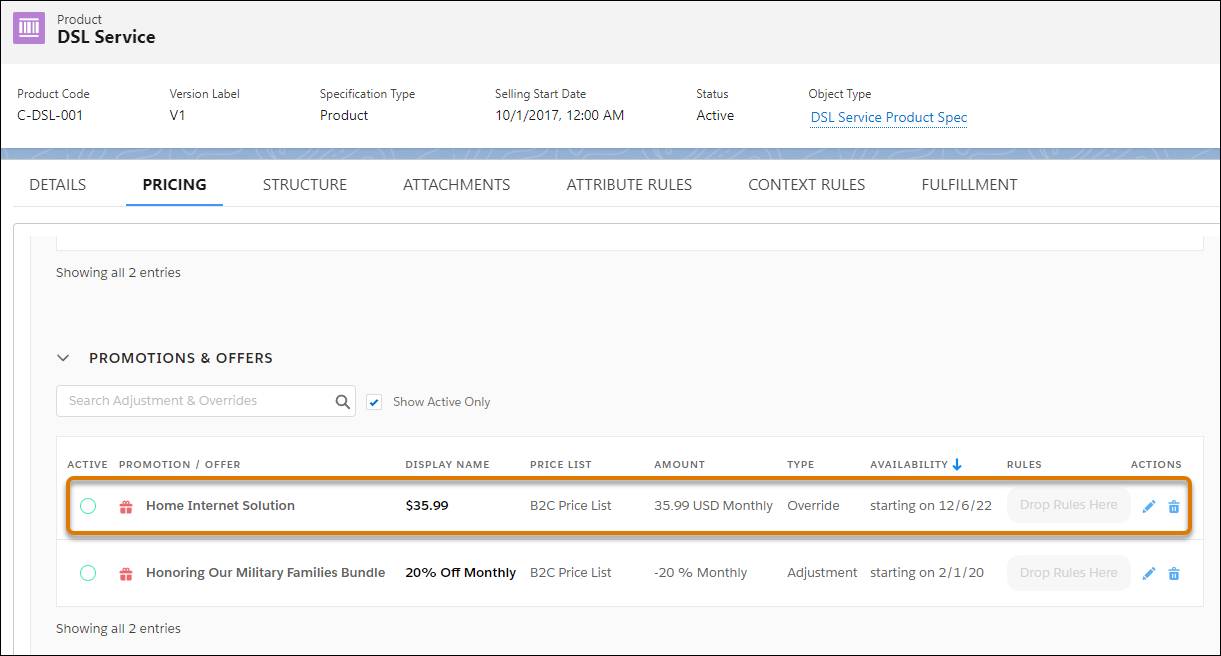
The Promotions & Offers section shows a price override of $35.99 that activates only when a customer orders the product as part of the Home Internet Solution bundle. There’s also a 20% monthly discount when it’s part of another bundle. In Shared Catalog and the Cart, you can override a price by setting a new amount, or you can adjust the price by an amount or percentage.
Product Pricing in Pricing Designer
Ada’s now ready to explore Pricing Designer, the workspace for more detailed pricing tasks, like setting up promotions, discounts, time plans, and time policies.
Open the App Launcher. Search for and select Vlocity Pricing Designer.

Use the navigation menu  to access the different Pricing Designer components and tools.

These options include price lists, pricing plans, pricing variables, time plans and policies, promotions/discounts, and the charge measurement tool.
Get started by looking at price lists.
Click PriceList from the navigation menu.
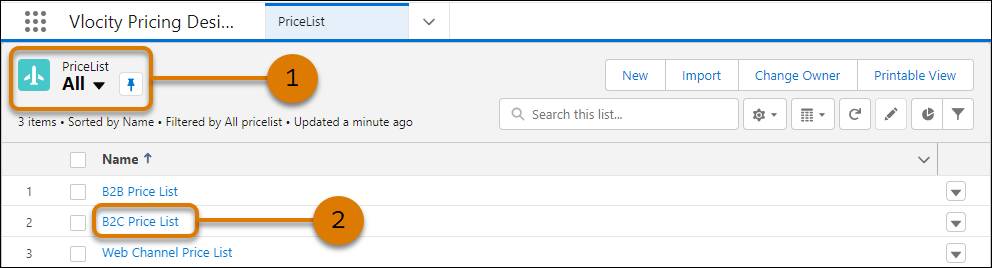
In the PriceList workspace, change the List View to show All (1). You have three different price lists: B2B Price List, B2C Price List, and Web Channel Price List. Open the B2C Price List (2).
Now you can view all the pricing components in the B2C Price List.

In the header, this price list is associated with the Standard Price Book (1), the standard Salesforce pricing component. You can select the tabs to view Charges, Costs, Pricing Elements, and Context Rules (2) that apply to the price list items.

You can refine the list of charges to Show Active Only (3), or Search (4) for a specific entry. There’s also a button to create a New Charge (5) in the price list.
In the list of charges, notice that the information for each price is similar to the entries you saw on the product Pricing tab.
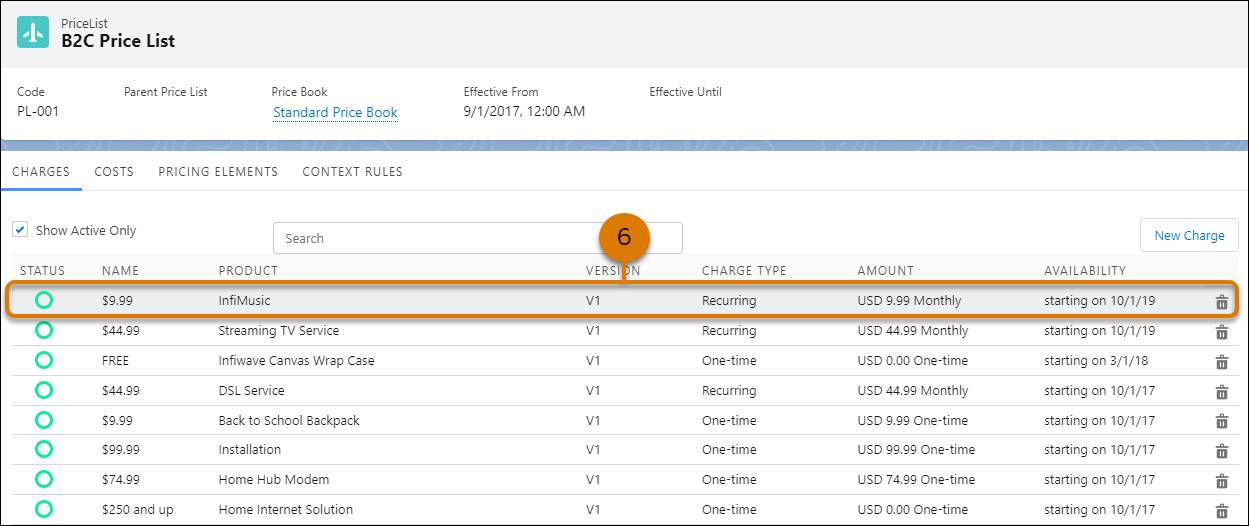
Each column shows the price Name, associated Product, Version, Charge Type, Amount, and Availability (6). Notice there’s a Status indicator, which relates to the charge’s lifecycle status, and the version number of each charge.
Click the charge associated with the DSL Service product to reveal its information and configuration options in the Edit Charge pane.

Here, you can configure the Product and Display Name for the product, or change its effectivity settings.
More About Price Lists
You just got your first glimpse of a price list in Pricing Designer. Price lists control which customers can see a specific product price in the Cart. Let’s learn a little more about how price lists work.
-
Multiple prices: Assign more than one price to a product by creating price list entries in different price lists.
-
Need-based: Create price lists based on your business needs. For example, separate customer pricing from wholesale pricing or from employee pricing.
-
Price book: Associate every price list with a price book because Salesforce requires price books. A price book is a list of products and their prices.
-
Parent and child price lists: Set up both parent and child price lists. The parent price list contains price list entries that you want to use in all its child price lists.
Child Price List
Child price lists act as containers for rules. Suppose you want to set different prices, depending on the location of the account. As shown in the table, you could write a rule that indicates the California price list applies to California customers, while the Nevada price list applies to Nevada customers.
Price List |
Cinema Channel |
Sports Channel |
|---|---|---|
B2C (parent price list) |
$9.99 |
$6.99 |
California (child price list) |
$6.49 |
$4.45 |
Nevada (child price list) |
$4.49 |
$2.45 |
Next Steps
Ada’s now learned where to view product pricing in Product Designer, Pricing Designer, and the Cart. She also has a firm understanding of how price lists work. Now it’s time to begin creating her own pricing components. In the next unit, follow along with Ada as she learns about the price-configuration process.