Work with Quotes
Learning Objectives
After completing this unit, you’ll be able to:
- Explore the spreadsheet-like quoting interface.
- Use the Transaction Line Editor to edit quote line items.
- View product and pricing information within the quote.
- Group transactions for better visibility.
A Modern Quoting Experience
CPQ simplifies working with quotes by offering an intuitive Excel-like user experience. Enjoy features like inline editing, column freezing, infinite scrolling, grouping, advanced search, filtering, and sorting. View product and pricing details, plus make instant pricing updates–all on the same platform. The days of juggling spreadsheets and complex calculations are gone.
Chris, our sales rep, can’t believe he has access to all these amazing features. Next, he delves into CPQ’s improved quoting experience.
In this unit, partner with Chris as he explores these features to simplify the quoting process and improve efficiency for EdgeMX. Time to say goodbye to quote chaos and hello to ordering!
Explore the Transaction Line Editor
For decades, businesses have relied on spreadsheets to create quotes. CPQ brings all the best features of spreadsheets into the quoting process with the improved Transaction Line Editor (TLE).

Products listed in the TLE of a quote are called quote line items. Here’s an example of the TLE interface on a quote.
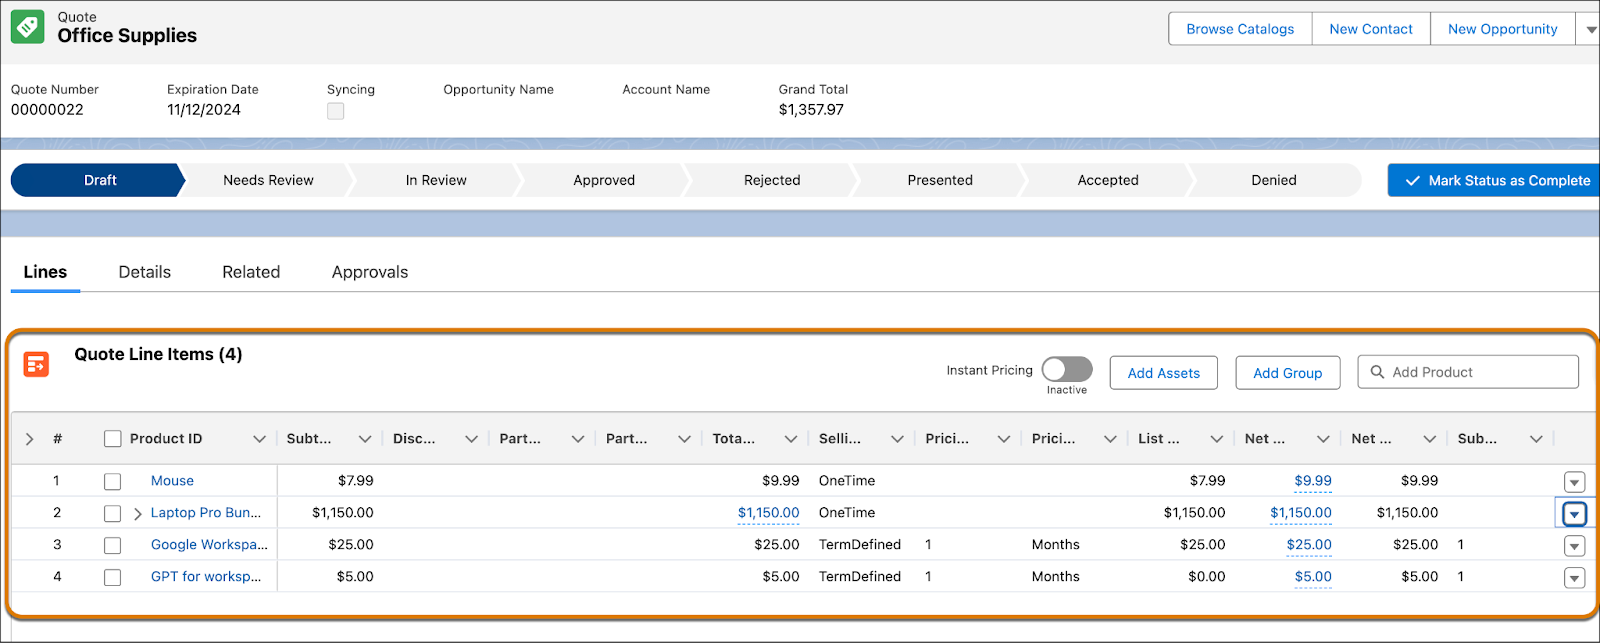
Next, learn how to use the TLE to add, edit, and price products in a quote.
In the next few sections of this unit, just read along to discover how to work with quotes. Toward the end of the unit, use your Developer Edition org to continue with hands-on practice.
Add and View Products
Need to add a product to your quote in a hurry? TLE is here to help.
The image shows the Add Product field in the TLE header.

Add products directly to your quote using the Add Product (1) field. Just enter the first three letters of the product you want to search for and press Enter. A list of products with similar names and their prices (2) is returned. Select the product you want to add to your quote.
To find out more about a product in your quote or check price details, click the product name in the quote line item. A side panel opens with all the product information, including a description, pricing details, and attributes.
Here’s an example of how this works in real time.

Use this feature to access all the product details without navigating away from your quote. No more switching tabs or windows!
Personalize the Quote Line Items Section
Using TLE, you can freeze columns, filter, search, and sort quote line items. This way you can personalize the quote as per your needs and get your job done faster. This feature is a big time-saver when working on quotes with many line items.

To freeze columns in the Quote Line Items section, select the Freeze up to this Column (1) option. This keeps the chosen column visible while you scroll through the other columns. The filter option in the TLE opens up the filter row (2) that enables you to search or filter columns to find quote line items. Use the Search Product ID (3) field to quickly search for products within the quote. Each column has a sort option (4) that lets you organize data as per your needs.
Edit Products
If you need to update the quantity of a product in your quote or apply a manual discount, use the in-line edit feature in TLE. Click the attribute you want to update in the quote line item, make your changes, and then save it.
This screen capture shows how to apply a 10% discount to the Mouse product within the quote.

To edit multiple products at the same time, select the line items, and click the attribute you want to update. Update the value, and then save your changes, as shown in this example.
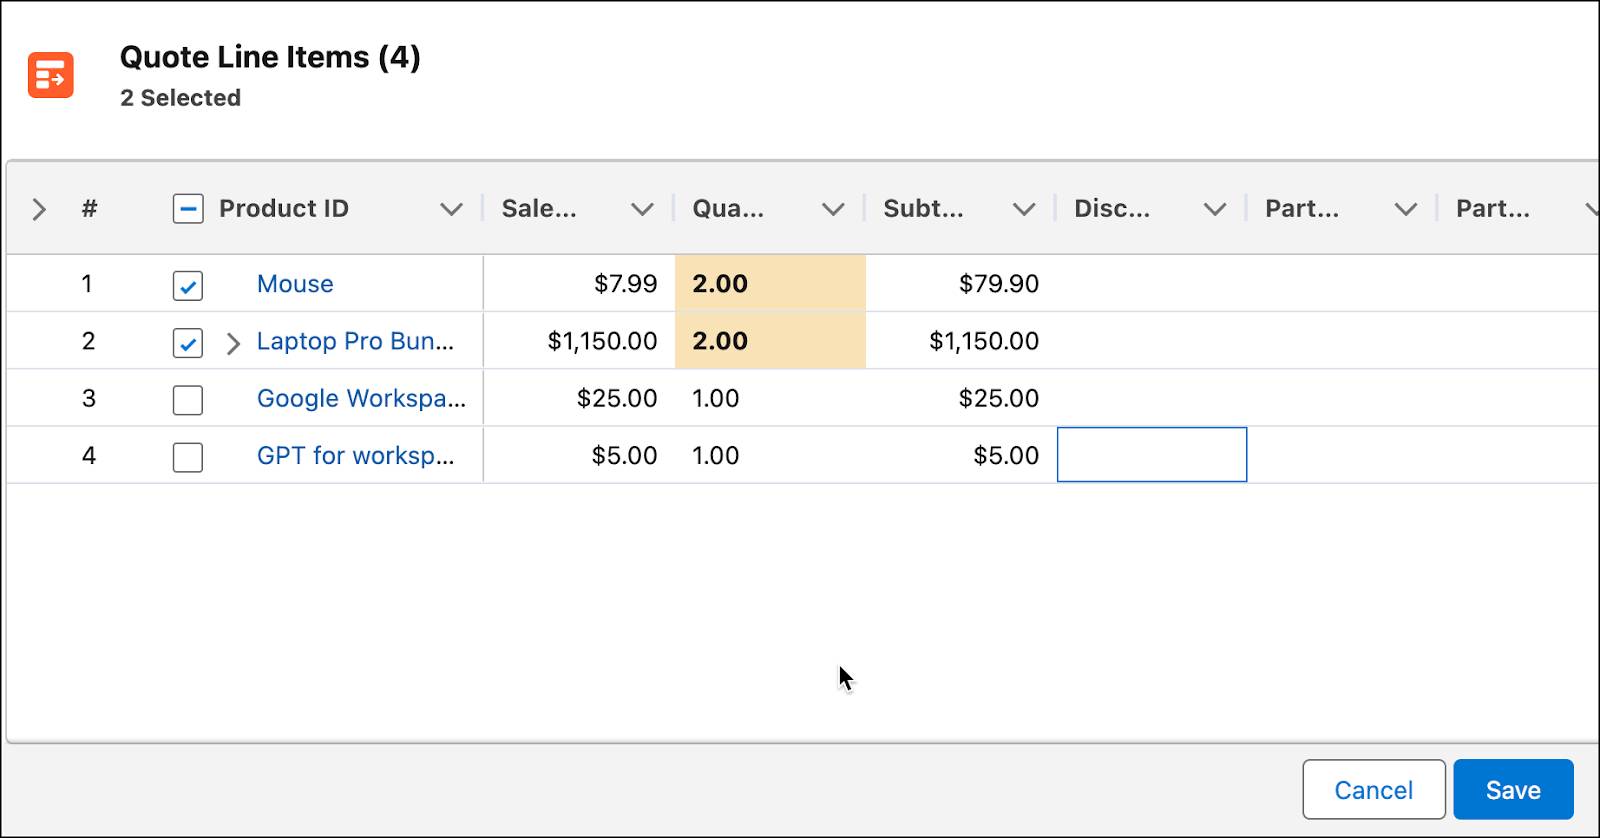
Be sure to save your changes to avoid losing your work. Unsaved changes are lost if you refresh the page or end your session.
View Pricing Information
You can quickly find prices for your products right in the Quote Line Items section. Just hover over the Net Unit Price of the product to see the price waterfall. As shown in this example, you can see price details, discounts applied, and other pricing information.

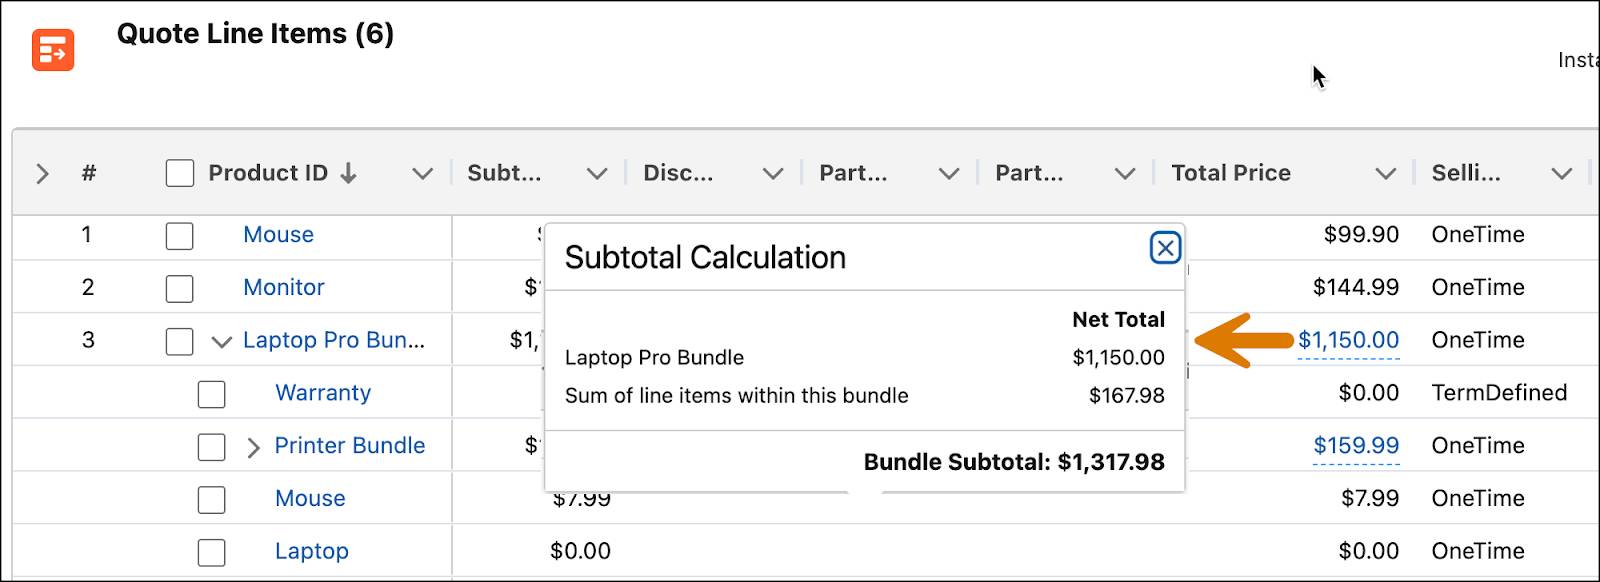
To see the price breakdown of a bundled product, hover over the Total Price of that bundle. Here you see the price of the parent product, the sum of the line items in the bundle, and the bundle subtotal.
Another important feature that CPQ gives you is derived pricing. Using derived pricing, automatically calculate product prices based on the prices of other products. Here’s an example. Say you add GPT for workspace, a derived pricing product, to your quote. The price of GPT for workspace is 20% of Google Workspace, which is the contributing product.

When you save the quote, the price of GPT for workspace automatically updates based on the price of Google Workspace. You can view the derived price of GPT for workspace in the Quote Line Items section itself.
Group Quote Line Items
Some businesses need dozens or even thousands of line items in one quote. Sales reps like Chris need a simple and intuitive way to navigate quotes like these. Customers also need a clear proposal that’s easy to understand. To make things easier for everyone, you can group line items in a quote. This feature lets you create logical groupings based on specific criteria, such as product category, customer segment, or sales region. By effectively using grouping, you can enhance the clarity and efficiency of your quotes.
There are two ways of grouping line items in a quote: Manual and Automatic.

To manually group line items, click Add Group (1). Then, edit the name and description (2) to help identify the group. Finally, select all the line items (3) that you wish to move, and click the Move Selected Lines (4) option in the group action header to move the lines.
To automatically group line items by column, navigate to the column header, and click the Group By option, as shown here.
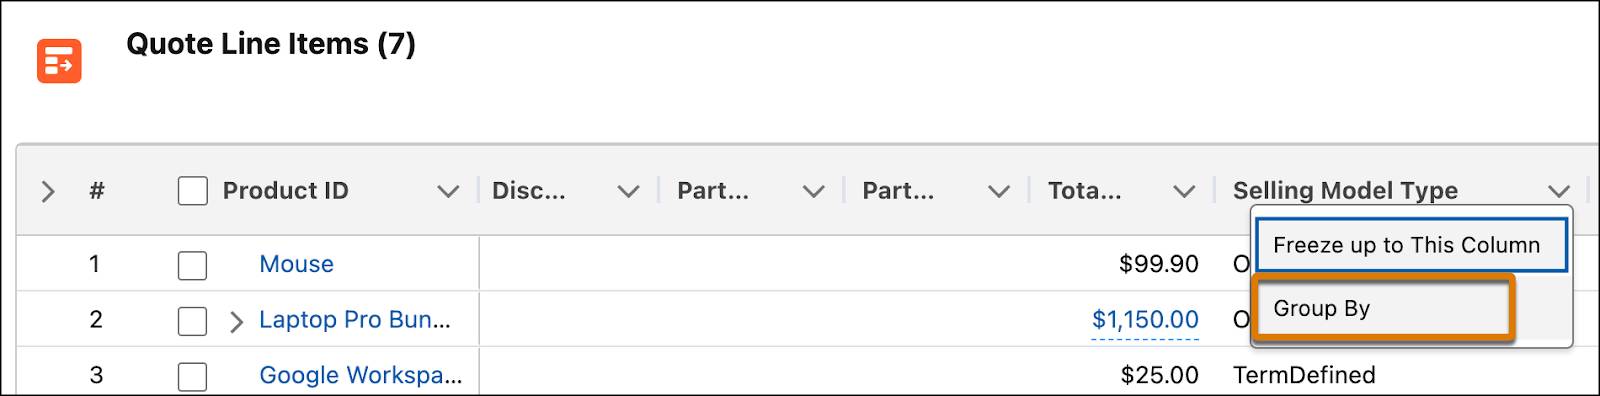
For automatic groups, a group name is already added based on the data in the column. However, you can edit the group name and description as you see fit.
To return to your default quote line view, use the Ungroup button in the TLE header.

When you ungroup the line items, remember to save your changes before grouping them again.
Quote Summary
The Quote Summary section gives you a complete pricing breakdown of your quote line items, including discounts. This calculation happens automatically using the pricing procedures set up in the system.
Here’s an example of a Quote Summary section.
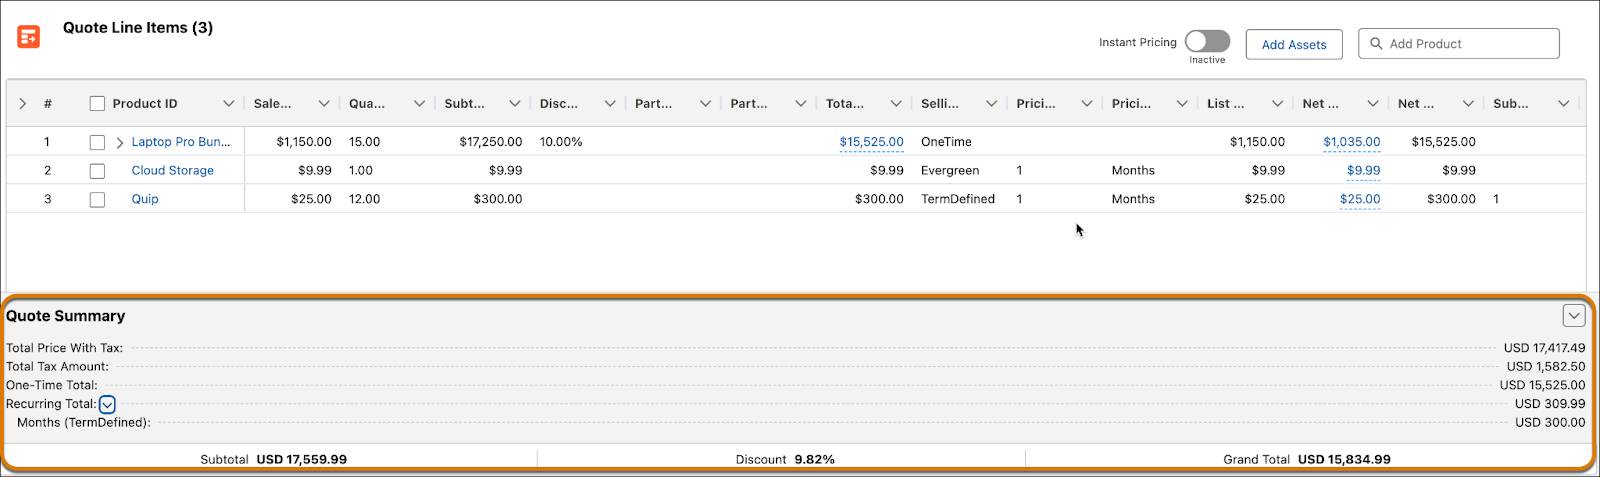
This contains pricing information, such as the Total Price, One-Time and Recurring Total, Subtotal, Discount, and Grand Total. You can also customize the Quote Summary section as per your needs.
Chris is thrilled to have access to all these amazing features. He’s ready to put his new quoting skills to work with the Office Supplies quote. Stay with him.
Update Your Quote
It’s time to open your Developer Edition Org and work on the Office Supplies quote you and Chris created in the previous unit. The quote currently looks like this.
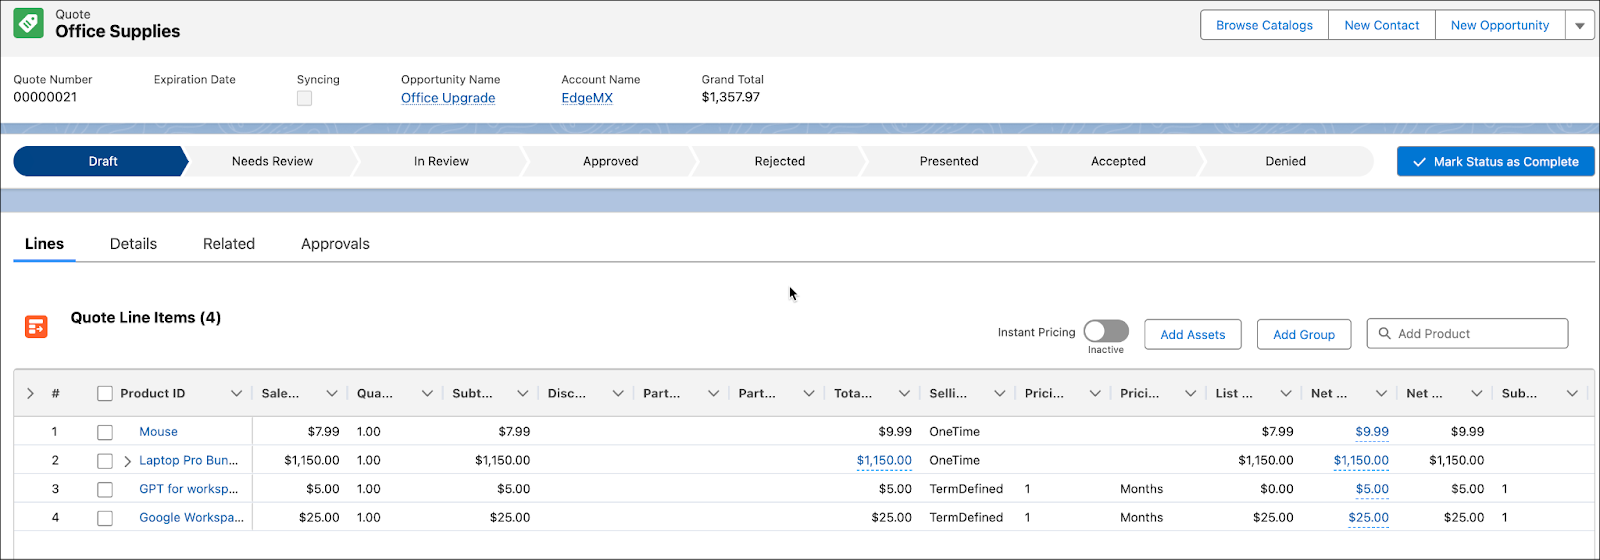
It contains four products: Mouse, Laptop Pro Bundle, Google Workspace, and GPT for workspace. Chris wants to make a few more changes to the quote before sharing it with the customer. He wants to:
- Add 10 Antivirus Products to the quote.
- Remove the Mouse product from the Laptop Pro Bundle.
- Offer a 10% discount on the Google Workspace product.
- Finally, group all products based on their Selling Model Type.
Jump right in and follow Chris’s lead in your org.
- Open the Office Supplies quote. The Lines tab shows the TLE with four quote line items.
- In the Add Product search field, type
Antivirusand press Enter.
- Select the Antivirus product from the dropdown.
- Click Save.
- Next to the Antivirus line item, double click the Quantity field, and type
10.
- Press Enter and save your changes.

You have successfully added 10 Antivirus products to your quote. Next, customize the Laptop Pro Bundle by removing the Mouse product.
- From the Laptop Pro Bundle line item action menu, click Configure. You might need to scroll right to see the action menu.
- On the configuration page, click the Accessories tab.
- Unselect the checkbox for the Mouse product.
- Click Update Prices.

- Review the updated Laptop Pro Bundle details in the Summary section.
- Click Save & Exit.
Now, apply a 10% discount to the Google Workspace product and observe how the associated derived product’s price decreases accordingly.
- Double click the Discount field on the Google Workspace line item.
- Notice a new dropdown list appears beside the Discount field.
- Select Percentage from this dropdown list.
- In the Discount field, type
10and press Enter.

- Save your changes.
The Total Price of the Google Workspace product is now discounted by 10%. Also, notice that the price of the derived product, GPT for workspace, has decreased accordingly.

Finally, group all the products in the Office Supplies quote based on their Selling Model Type.
- Click the down-arrow in the Selling Model Type column header and select Group By.

- Scroll down and review the three groups that are automatically created.
- Click Save.
Notice that the Transaction Line Table is now updated.

It’s grouped by Selling Model Type in ascending order - OneTime, TermDefined, and Evergreen. At the top of each group, you can easily view its Group Total.
With all the updates to the Office Supplies quote ready, Chris goes ahead and shares the quote with EdgeMX for review. He can also create a contract directly from the quote. You won’t do this as part of your hands-on practice, but you can learn more about creating contracts in the Deep Dive into Salesforce Contracts module.
Looking Ahead
Chris just finished a call with EdgeMX, who are impressed with the quick turnaround time for the quote. They’ve requested a few final updates, and after that, are happy for Chris to place their order.
In this unit, you learned to use the improved Transaction Line Editor to update your quote. In the next unit, you convert it to an order that you can finalize. For now, it’s time to complete the Hands-On Challenge at the end of this unit to make a few more changes to your quote.