Create a Data Processing Engine Definition
Create a DPE Definition
It’s time to create the new DPE definition and add the data source nodes, join nodes, and filter nodes. You can create a DPE definition in two ways: by adding nodes in the builder or by uploading a JSON file to the builder. For this project, you use the builder to create and define each node.
Now, access your Developer Edition org and use it to complete all the steps in this project.
- Click
 , and select Setup.
- Enter
Data Processing Enginein the Quick Find Box.
- Under Workflow Services, click Data Processing Engine.
- Click New.
- Add the following details.
- Name:
Create Transaction Journals From Orders - API Name: This field auto-populates with
Create_Transaction_Journals_From_Orders - Process Type: Loyalty
This helps you group all loyalty-related definitions.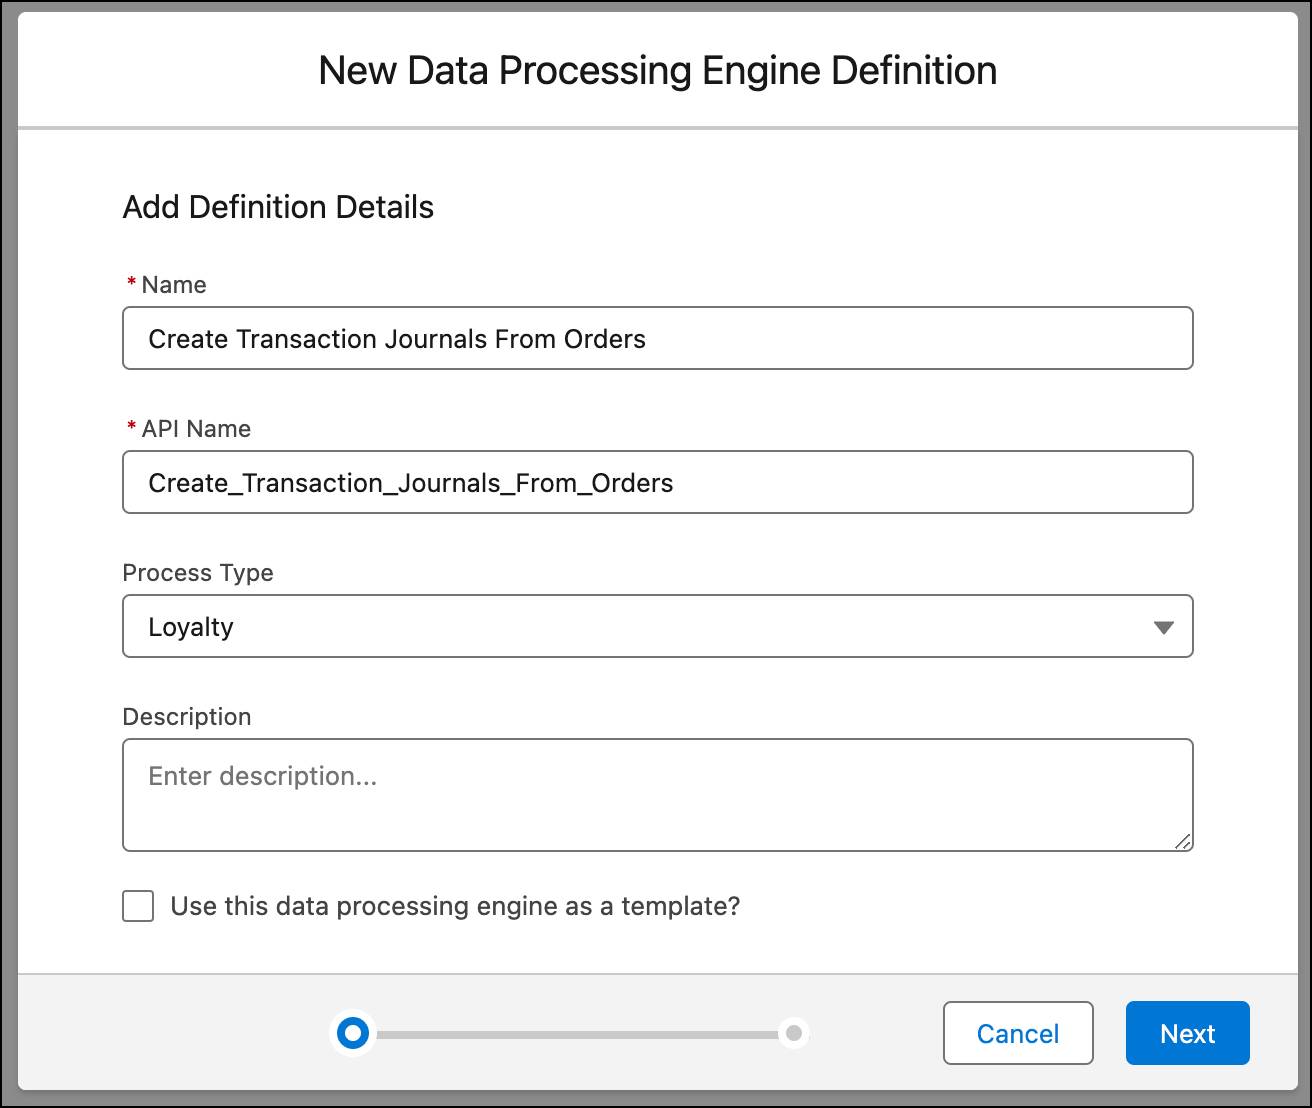
- Name:
- Click Next.
- Select CRM Analytics at the runtime platform.
- Click Done.
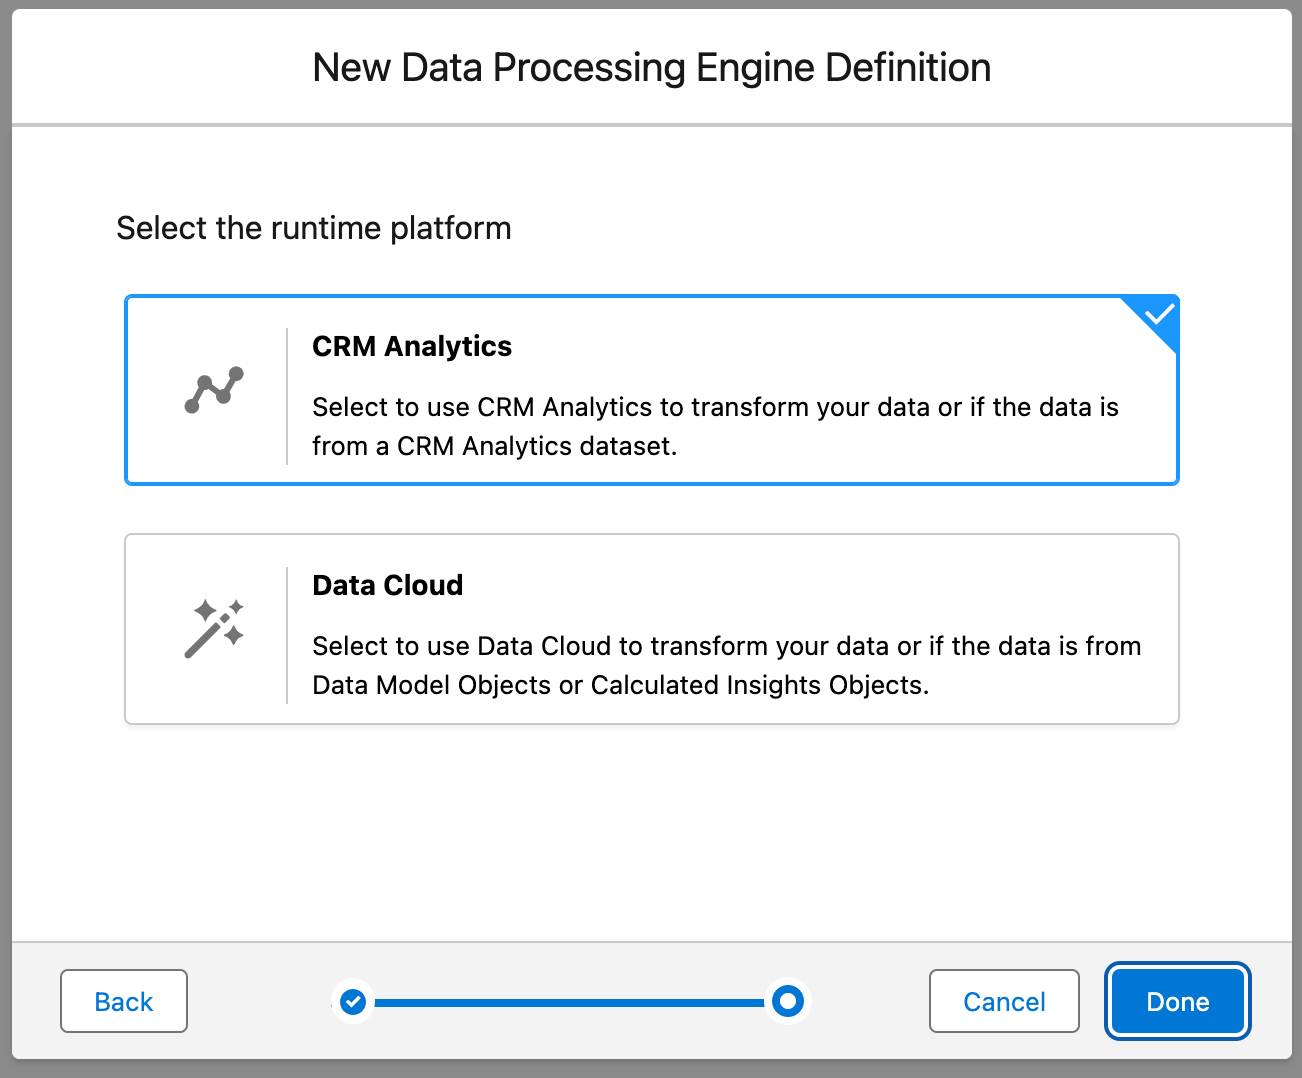
The DPE builder opens with the newly created definition. Next, Linda adds all the required nodes to this definition.
Add the Data Sources
Linda has identified three objects to use as data sources: Order, Loyalty Program Member, and Contact. She creates a data source node for each object.
Data Source: Order
The Order object contains the order amount, status, start date, account name, program partner, and more. This object has a few custom fields.
- ActivatedDate: This date field is used to filter orders after a specified date.
- Loyalty Program Partner: This field provides partner details, which the loyalty program uses to process rewards.
- Order Status Copy: The order status can be Pending or Processed. The definition only considers orders that are pending.
Here’s how to create a data source for orders.
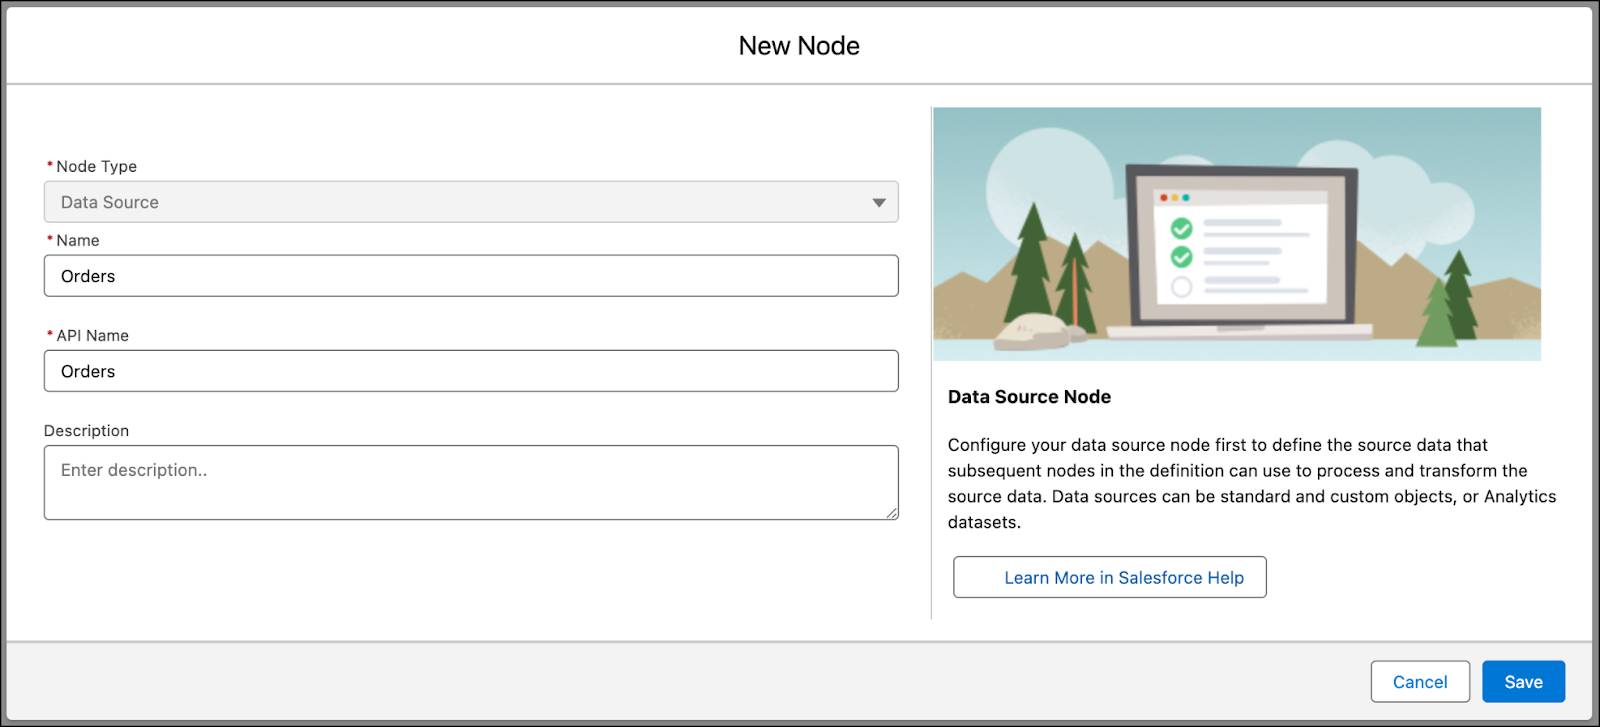
- Click New Data Source Node.
- Enter these details:
- Name:
Orders - API Name: Auto-populates with
Orders
- Name:
- Click Save.
- Select Source Object as Order.
- Click Select Fields, and select:
-
Account Name
-
Activated Date
-
ActivatedDate
-
Loyalty Program Partner
-
Order Amount
-
Order ID
-
Order Number
-
Order Start Date
-
Order Status Copy
-
Status
-
Account Name
- Change the alias for Account Name to
Order_AccountId - Change the alias for Order ID to
Order_Id
- Click Save twice.
- Save your work.
Data Source: Loyalty Program Member
Now add the Loyalty Program Member object as a data source to fetch details about program members.
- Click New Node.
- Select Node Type as Data Source.
- Enter these details:
- Name:
Loyalty Program Members - API Name: Auto-populates with
Loyalty_Program_Members
- Name:
- Click Save.
- Select Source Object as Loyalty Program Member.
- Click Select Fields, and select:
-
Contact
-
Loyalty Program
-
Loyalty Program Member ID
-
Member Status
-
Membership Number
-
Contact
- Click Save twice.
- Save your work.
Data Source: Contact
Next, add the Contact object as a third data source.
- Click New Node.
- Select Node Type as Data Source.
- Enter these details:
- Name:
Contacts - API Name: Auto-populates with
Contacts
- Name:
- Click Save.
- Select Source Object as Contact.
- Click Select Fields, and select:
-
Account Name
-
Contact
-
Contact ID
-
First Name
-
Last Name
-
Name
-
Account Name
- Click Save twice.
- Save your work.
You now have information about all orders, contacts, and loyalty program members. Next, join the information about members and contacts.
Join Program Members and Contacts
An order has customer information but not member information. To join contact and member information, use an inner join node to ensure only the matching fields from both source nodes are part of the output.
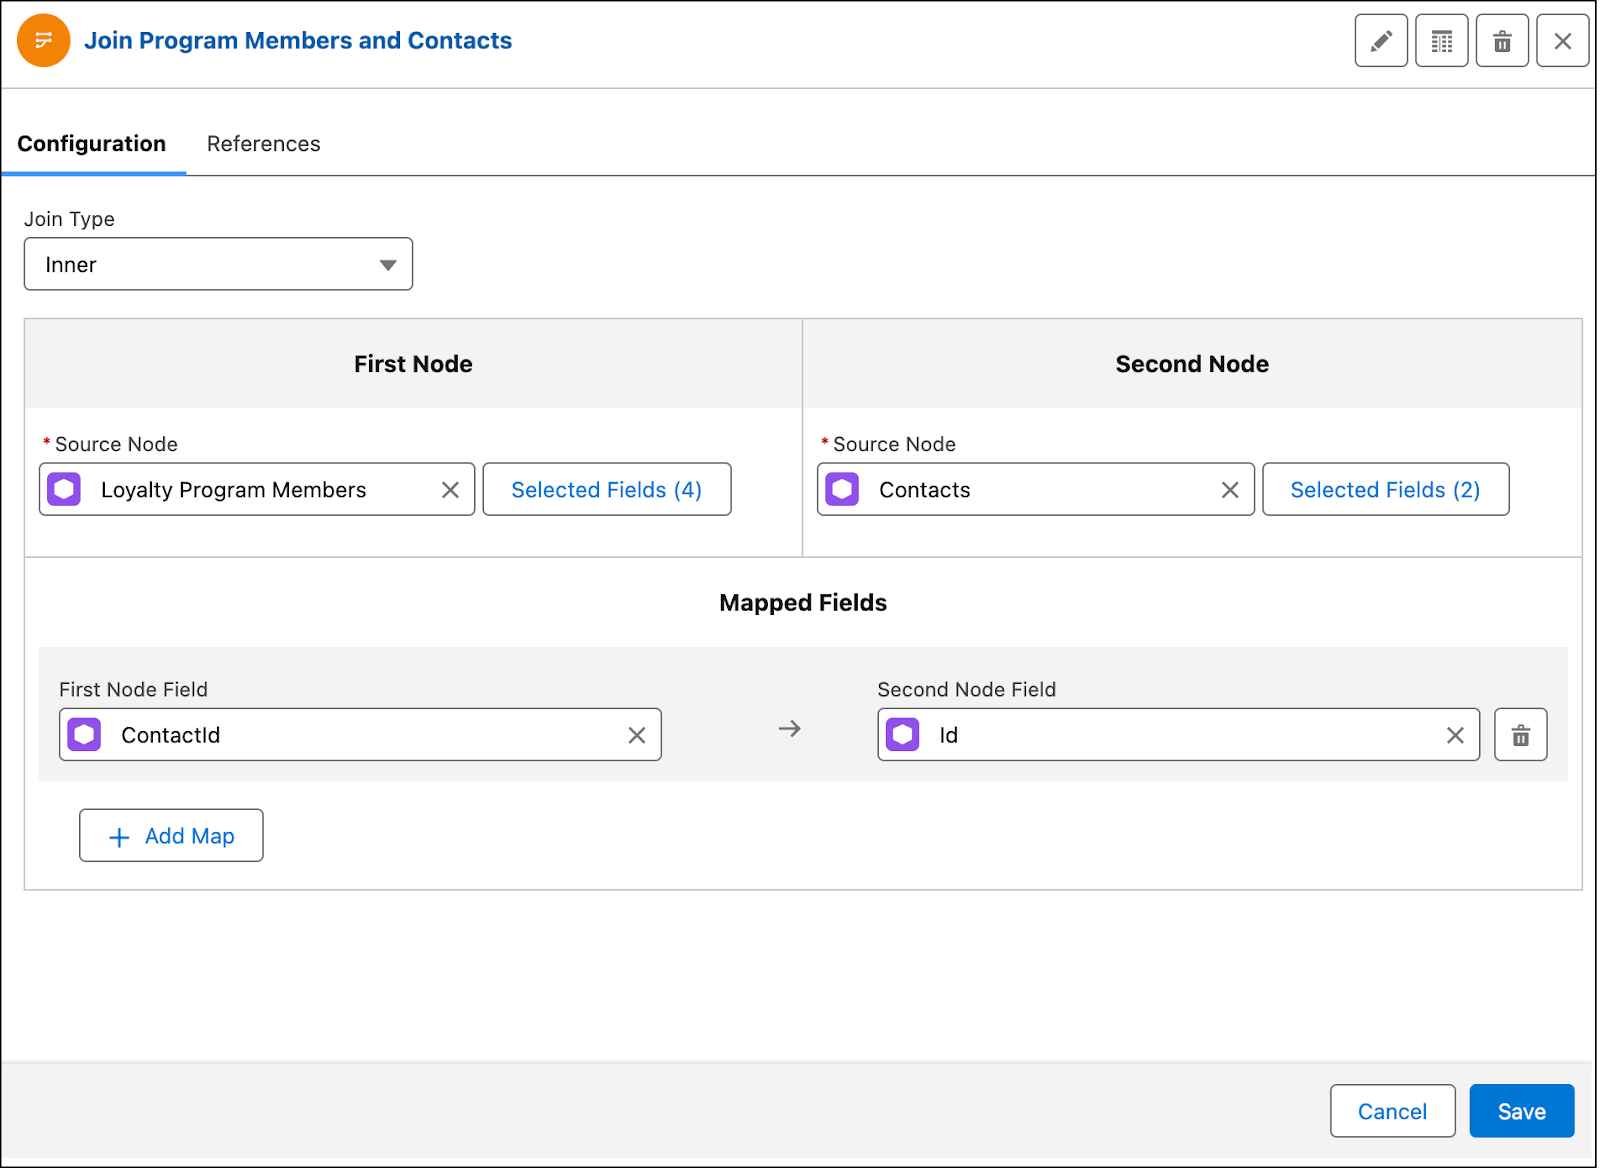
- Click New Node and add the following details.
- Node Type: Join
- Name:
Join Program Members and Contacts - API Name: Auto-populates with
Join_Program_Members_and_Contacts
- Node Type: Join
- Click Save.
- Select Join Type as Inner.
- Add the following details under First Node.
- Source Node: Loyalty Program Members
- Select the following fields:
-
Id
-
MembershipNumber
-
MemberStatus
-
ProgramId
-
Id
- Source Node: Loyalty Program Members
- Click Save.
- Add the following details under Second Node.
- Source Node: Contacts
- Select the following fields:
-
AccountId
-
Name
-
AccountId
- Source Node: Contacts
- Click Save.
- Add the following details under Mapped Fields.
- First Node Field: ContactId
- Second Node Field: Id
- First Node Field: ContactId
- Click Save.
- Save your work.
The join node provides a list of contacts and members that share the same contact ID. Next, to ensure the definition only processes active orders that are associated with active members, you create two filter nodes.
Filter Active Orders
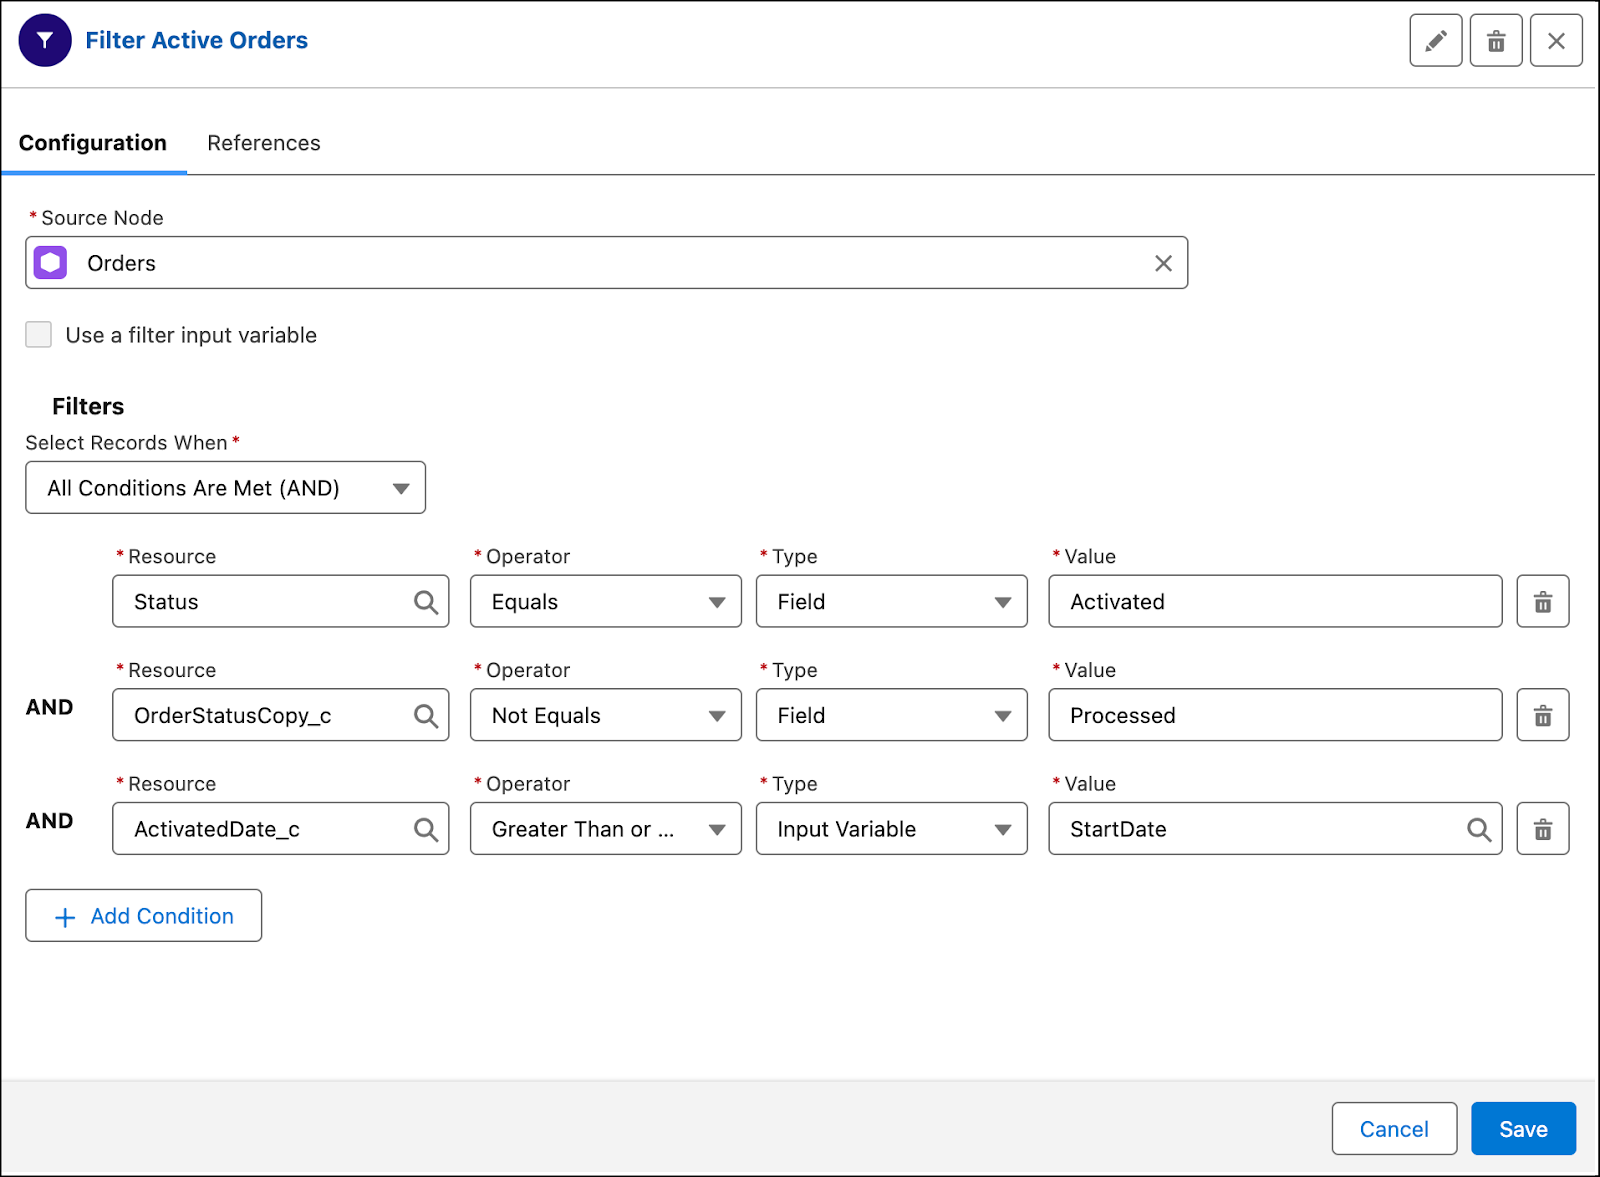
Once an order is created and ready for processing, it has an Activated status. The first filter includes only those orders where the Status is Activated and the Order Status Copy is Pending. After processing the order for loyalty rewards, the DPE definition updates the Order Status Copy to Processed.
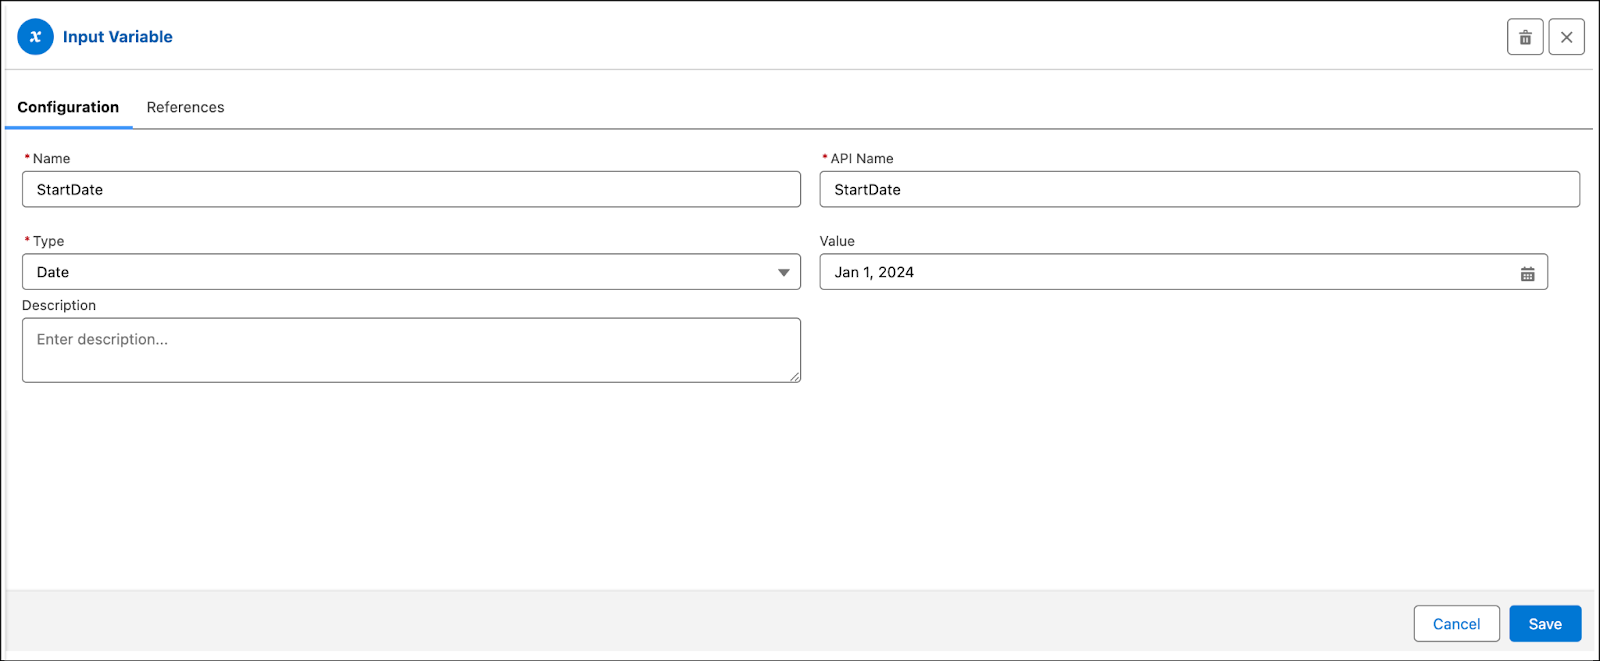
To ensure the definition picks up valid orders, create an input variable to set the order activated date as greater than or equal to the start date.
First, create the input variable.
- Click
 .
.
- Click the Input Variables tab.
- Click New Input Variable.
- Add the following details.
- Name:
StartDate
- API Name: Auto-populates with
StartDate
- Type: Date
- Value: 1st January 2024
- Name:
- Click Save.
- Save your work.
Next, create the filter.
- Click New Node and add the following details.
- Node Type: Filter
- Name:
Filter Active Orders - API Name: Auto-populates with
Filter_Active_Orders
- Node Type: Filter
- Click Save.
- Click the Filter Active Orders node and select Configure.
- Select Source Node as Orders.
- For Select Records When, ensure All Conditions Are Met (AND) is selected.
- Add the following details for the first filter condition.
- Resource: Status
- Operator: Equals
- Type: Field
- Value:
Activated
- Resource: Status
- Click Add Condition.
- Repeat steps 6 and 7 with the following details to add the second and third filters.
Resource |
Operator |
Type |
Value |
|---|---|---|---|
OrderStatusCopy_c |
Not Equals |
Field |
Processed |
ActivatedDate_c |
Greater Than or Equal |
Input Variable |
StartDate |
- Click Save.
- Save your work.
Remember, in addition to active orders, you also need a second filter node to get records for active members.
Filter Active Loyalty Program Members
Keep in mind that the active members must belong to the loyalty program. To ensure the definition filters the correct program name, you need a second input variable to fetch the name.
- Click
 .
.
- Click the Input Variables tab.
- Click New Input Variable.
- Add the following details.
- Name:
Program ID
- API Name: Auto-populates with
Program_ID
- Type: Text
- Name:
- Click Save.
Next, create the filter with two conditions.
- Click New Node and add the following details.
- Node Type: Filter
- Name:
Filter Active Loyalty Program Members - API Name: Auto-populates with
Filter_Active_Loyalty_Program_Members
- Node Type: Filter
- Click Save.
- Click the Filter Active Loyalty Program Members node and select Configure.
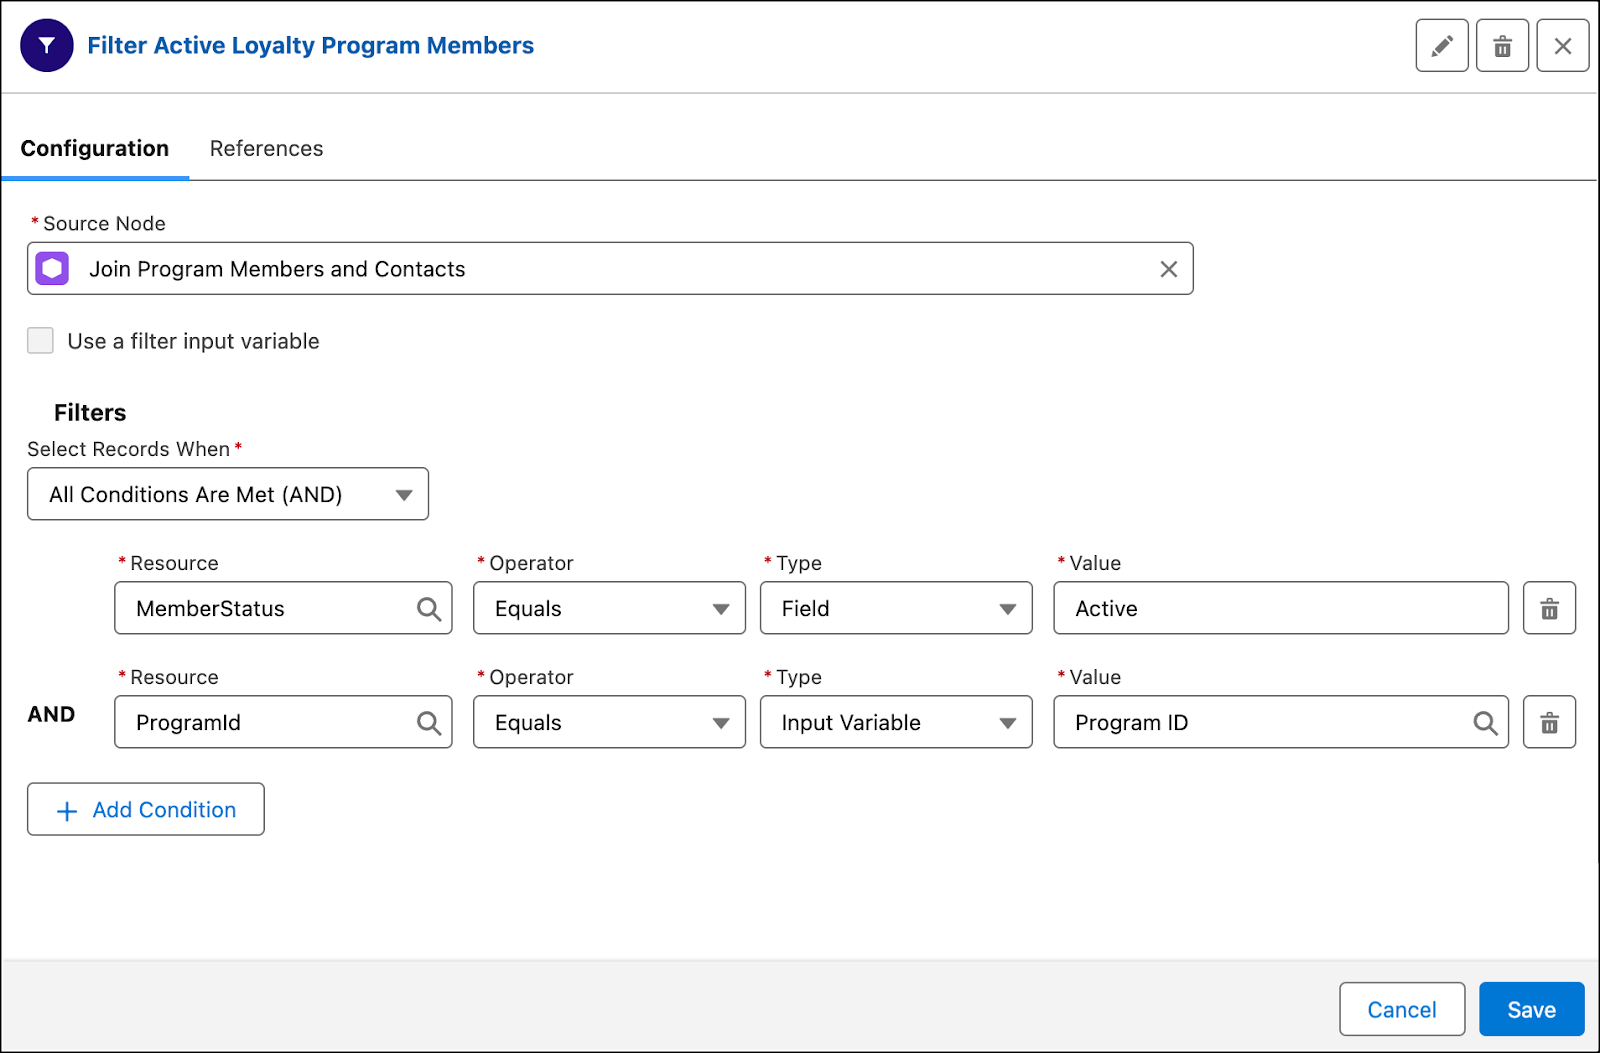
- Select Source Node as Join Program Members and Contacts.
- For Select Records When, ensure All Conditions Are Met (AND) is selected.
- Add the following details for the first filter condition.
- Resource: MemberStatus
- Operator: Equals
- Type: Field
- Value:
Active
- Resource: MemberStatus
- Click Add Condition.
- Add the following details for the second filter condition.
- Resource: ProgramId
- Operator: Equals
- Type: Input Variable
- Value: Program ID
- Resource: ProgramId
- Click Save.
- Save your work.
You’ve got the relevant program members and the orders. In the next step, you join this information.
