Gather Requirements
Learning Objectives
After completing this unit, you’ll be able to:
- Gather business requirements for your preference center.
- Explain the difference between a private domain and personalized URLs.
Custom Preference Center
Managing your subscriber's preferences is an important responsibility of marketers. And for good reason—because understanding how your customers want to hear from you (and adhering to their wishes) is the only way to build a successful, trusted relationship. It’s important to take the time to get it right.
There are a few ways to manage preferences. Before you decide on a custom preference center, check out the Personalized Email Marketing badge. In that badge, you learn about the default profile and subscription centers in Marketing Cloud Engagement, along with the benefits of creating a custom preference center. If you already know that a custom preference center is for you, then you’re in the right place. In this module, we review the requirements and steps to use CloudPages to create a preference center. Because custom preference centers are just that—custom—we cover one specific use case in this module that provides a template to help you create your ideal preference center.

Preference Center Basics
Preference management in Marketing Cloud Engagement includes two standard pages: a basic profile page that collects subscribers’ personal information and a subscription center that handles campaign-specific opt-ins. Creating a custom preference center combines these two pages into one, letting you customize it for your audience and brand. Because it’s a custom solution, you can create it to perform specific actions depending on your needs and workflow. For example, here’s a Salesforce preference center that manages employee communications.
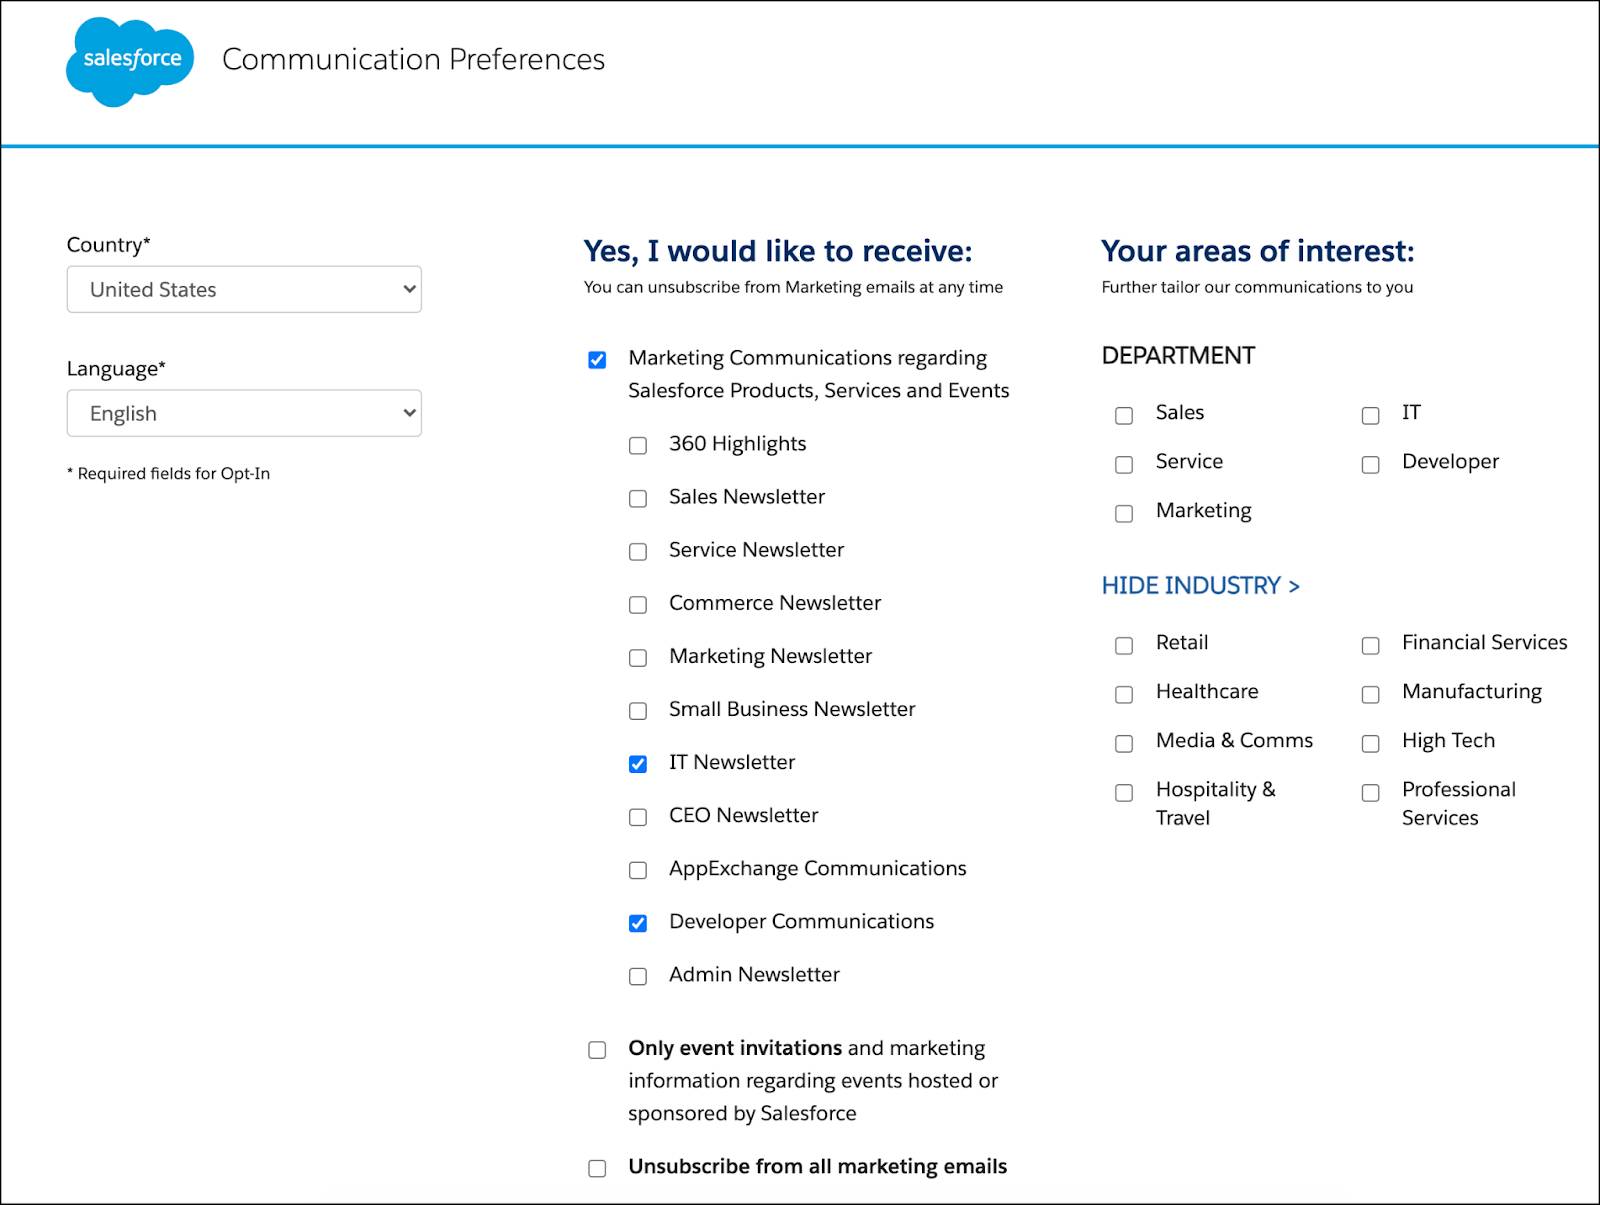
A good preference center makes it easy for subscribers to tell you exactly how they want to hear from you. This is an invaluable tool for marketers.
Gather Requirements
Before you create a custom preference center, discuss the requirements with your team. Let’s review some of the topics you should cover.
Content Considerations
Other than the compliance requirement of having a prominent and accessible unsubscribe option, the content of your preference center is up to your team. However, you shouldn’t collect data unless you plan to use it. Start by listing out everything you want to know about your customers, then narrow your focus by asking these questions.
-
What information is relevant and needed to send your campaigns? Connect each data point to a communication or strategy.
-
How do your communications benefit the customer? Clearly explain each communication and how often it’s sent.
-
Are you requesting sensitive data like a birthdate? If you collect sensitive data, clearly describe how it’s used.
Design Considerations
Next, consider the design and user experience of your page. Your preference center should be an extension of your brand and have a similar design to your emails and website. As you design your page and review requirements with your design team, consider these questions.
-
Is it mobile-friendly with large, easy-to-use buttons?
-
Is the unsubscribe button clearly visible and easy to find?
-
Is it consistent with your company branding?
-
Does it follow accessibility guidelines?
-
Does it include alt text for any graphics or images?
Process Considerations
In addition to content and design, think about how the user can unsubscribe or change communication preferences.
-
Do you want an option for a one-click unsubscribe? If so, plan to create a separate processing page for your unsubscribe confirmation.
-
Do you want to send an email confirming preference updates? If so, create a triggered email campaign.
-
What success and error messages do you need to create? Make sure that your error messages are clear and that they provide an explanation of the next steps.
-
Do you want to have an opt-down alternative along with an unsubscribe option? If so, define the cadence and how you plan to support sending fewer emails to that subscriber.
-
Is the subscriber coming to the page from an email or a website? Depending on your setup, consider the information that you have about that customer and how you can retrieve it.
Account Considerations
Finally, discuss the account-related considerations.
-
Calculate impressions based on your subscriber list. An impression is logged every time a customer visits your preference center, which impacts an account’s Super Message usage. Have questions about Super Messages? Speak with your admin or account executive for more details.
-
Obtain a private domain with SSL (Secure Socket Layer) certificate. You might also want a personalized, private domain that identifies your brand. This is especially important if your page URL is visible to customers and is accessed directly through that URL. Purchase a branded and personalized domain with SSL before you build your preference center to make sure it’s set up properly. It’s important to note that you need one SSL certificate per custom CloudPages domain.
-
Use personalized and friendly URLs. You can also use personalized and friendly URLs for your page. Personalized URLs, or PURLS, refer to the personalization of the page key (pages.cumulus.com/PAGEKEY) versus a purchased private domain (pages.cumulus.com). PURLs provide greater campaign customization, making messages more directed and relevant.
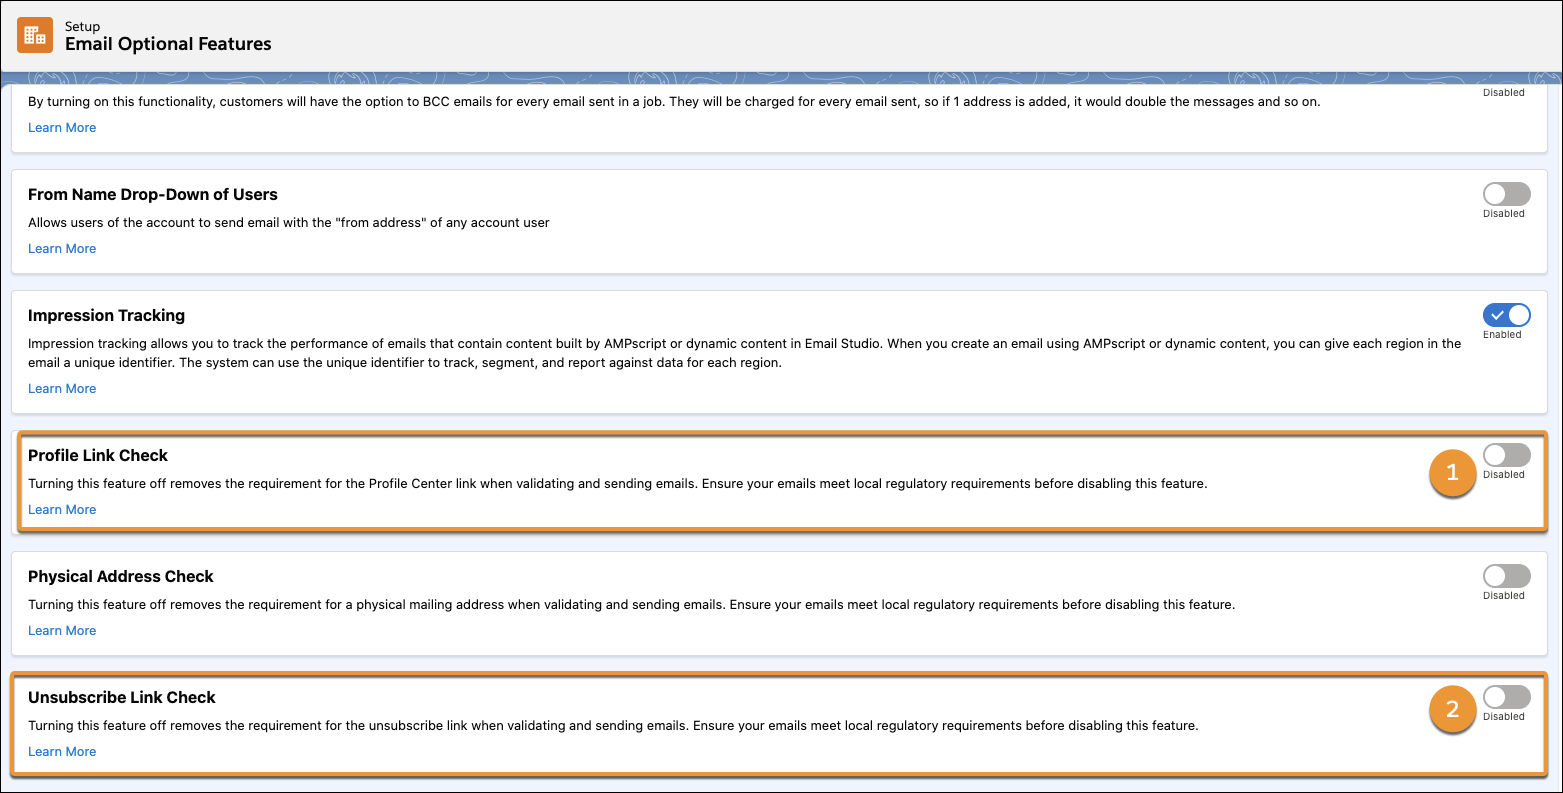
Allow Custom Links
Before you can use a custom link in your email footers, an admin needs to confirm that custom links are allowed in your account. After that, the account admin can follow these steps to turn on custom links.
- From Marketing Cloud Engagement Setup, search in the Quick Find bar for
Email Optional Features.
- Confirm that both Profile Link Check (1) and Unsubscribe Link Check (2) are turned off.
Next Up: Data Management
Now that you have an idea of your content, design, and account considerations, let’s cover the most important aspect of planning for your preference center: data management.
Resources
- Salesforce Help: Types of Data Usage in Marketing Cloud Engagement
- Trailhead: Personalized Email Marketing
- Salesforce Help: Create a Custom Preference Center
- Salesforce Help: SSL Certificates for Account Branding
- Salesforce Help: Create a Personalized URL for a Landing Page
- External: Web Content Accessibility Guide