Complete Store Visit Tasks and Sync Data
Learning Objectives
After completing this unit, you’ll be able to:
- Get information about a store from the Retail Store Cockpit.
- Edit the special instructions, status remarks, and priority of a visit.
- Perform inventory checks and custom visit tasks.
- Perform a manual data sync.
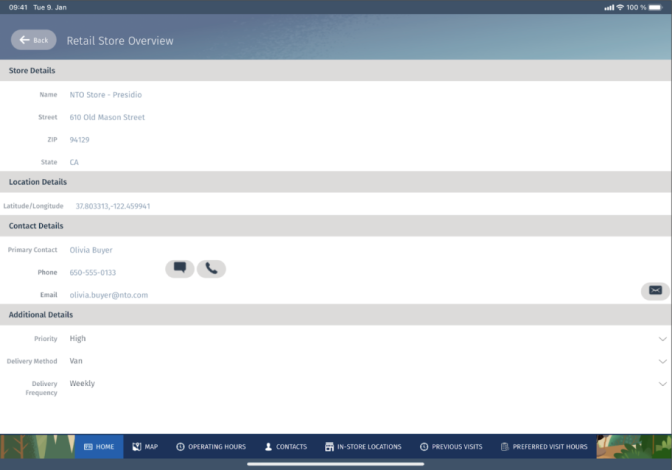
View Store Details
Chantelle is curious to learn more about the NTO Store - Presidio that she’s scheduled to visit next. She taps SHOW DETAILS in the Retail Store Info card and navigates to the Retail Store Overview page.
Here, Chantelle finds information such as:
- Name and address of the store
- Location of the store in a map
- Details of the primary contact associated with the store and additional contacts from the related account
- Additional details such as visit priority, in-store locations, operating hours, and preferred visit hours
She notices the following tabs at the bottom of the page.
- HOME
- MAP
- OPERATING HOURS
- CONTACTS
- IN-STORE LOCATIONS
- PREVIOUS VISITS
- PREFERRED VISIT HOURS
Chantelle is on the HOME tab, which appears by default when she taps SHOW DETAILS. She taps on the MAP tab to find out more. This view allows her to review store locations on the map.

Next, Chantelle taps OPERATING HOURS to view the operating hours for the NTO Store - Presidio for each date of the current week. The PREFERRED VISIT HOURS tab also displays a similar view of the preferred hours of visit for each day of the week.

Chantelle now knows when to visit the store. She wonders whom she needs to meet there. She taps CONTACTS to view the details of the primary contacts associated with the store. This is generally the store manager or the buyers. Chantelle can view their names, photos, and phone numbers.

Next, Chantelle taps IN-STORE LOCATIONS. In this view, she can see the various points of sale or locations within the store such as the main shelf or the backroom.

Lastly, Chantelle is interested to review the details of her previous visits to the store. She taps PREVIOUS VISITS and sees a historical view of all her past visits to the store with dates, times, and visit outcomes.

Edit a Visit
Thanks to all the useful information she’s gathered, Chantelle is now ready for her visit to the NTO Store - Presidio. Once she reaches the store, she notices that there’s no internet connectivity in the area. She logs on to the offline mobile app and taps on the NTO Store - Presidio visit on the Visits for today card. This takes her to the Retail Store Cockpit page.
Chantelle quickly scans the page and realizes that she needs to edit certain details associated with the visit.
She taps EDIT on the Visit Details card, and edits the special instructions, status remarks, and the priority of the visit.
Chantelle is amazed to see how easily she can do this!
Execute Visit Tasks
It’s now time for Chantelle to start her visit and record details of the visit in the offline mobile app. She taps Start Visit on the Retail Store Cockpit page.
Next, Chantelle checks the Tasks card to execute visit tasks such as inventory check and other custom assessment tasks.

When she taps the Inventory Check task on the Tasks card she sees a list of products and product categories, and the standard KPI she needs to record for the product or product category. The highest-priority KPI is listed as Standard and the other KPIs are listed as Additional. The in-store locations are displayed as tabs at the bottom of the page.

From here, Chantelle can:
- Review product KPIs and targets, categorized by in-store locations such as store, backroom, or main shelf.
- Search for a product or product category by using the name, product code, product ID, or GTIN. She can scan the barcode of a product by using the device camera.
- Filter product KPIs by category.
- Capture KPI values easily:
- Using +/- steppers for numeric KPIs.
- Using toggle for boolean KPIs.
- Tap Scan to capture images for products on the shelves and review uploaded pictures.
For numeric KPIs, in addition to the +/- steppers, Chantelle can also enter a number by using the numeric soft keyboard. This is very useful when she needs to enter a higher value. For example, to increase the target value for BigfootBar Tart Cherry/Sunflower - Paleo, 2oz bar - 6Pack to 100, Chantelle taps the product name and then taps 100 on the keyboard.

Next, Chantelle wants to perform a store check custom task. She taps the Store Check task on the Tasks card to view its details. She can see a list of KPIs, such as the number of checkouts and the overall store condition, categorized by in-store locations.

Chantelle can perform the following activities on this page.
- Review product KPIs and KPI targets.
- Enter KPI values by using +/- steppers for numeric KPIs and toggle for boolean KPIs.
- Capture images for products on the shelves and review uploaded pictures.
Chantelle captures the details for the NTO Store - Presidio and navigates back to the Retail Store Cockpit page. She is happy that her store visit has run smoothly and taps End Visit to mark the visit as complete.

Sync Data Manually
The offline mobile app synchronizes data with Salesforce automatically in the background based on the timer or on an event such as a completed visit. However, field reps have the option to trigger an explicit sync at any point in time.
Chantelle decides to manually sync her device after completing her visit to the NTO Store - Presidio. To initiate the sync, she navigates to the Sync Status card on the User Cockpit and taps  or
or , if it's the first sync of the day. When the sync is complete, the app updates the date and time of the last sync.
For more information on syncing your device, see Sync Management.
Exciting Times Ahead
Chantelle is happy with all that she has accomplished. With the offline app at her fingertips, she’ll never be out of action. She now has a clear advantage in executing her day-to-day retail activities, even when she’s offline.
Resources