Configure a Component and Upload Content Assets
Learning Objectives
After completing this unit, you’ll be able to:
- Describe how page visibility works with components.
- List three attributes that Brandon uses in his component.
- Explain why renaming a folder in the Media Manager can cause problems.
- Explain how to upload content asset files.
Make a Better Page
Brandon’s on a roll. He created a new Page Designer page, added a component, and configured who can see it and when. Now he wants to add a second component with more complexity. He also wants to understand how B2C Commerce figures out what components to display. And, he can upload some great new content assets.
Add Another Component
Brandon wants to add a second, more complicated component that displays a carousel. Here's how he adds the carousel component and then the individual tile components that the carousel displays.
- In Business Manager, click App Launcher, and select Merchant Tools | Content | Page Designer.
- Select the page: Cloud Kicks Homepage
- Click the Page Structure
 icon.
icon. 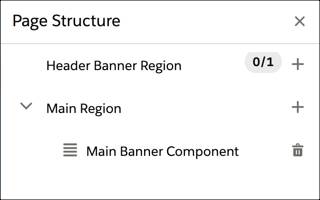
- Click the plus sign beside Main Region.
- Select Carousel in the Commerce Layouts section. Or, drag and drop the component from the Components pane. The new component appears in the right pane.
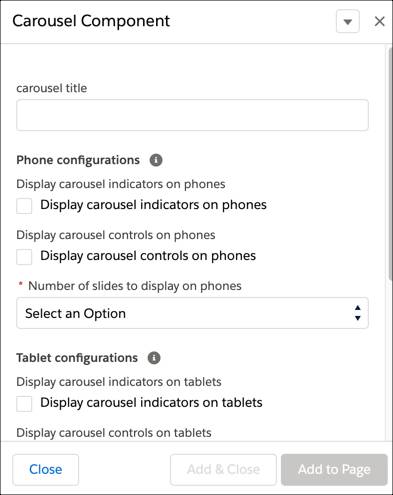
- Enter the carousel title that shows on the storefront page.
- Select the indicators, controls, and number of slides (1, 2, and 3) to show for each of the sizes: phone, tablet, and desktop.
- Add the slides for the carousel.
- Click the Page Structure
 icon.
icon. 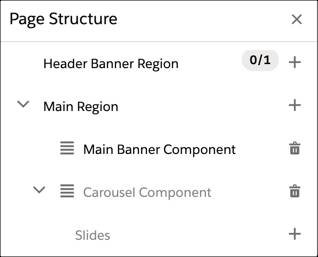
- Click the plus sign beside Slides and select the Image With Text component. This component lets you showcase multiple products. The shopper clicks the link in the tile and navigates to what you want them to see, for example, a specific product or category page.
- With this component you can:
- Select an image.
- Add a text overlay.
- Create a link to a product, category, search term, or an external site.
- Enter text that displays below the image.
- Select an image.
- After you enter or select the details for this slide, click Save. The new component displays in the center pane.
- Click the Page Structure
 icon.
icon.
- Click the plus sign beside Slides to add two more slides, because you specified three slides for the desktop view. Always add the largest number of slides that you configured for a Carousel component. That way, each slide for a view can be different.
When Brandon’s satisfied with how his page looks, he clicks Publish to make it available online.
After he creates a few pages, some of his early attempts might not be exactly what he wants. No problem! Here’s how he deletes a page.
- In Business Manager, click App Launcher, and select Merchant Tools | Content | Page Designer.
- Click the dropdown arrow for the page you want to delete, then select Delete.
How Does Visibility Work?
Brandon needs to know how Page Designer decides which components to display so he has no surprises. Page Designer starts at the top of the list in the Page Structure and checks the visibility rules for each component in turn.
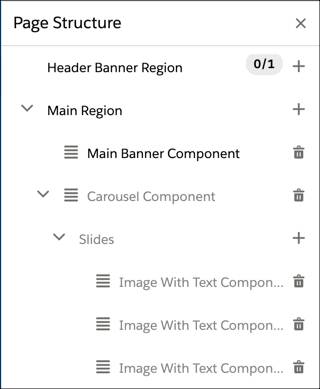
Page designers shows the first component, for example, Main Banner, that matches the customer group, date, and time rules. If it checks all the components in order and finds no match, it displays the component at the bottom of the list, for example, the third Image With Text component. In the page structure list, components that are below a component that has no rules applied to it don’t appear because the component above it with no rule is always a match.
For example, Brandon creates a homepage with five components.
- Banner1
- Carousel
- Image With Text1
- Image With Text2
- Banner 2
Brandon forgot to add rules to the Carousel component so the Image With Text components and the Banner2 component don’t appear.
You can drag the components around to change the order in which they are listed on the Page Structure window.
Manage Content Assets
Brandon wants his pages to have amazing content that highlights his awesome products. Here are the steps he takes to upload content and manage his files.
- In Business Manager, open Page Designer.
- Click the Media Manager
 icon.
icon. 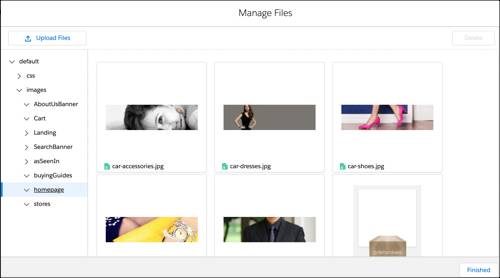
- Expand the folders to see their contents. You can upload a wide variety of file types and structure them however you want.
- Click the three dots to the right of a folder name. You can:
- Create a new folder.
- Rename the folder. Think twice about this because it unlinks the files in this folder from any pages where the files are used. Suddenly your gorgeous graphics no longer appear!
- Delete the folder.
- To upload local files:
- Select a folder to upload into.
- Click Upload Files and select the files, or drag files into the Manage Files window.
- To delete files from the content library:
- Select a file’s trash icon or select one or more files.
- Click Delete.
- Click Finished to exit the Media Manager.
Let's Sum It Up
In this unit you followed along with Brandon as he added a component to his page. In the process, you learned that each component type has its own attributes and complexities. You also learned how to upload your fabulous content assets into Page Designer.
Now you can take the quiz and earn an awesome badge!
Resources