Configure Order Management for B2C Commerce and High-Scale Processing
Learning Objectives
After completing this unit, you’ll be able to:
- Explain how to configure Order Management delivery methods for a Salesforce B2C Commerce integration.
- Explain how to set up a connection between Order Management and B2C Commerce.
- Explain how high-scale order processing works.
- List the steps you need to take to test a high-scale system.
Configuration Order Management
Linda performs these tasks to integrate Order Management with B2C Commerce.
Step |
Task |
|---|---|
1 |
Configure delivery methods in the org. |
2 |
Connect B2C Commerce to Order Management. |
3 |
Configure high-scale order processing. |
Configure Delivery Methods
Linda configures delivery methods in her Order Management org to match those in her B2C Commerce storefront. To do this, she needs a product record containing a price, and an order delivery method that references the B2C Commerce delivery ID and the product (containing the price).
She can create one product record for each delivery method or associate one product record with multiple delivery methods.

Here’s how she configures it.
First, create a product that represents a shipping method in the Salesforce org.
- From the App Launcher, find and select Products.
- Click New.
- Enter a descriptive name and product code:
UPS Ground ShippingandUPS_Ground - Select Active.
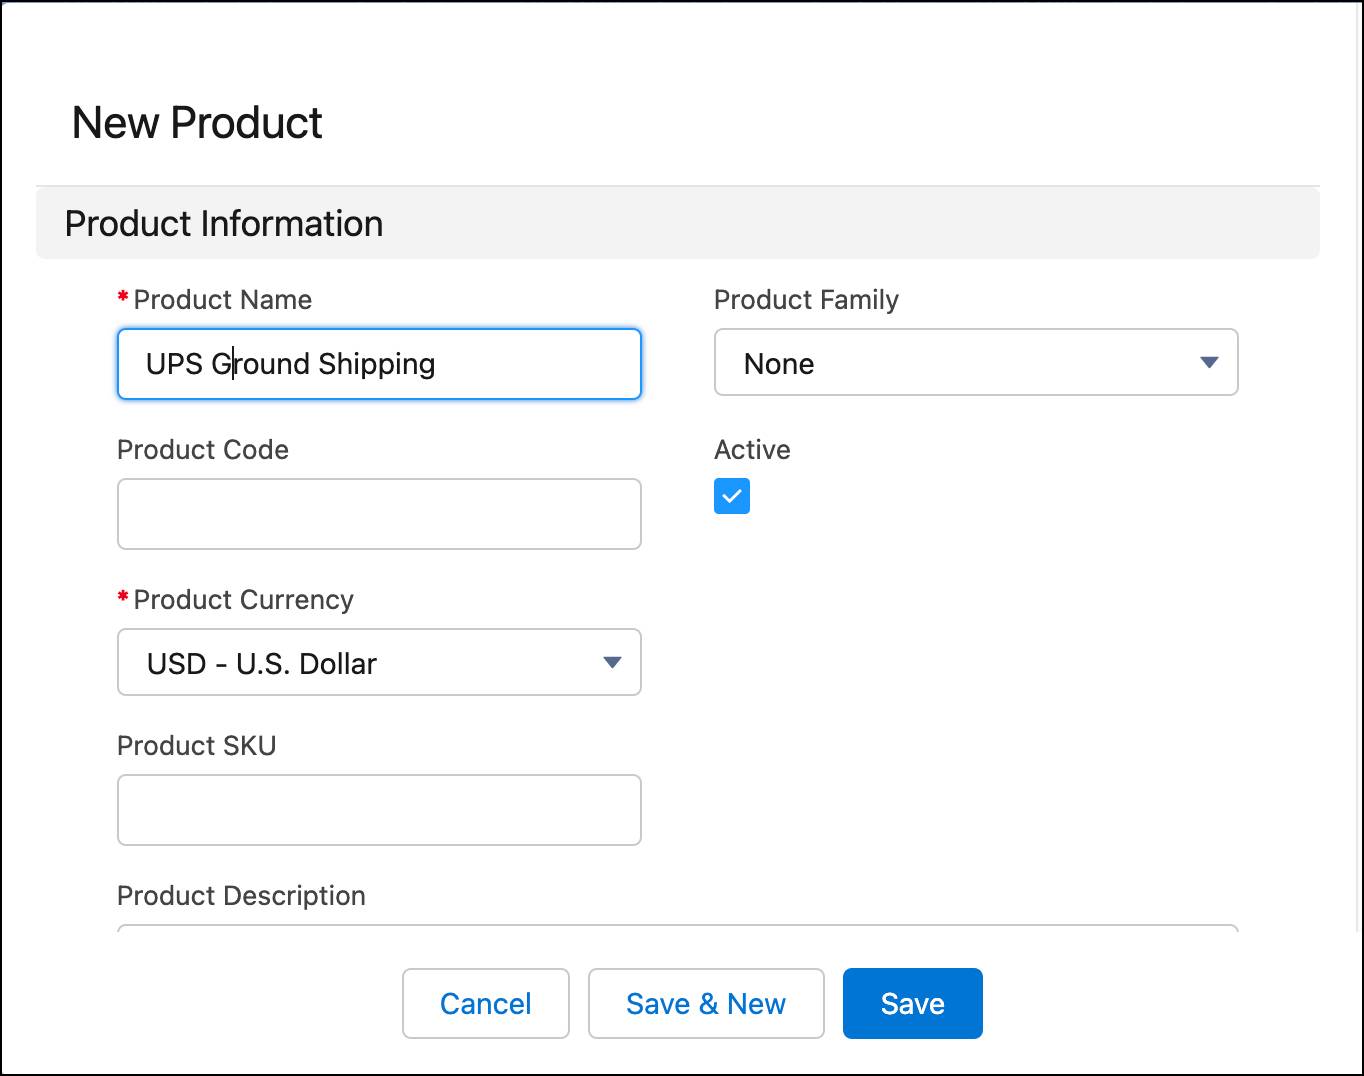
- Click Save. If the Optional Price Books feature is enabled, the product is ready and you can create an order delivery method. Otherwise, continue with these steps.
- On the new product page, select the Related tab.
- In the Price Books related list, click Add Standard Price.
- If the org has multi currency enabled, select a currency.
- In the List Price field, enter
0. If you leave this field empty, you’ll get errors when using the delivery method.
- Select Is Active.
- Click Save & New, and repeat the steps for each supported currency.
- Click Save when you are finished.
Next, create an order delivery method that corresponds to each B2C Commerce delivery method.
- From the App Launcher, find and select Order Delivery Methods.

- Click New.
- Enter a name.
- In the Reference Number field, enter the shipping method ID used in the storefront. This ID must match the value in storefront order data.
- Find and select the product that you created for the delivery method.
- Select Is Active.
- Click Save.
- Repeat the steps for each supported delivery method.
When Order Management receives an order with delivery charges, it uses the shipping method IDs included in the order to look up each delivery method. Then it adds the corresponding products to the order.
If you use B2C Commerce, the Reference Number value is the shipping method ID used in your storefront. If you set up a delivery method that’s not associated with your storefront, you don’t have to assign it a reference number. If you do assign it a reference number, make sure it doesn’t conflict with one in your B2C Commerce storefront.
Connect B2C Commerce
Setting up a connection between Order Management and B2C Commerce requires two systems and the help of Salesforce Support. Here’s how Linda configures the connection.
- In one window, open Business Manager.
- Select Administration > Global Preferences > Salesforce Order management Configuration and copy the Tenant ID.
- In another window, log into the Salesforce org as the system administrator.
- From Setup, in the Quick Find Box, enter
B2C, and select B2C Commerce Connections. If the link doesn’t appear, try logging out and back in again.
- Click New Connection.
- In the Connection Request section, enter the connection name and the B2C instance ID you copied from Business Manager.
- Click Save.
- In the Allow Tenant Linkage window, click Allow.
- Select Order Integration from the Available Connection Type box and move it to the Selected Connection Type box.
- Click Save.
- Wait to receive an email at your System Administrator email address indicating that the provisioning is complete.
- Refresh the B2C Commerce Connections page in your org.
- In the Tenant Connections section, find your connection.
- If the connection was provisioned successfully, it shows Status Provisioned.
- In Business Manager, select Administration > Global Preferences > Salesforce Order Management Integration Administration.
- Set the Integration State value to active.
- Click Save.
- Repeat these steps for each B2C Commerce instance. If provisioning fails, and the status doesn't help resolve the problem, contact Salesforce Support.
- To activate the integration:
- Log in to Business Manager.
- Select Administration > Global Preferences > Salesforce Order Management Configuration.
- Select Activate Connection.
Configure High-Scale Orders
The high-scale system for importing orders from B2C Commerce handles a lot more order volume than the regular system. Salesforce usually recommends this functionality. However, if your configuration stops the automated order creation process to add additional data or formatting before creating order summaries, you can’t use it.
Enable High-Scale Processing
High-scale processing uses an internal data service called Zero Object Service (ZOS). ZOS is an internal microservice for high-volume, low-latency multitenant data storage and retrieval. That means it handles a lot of data. It also acts as a buffer for storefront order data that would otherwise overwhelm Order Management processing. Order data is first stored in ZOS, which can accept it at a much higher rate than the regular integration. ZOS sends the data asynchronously to Order Management, which creates order summaries and processes the orders at a slower–but still fast!–rate.
High-scale processing can handle these order volumes.
- Orders placed—5,000 per minute
- Orders ingested into Order Management—2,500 per minute
- Orders routed for 200 locations—2,000 per minute
- Orders routed for 500 locations—1,500 per minute
Here’s how Linda enables high-scale order processing.
- Open your org.
- From Setup, in the Quick Find box, enter
Order Management, and select Order Management.
- Turn on High Scale Orders.
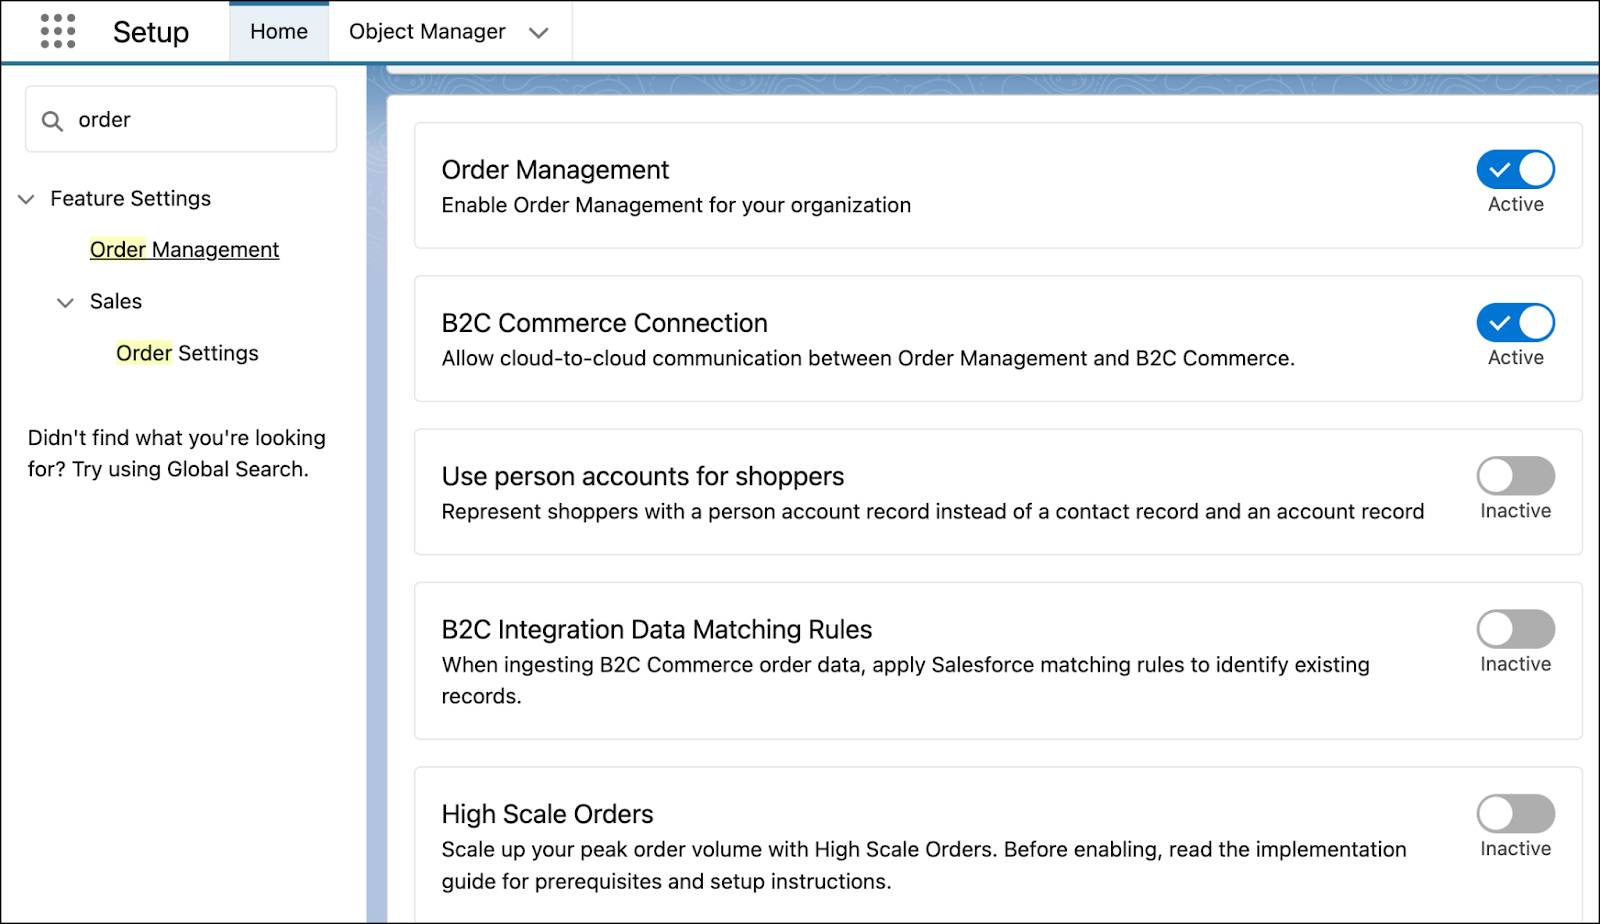
High-scale orders don't use the standard Create Order Summary flow. If all your orders are from channels where high-scale processing is enabled, don’t enable the standard Create Order Summary flow.
If you have some orders coming from channels where high-scale processing is enabled and some from channels where it isn’t, you can modify the Create Order Summary flow to only process the latter.
Configure Your Org to Use Pending Order Summaries
To manage the movement of order data from your storefront to Order Management, the high-scale system uses the Pending Order Summary object. Order Management processes pending order summaries asynchronously to generate order summaries.
Here’s how Linda configures her org for that.
- Enable orders without price books, which are required for the high-scale system.
- From Setup, in the Quick Find Box, enter
Order Settings, and select Order Settings.
- Select Enable Optional Price Books for Orders.

- Click Save.
- Edit the Account object page layout.
- From the Object Manager, enter
Accountin the search box.
- Select Account | Page Layouts | Account Layout.
- In the Account Layout section, select Related Lists, and drag Pending Order Summaries to the Related Lists section.
- Edit the Contact object page layout.
- From the Object Manager, enter
Contactin the search box.
- Select Contact | Page Layouts | Contact Layout.
- In the Contact Layout section, select Related Lists, and drag Pending Order Summaries to the Related Lists section.
Here’s how to give the custom permission set access.
- From Setup, in the Quick Find Box, enter
Permission Sets, and select the custom permission set. The permission set must have the Lightning Order Management User permission set license.
- Select Object Settings.
- Select Pending Order Summaries, and click Edit.
- Select Read and Delete and Save.
- Select Object Settings.
- Select Pending Order Summary Processed Event, and click Edit.
- Select Read and Create and Save.
Modify the Create Order Summary Flow
Linda wants to enable the Create Order Summary flow, so that before Order Management processes an order, it checks if high-scale processing is enabled. She asks a developer to create an Apex invocable method that queries the pref value for high-scale processing using the tooling API. Here’s an example:
/services/data/v56.0/tooling/query?q=Select+IsHighScaleOrdersEnabled+From+OrderManagementSettings
- If high-scale processing is enabled, the flow exits.
- If high-scale processing isn’t enabled, the flow creates the order summary.
Test the High-Scale System
To make sure the high-scale system is working correctly, Linda submits test orders and verifies that Order Management ingests them within a few minutes. Here’s how she does it.
- In Business Manager, go to Merchant Tools > Ordering > Orders.
- In the Order Management column, locate the order, which should have an Accepted label.
- In your Order Management org, search for the order summary and related records, and verify that they exist.
- If you get an error, or order summaries aren’t created, open a case with Salesforce Support.
Next Steps
In this unit, you learned how to configure Order Management with B2C Commerce and high-scale order processing. Next, learn how to configure Order Management access and permissions.
Resources
- Salesforce Help: Manage Multiple Currencies
- Salesforce Help: Tailor Business Processes to Different Users Using Record Types
- Salesforce Help: Enable Orders Without Price Books
- Salesforce Help: Organization-Wide Sharing Defaults
- Salesforce Help: Guidelines for Creating Products