Make Data Flow Both Ways
Learning Objective
After completing this unit, you’ll be able to:
- Set up Salesforce Change Data Capture (CDC) and Platform Events to automatically send Salesforce data to AppFlow.
- Set up a flow to send data from Amazon Simple Storage Service (Amazon S3) to Salesforce.
To have Salesforce send data to AWS automatically, you enable change data capture (CDC) in Salesforce and platform events in AppFlow during the flow creation process. This is done with simple clicks. First, head to your Salesforce org.
Enable Change Data Capture in Salesforce
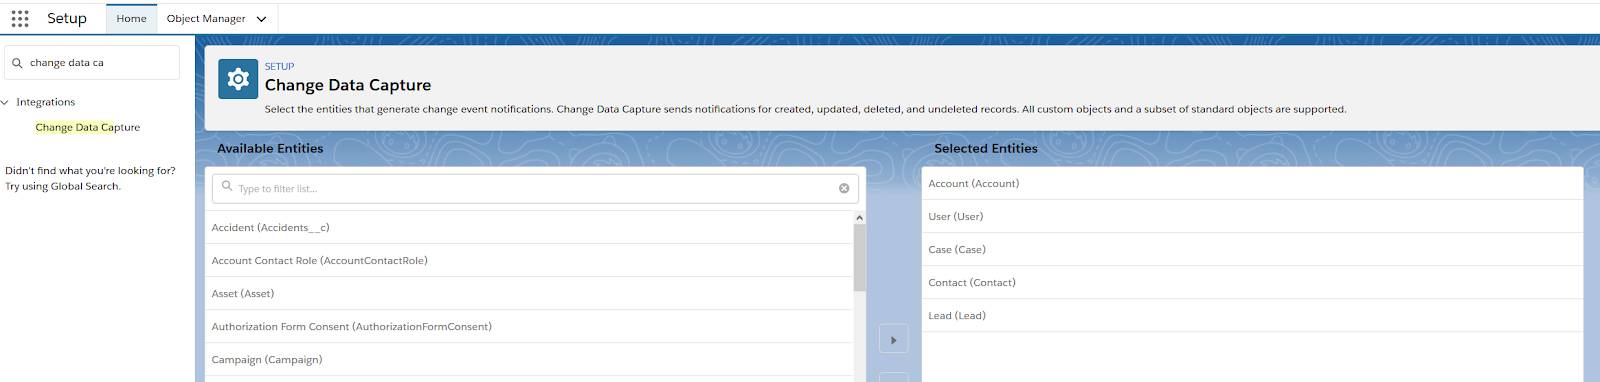
- In Salesforce, click
 and select Setup.
 - Enter
change data capturein Quick Find, then click Change Data Capture. - Select the object or objects that you want to generate change event notifications for, and move them right into the Selected Entities column.
- Then, click Save.
The first half is done. Now on to Amazon AppFlow.
Set Up the Event Trigger in AppFlow
- From AWS Management Console, enter
AppFlowin the Find Services field. - Click Amazon AppFlow.
- After that, click Create flow.
Create a new flow following the steps described in the second unit. Recall when you choose the Source, you have to select Salesforce events, and pick the Salesforce Event Name from the drop down. When you get to the Flow trigger page, there’s multiple options (run on demand, run on schedule, or run flow on event). When you use CDC to send object data to AWS whenever there’s a change, choose Run flow on event.
With CDC and event triggers enabled, Salesforce sends new data to AWS when you:
- Create a new record.
- Change field data.
You can monitor these events in Amazon AppFlow under the Run history tab.
Note, as you also map the fields during the flow creation process, Salesforce only sends data for those specific fields whenever the event is triggered.
Transfer Data from AWS to Salesforce
Now, let’s look at data flowing the other way—from AWS to Salesforce. You can pick from the variety of Sources available including a different Salesforce instance, or select Amazon S3. There are several things you need to do to prepare.
- The first thing you do is create a S3 bucket if you haven’t already.
- Then, within that bucket, create a folder.
- Next, create a CSV file mapping to the Salesforce object you’re updating and upload it into S3.
Create a CSV from Amazon S3
Best practices to follow when creating your CSV:
- The CSV file must include a header row with the field names that map to fields in Salesforce. For example, let’s say you want to insert new Contact records or update existing Contact records in Salesforce. Create a CSV file with a header that includes Contact ID, Contact Name, Contact Email, and any other field that you want to insert or update in Salesforce.
- Each line after the header should include the record ID you want to insert or update. In the following example, the first line contains the headers and includes the following field names–UniqueID, Last Name, First Name, Company, Title, Email, Owner ID, and AccountID. The second line contains values that are used to update an existing contact record in Salesforce with ID 0036g00000l3laiAAA. For new records, the UniqueID should be blank.
![]()
Create a Flow with Amazon S3 as the Source
- From AWS Management Console, enter
AppFlowin the Find Services field then click Amazon AppFlow. - Then, click Create flow. When you get to the Configure flow page, you follow similar steps to the flow you created earlier in this module.
- Give the flow a name and enter a description, then click Next.
- Select Amazon S3 as the source in the dropdown list and select the bucket you just created.
- Enter the name of the folder you created in the Enter bucket prefix field.
- Select Salesforce as the destination. You are prompted to log in with your Salesforce credentials. Once you have successfully logged in, you’re redirected to AppFlow.
- Select the Salesforce object that you want to update and click next.
You have three options to update Salesforce.
- Insert new records. When you select this setting, Amazon AppFlow inserts your CSV data into the chosen Salesforce object as a new record. This is the default option.
- Update existing records. When you select this setting, Amazon AppFlow uses your source data to update existing records in Salesforce. For every source record, Amazon AppFlow looks for a matching record in Salesforce based on your criteria. You can specify matching criteria on the Map data fields page. When a matching record is found, Amazon AppFlow updates the record in Salesforce. If no matching record is found, Amazon AppFlow ignores the record or fails the flow according to your chosen error handling option. You can specify your error handling preferences on the Configure flow page.
- Upsert records. When you select this setting, Amazon AppFlow performs an upsert operation in Salesforce. For every source record, Amazon AppFlow looks for a matching record in Salesforce based on your criteria. When a matching record is found, Amazon AppFlow updates the record in Salesforce. If no matching record is found, Amazon AppFlow inserts the data as a new record.
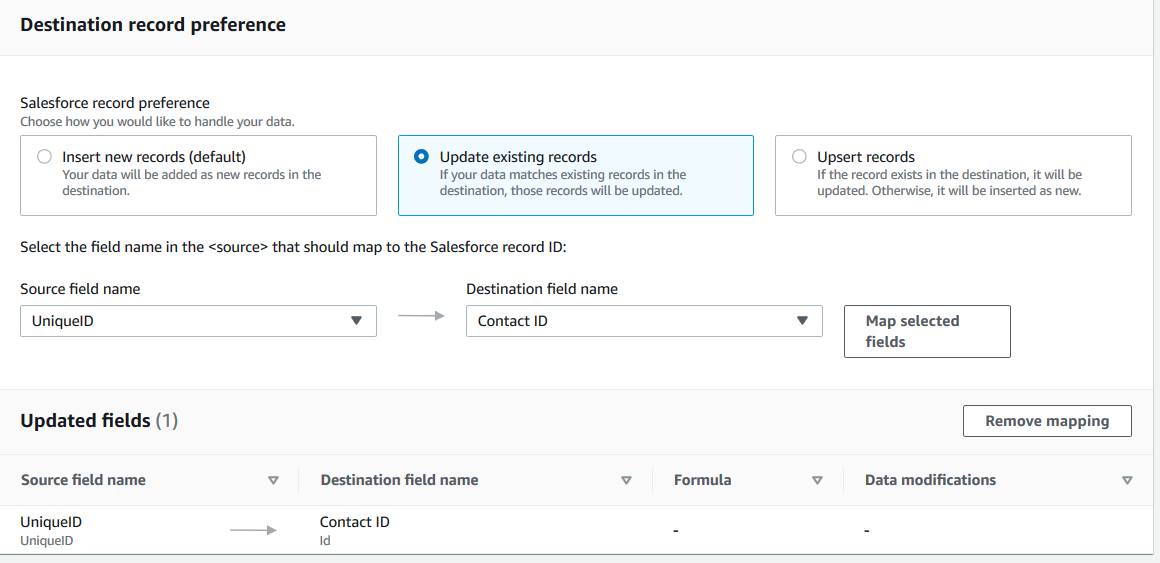
In the following example, Update existing records is selected. UniqueID is selected from the CSV and is mapped to Contact ID in Salesforce.
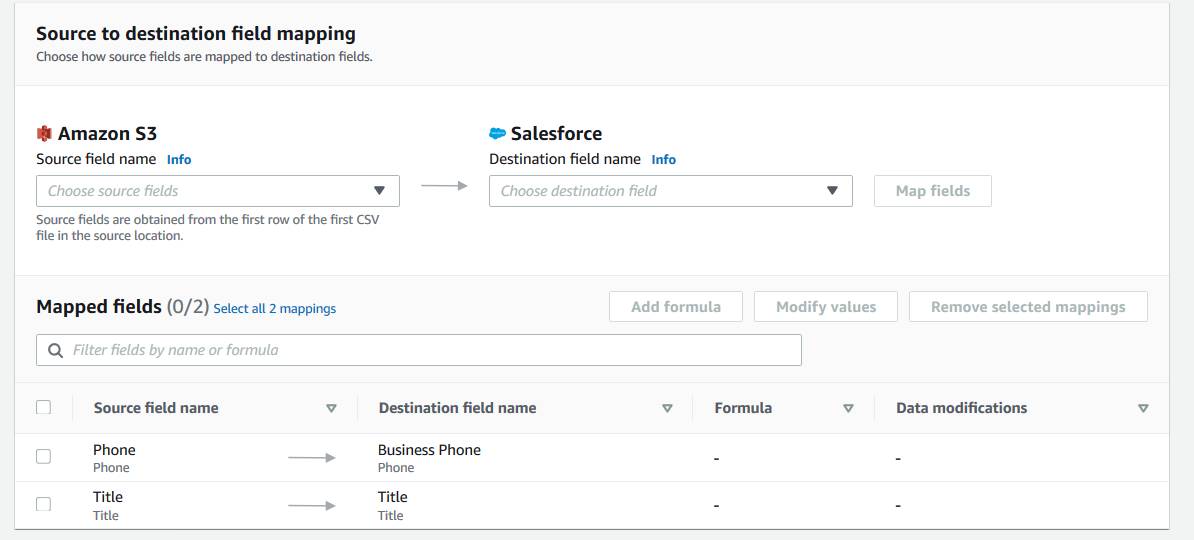
You can then map the remaining fields from the source to the destination in the “Source to destination field mapping” interface.
And so on. You have the option to remove the mapping and adjust if you make a mistake. Then, set up the rest of the flow as usual and watch Salesforce update based on your Amazon S3 data.
Sum It Up
In this module, you learn about Amazon AppFlow—how it secures your data and how to set up simple and automated flows. You’re now a step closer to getting a unified view of your customer whether you’re in Salesforce or in AWS!