Configurare e attivare l’agente Nurturing dei lead
Obiettivi di apprendimento
Al completamento di questa unità, sarai in grado di:
- Creare un nuovo agente.
- Testare le risposte dell’agente.

Introduzione
Nell’unità precedente hai configurato il sistema in modo da supportare la creazione e la gestione dell’agente. Ora configuriamo l’agente.

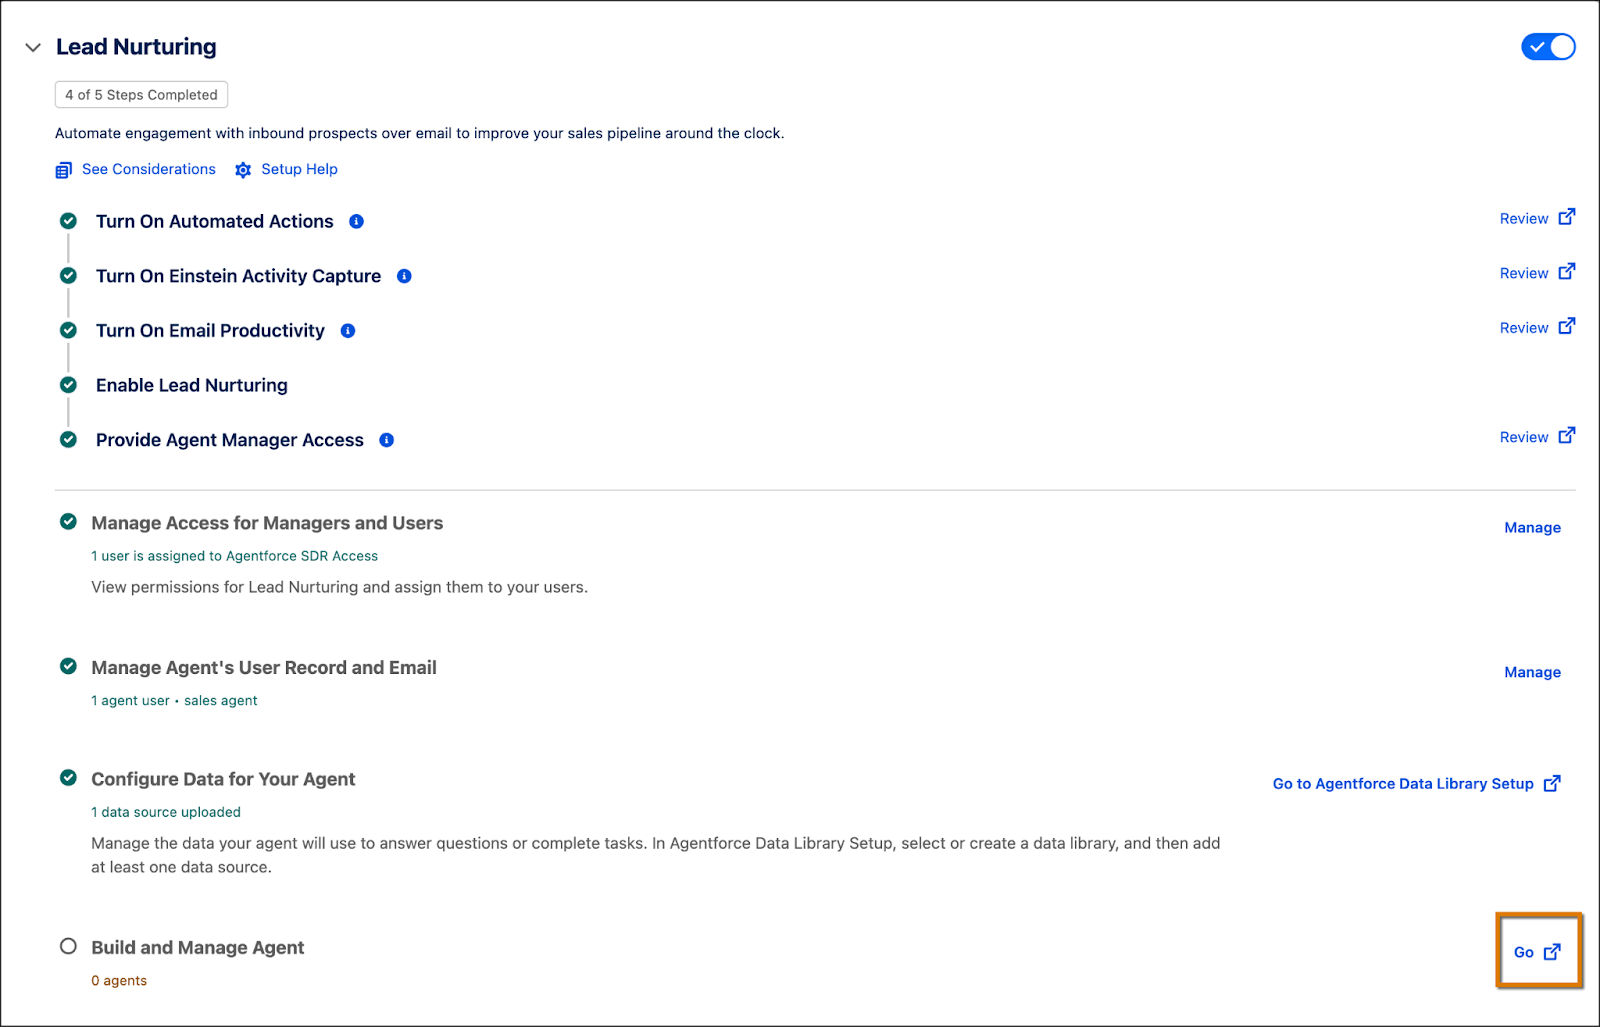
Creare un nuovo agente di vendita
L’esperienza di configurazione guidata di Salesforce Go semplifica la creazione, il testing e l’attivazione dell’agente. Segui le istruzioni seguenti per configurare l’agente Nurturing dei lead.
- Nell’area di configurazione Lead Nurturing (Nurturing dei lead), in corrispondenza di Build and Manage Agent (Crea e gestisci agente), fai clic su Go (Vai)
 . Tieni presente che questo passaggio si apre nelle nuova funzione Agentforce Studio.
- Si apre l’esperienza guidata di configurazione. Fai clic su Let’s Get Started (Iniziamo).
 [alt text: Schermata Build a new Sales Agent (Genera un nuovo agente di vendita) della configurazione guidata dell’Agentforce Builder (Generatore Agentforce).
- Fai clic sul modello Lead Nurturing (Nurturing dei lead).
- Fai clic su Continue (Continua).
Per iniziare
Segui i passaggi di configurazione dei dettagli principali dell’agente.
- Nella pagina Getting Started (Per iniziare), il campo User Record (Record utente) è precompilato con l’utente agente che hai creato in precedenza. Se hai creato più utenti agente, questi saranno tutti visualizzati qui, consentendoti di scegliere quello che preferisci. Inserisci questi dettagli:
- Agent Name (Nome agente):
Lead Nurturing(Nurturing dei lead) - Company Name (Nome società):
Welo - Incolla il testo seguente nel campo Description (Descrizione):
- Agent Name (Nome agente):
Welo is a premier provider of IT solutions and services, specializing in cutting-edge hardware and comprehensive services for managing data centers.

- Fai clic su Salva e continua.
Configurare le impostazioni email
L’agente invia un’email di contatto iniziale a ogni cliente potenziale e, in caso di mancata risposta, invia tempestivamente dei solleciti. In Email Settings (Impostazioni email) puoi configurare il messaggio principale aggiungendo una proposta di valore primaria, punti di forza, impostazioni di sollecito e tono del messaggio. Ecco come fare:

- In Primary Value (Proposta di valore principale), incolla il testo seguente:
Welo offers top-tier IT solutions and services, specializing in hardware and services for managing data centers. Our commitment to excellence and innovation ensures we deliver unparalleled services that empower businesses to thrive and innovate.
- In Key Achievements (Obiettivi raggiunti chiave), incolla il testo seguente:
Customer Satisfaction Rate: Welo boasts a 95% customer satisfaction rate, reflecting our commitment to delivering exceptional solutions.
Transforming Retail Operations: Partnered with a major retail chain to implement a custom CRM solution, resulting in a 30% increase in sales and a 25% improvement in customer retention.
Streamlining Healthcare Services: Collaborated with a healthcare provider to develop an integrated patient management system, reducing administrative costs by 20% and improving patient satisfaction scores by 15%.
- Lascia invariate le impostazioni del sollecito e quelle aggiuntive. Ora, tutto è pronto per testare l’email di contatto iniziale dell’agente.
- Nella sezione Preview Email (Anteprima email), fai clic sul campo Search Recipients e cerca
Sandra Eberhard.
- Fai clic su Generate Preview (Genera anteprima). Ora puoi vedere la risposta, radicata nel contesto del nome dell’account del lead e delle informazioni che hai fornito. L’anteprima ti consente di rivedere le risposte prima di procedere alla fase successiva dell’esperienza guidata.
- Fai clic su Continue (Continua).
Testare le risposte dell’agente
Ora che l’email di contatto iniziale è stata impostata e testata, è il momento di configurare le risposte dell’agente alle richieste e le domande dei clienti. In questa fase della configurazione guidata, hai la possibilità di creare una libreria dati e aggiungere fonti di dati. Dal momento che hai configurato una libreria di dati in precedenza, possiamo usare quella.

- Fai clic sull’elenco a discesa Data Library (Libreria dati) e seleziona Welo Customer Policies Library (Libreria delle policy cliente Welo).
- Nella sezione Preview Email (Anteprima email), fai clic sul campo Search Recipients e cerca
Andy Young.
- Incolla la domanda del cliente di esempio seguente per vedere come risponde l’agente:
How do companies usually handle data backup?
- Fai clic su
 .
.
- Dopo aver letto la risposta, fai clic su Continue (Continua).
Poiché hai selezionato una fonte di dati web, l’agente esegue una ricerca sul web e risponde alla domanda di esempio. Allo stesso modo, puoi utilizzare una fonte di dati su file per caricare le policy di reso aziendali e dati sui prodotti, fornendo così all’agente gli strumenti per rispondere a domande relative a rimborsi o prodotti, tutto in un unico posto. Tieni presente che i file di contenuti aggiunti come fonti di dati possono richiedere fino a 24 per comparire nelle risposte dell’agente.
Assegnare clienti potenziali all’agente
Nella fase Assign Prospects (Assegna clienti potenziali), puoi automatizzare l’assegnazione di clienti potenziali all’agente, semplificando così la gestione delle iniziative di contatto e dei follow-up.
Poiché si tratta di un’azienda leader nella fornitura di soluzioni IT e di servizi per i data center, il target è il settore dei servizi finanziari, in cui la richiesta di infrastrutture sicure e scalabili è particolarmente alta. Inoltre, ti concentri su clienti potenziali che hanno già manifestato una propensione all’acquisto, ad esempio interagendo con una demo o chiedendo informazioni sui prezzi. Qui puoi automatizzare l’assegnazione di questi clienti potenziali qualificati all’agente in base a criteri specifici. Segui i passaggi riportati qui sotto per procedere con questa fase:

- Sotto Assign Prospects (Assegna clienti potenziali), sposta il pulsante di alternanza Leads (Lead) su On (Attivo).
- Sotto Assign Lead to Agent When (Assegna Lead all’agente quando), seleziona Lead is created or updated (Lead è creato o aggiornato).
- Apri l’elenco a discesa Take Action When (Intraprendi l’azione quando) e seleziona Custom Logic (AND + OR + NOT) (Logica personalizzata (AND + OR + NOT)).
- Fai clic su + Add Condition (+ Aggiungi condizione) tre volte per creare tre righe per le condizioni.
- Configura le righe delle condizioni come segue:
- Riga 1: Field (Campo) = Industry (Settore); Operator (Operatore) = Equal (Uguale a); Value (Valore) = Finance (Finanza)
- Riga 2: Field (Campo) = Rating (Valutazione); Operator (Operatore) = Equal (Uguale a); Value (Valore) = Warm (Media)
- Riga 3: Field (Campo) = Rating (Valutazione); Operator (Operatore) = Equal (Uguale a); Value (Valore) = Hot (Alta)
- Riga 1: Field (Campo) = Industry (Settore); Operator (Operatore) = Equal (Uguale a); Value (Valore) = Finance (Finanza)
- Imposta l’espressione logica personalizzata su
1 AND (2 OR 3). - Fai clic su Save (Salva) e poi su Continue (Continua).
Rivedere e attivare l’agente
La fase conclusiva consiste nell’esaminare le configurazioni e testare il modo in cui l’agente gestisce il contatto iniziale, invia solleciti e risponde alle domande dei clienti. Queste operazioni possono essere eseguite nella sezione Preview Email (Anteprima email). Quando ritieni soddisfacenti i risultati, fai clic su Activate Agent (Attiva agente) per lanciare l’agente.

Conclusioni
Questo è tutto. Hai creato un agente, configurato le sue iniziative di contatto iniziale e i solleciti, lo hai connesso a una libreria dati e hai testato come gestisce domande reali dei clienti. Una volta completata la configurazione, l’agente è pronto per entrare in azione e aiutarti a coinvolgere clienti potenziali in modo più intelligente, più veloce e più efficace. Ora puoi rilassarti e lasciare che il tuo nuovo compagno di squadra digitale si metta al lavoro.