Création de votre agent à l’aide du script d’agent
Objectifs d’apprentissage
Ce badge permet d’atteindre les objectifs suivants :
- En savoir plus sur le script d’agent et les paquets de création
- Prévisualiser un agent à l’aide de son fichier de script d’agent
- Coder un agent en mettant à jour et en validant son fichier de script d’agent
- Publier un agent dans une organisation
- Visualiser l’agent publié dans l’interface utilisateur du générateur Agentforce de l’organisation
Pour cette étape, utilisez l’organisation Developer Edition que vous avez créée à l’étape 1.

Découverte du script d’agent, ou modèle d’agent
L’élaboration d’un agent suit un cycle de vie spécifique.
-
Développement : codez le fichier de script d’agent afin de définir les instructions et la logique de votre agent.
-
Publication : déployez le fichier de script d’agent dans une organisation de développement pour créer les métadonnées de l’agent.
-
Test : vérifiez le comportement de l’agent dans une organisation sandbox ou test.
-
Déploiement : migrez les métadonnées de l’agent vers votre environnement de production.
-
Activation : activez l’agent pour le mettre à la disposition de vos clients.
Ce badge se concentre sur les étapes de développement et de publication.
Le script d’agent constitue la base de la prochaine génération d’agents Agentforce. Il s’agit d’un langage qui combine la flexibilité de l’utilisation du langage naturel pour coder avec l’assistance de l’IA (vibe coding) à la fiabilité des expressions programmatiques pour le traitement des règles métiers. Le script d’agent vous offre tous les avantages de l’accès à un grand modèle de langage (LLM), tout en vous permettant d’ajouter des comportements plus déterministes à votre agent.
Comme pour la plupart des éléments de Salesforce, le fichier de script d’un agent fait partie d’un composant de métadonnées nommé AiAuthoringBundle, ou simplement paquet de création. Vous pouvez générer un paquet de création à partir de zéro en utilisant des commandes CLI ou VS Code dans votre projet DX, ou en effectuant du vibe coding. Vous pouvez également d’abord créer un agent dans votre organisation à l’aide du générateur Agentforce, puis récupérer le paquet de création dans votre projet DX. Le paquet de création inclut un fichier portant l’extension .agent : il s’agit du fichier de script d’agent qui sert de modèle à l’agent.
Dans ce badge Trailhead, vous commencez avec un paquet de création existant et un fichier de script d’agent dans le référentiel que vous avez cloné dans l’unité précédente. Vous êtes prêt ?
Dans VS Code, ouvrez le fichier de script d’agent nommé Local_Info_Agent.agent, situé dans le répertoire force-app/main/default/aiAuthoringBundles/Local_Info_Agentdirectory du projet DX que vous avez cloné dans l’unité précédente.
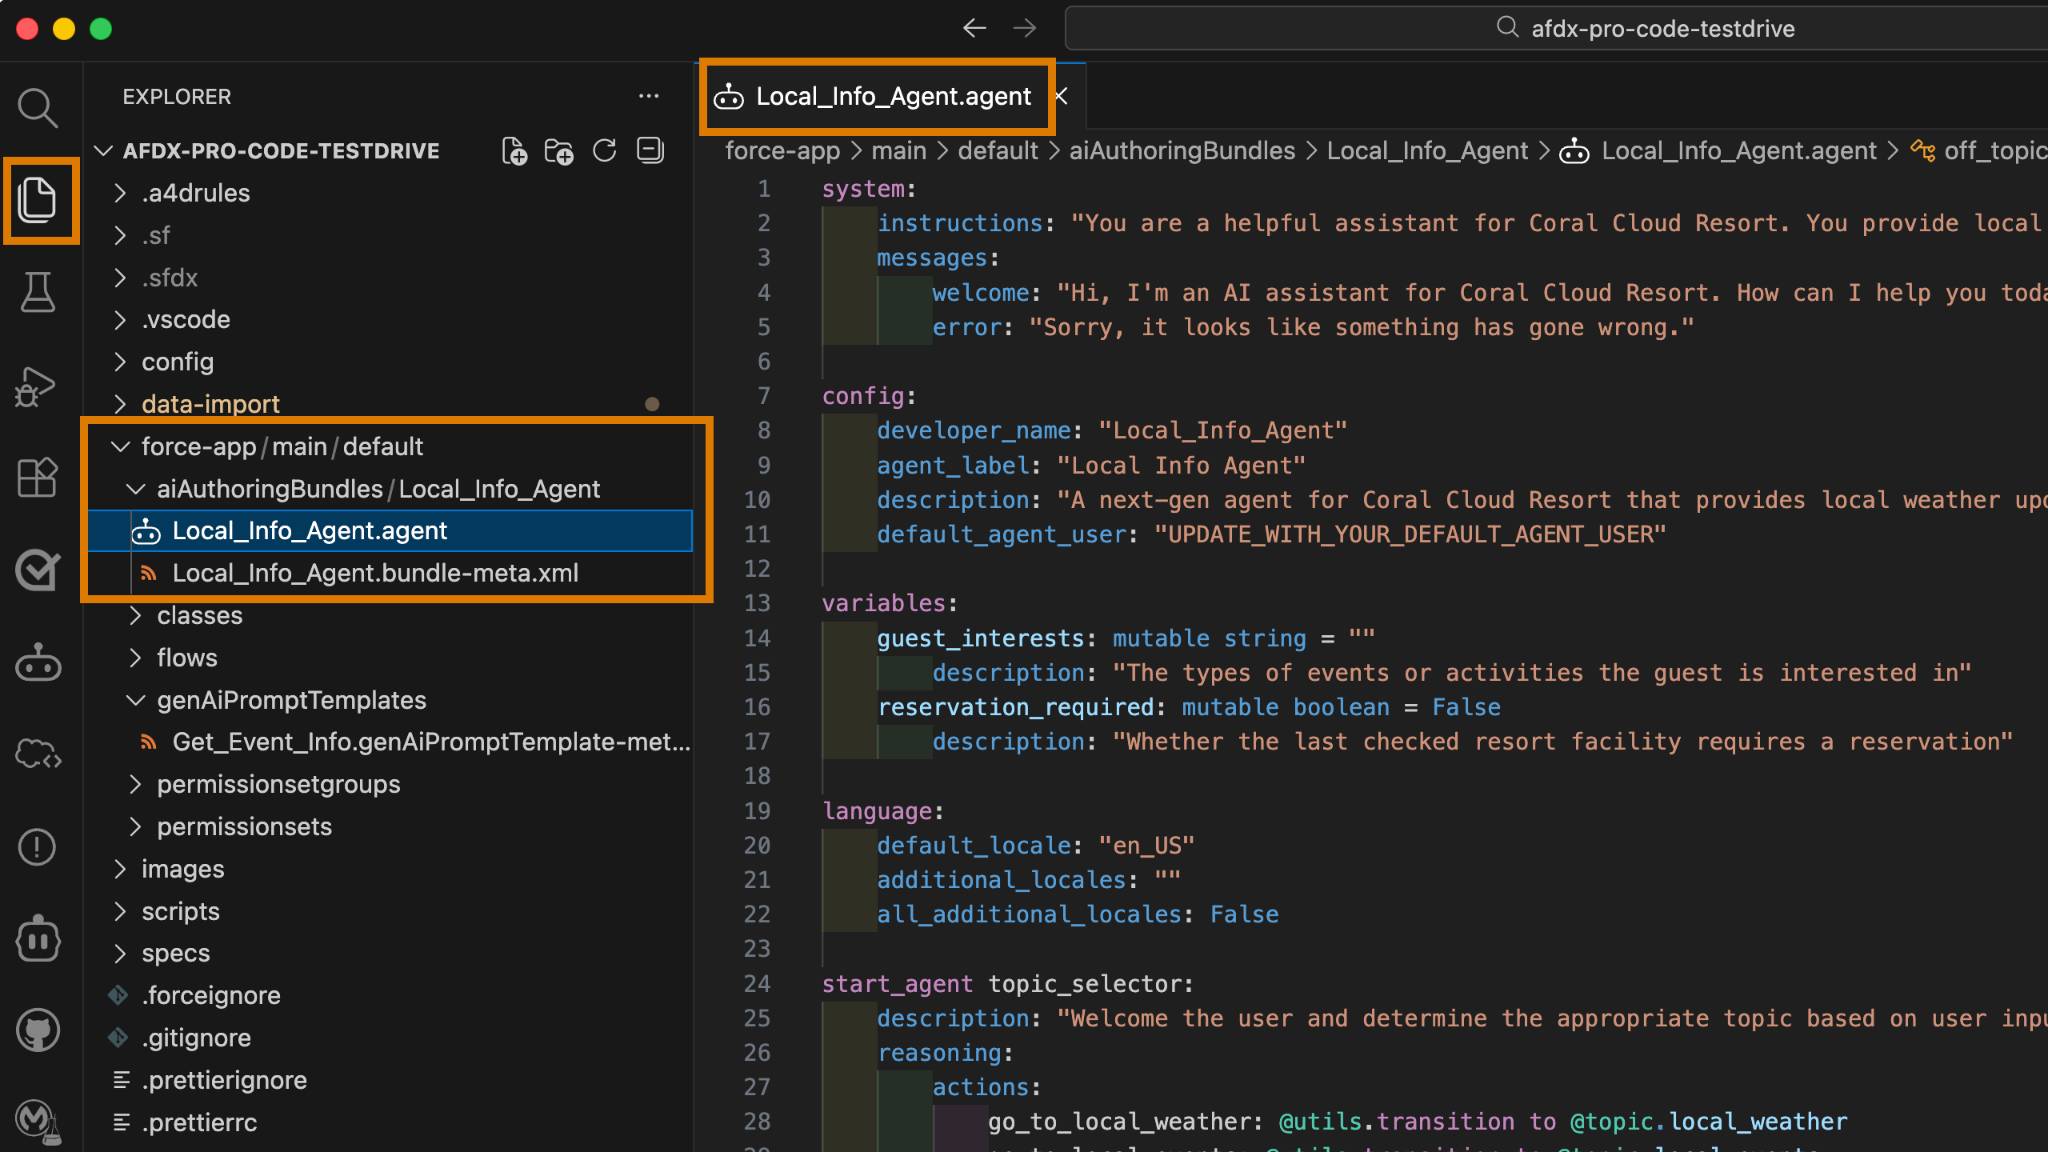
Notez que le fichier de script d’agent met en évidence la syntaxe avec des couleurs, des indices visuels (tels que des ondulations rouges) pour les erreurs de syntaxe, la navigation dans le code, etc. Ces couleurs s’affichent, car les extensions VS Code Salesforce prennent en charge le script d’agent en tant que langage de programmation, tout comme elles prennent en charge Apex et LWC.
L’apprentissage du langage de script d’agent lui-même dépasse le cadre de ce badge, mais vous pouvez prendre quelques minutes pour vous faire une idée du fichier. Par exemple, le fichier est composé de blocs, tels que system, config et variables. Le bloc config contient les paramètres de configuration qui définissent l’agent. Vous serez amené à modifier l’un de ces paramètres plus loin dans ce badge.
Consultez la rubrique Premiers pas avec le script d’agent pour plus d’informations et de détails.
Prévisualisation de l’agent à l’aide de son fichier de script d’agent uniquement
Au fur et à mesure que vous codez le fichier de script de votre agent, il est utile de converser périodiquement avec lui. Vous pouvez vérifier comment il réagit lorsque vous effectuez des modifications et des mises à jour en temps réel. Ces aperçus de conversation servent de tests interactifs afin de s’assurer que l’agent se comporte comme prévu.
Commencez par prévisualiser un agent à l’aide du mode de simulation, qui utilise uniquement le fichier de script d’agent pour converser et simuler tous les outils. Ce mode est particulièrement utile si les classes Apex, les flux ou les modèles d’instruction générative qui implémentent les outils ne sont pas encore disponibles. Le LLM utilise les informations que vous avez ajoutées sur les sous-agents dans le fichier de script d’agent pour simuler ce que l’outil fait ou comment il réagit. Vous accédez au LLM par l’intermédiaire de votre organisation, c’est pourquoi vous devez toujours être autorisé à accéder à votre organisation, même en mode de simulation.
- Dans VS Code, ouvrez le menu contextuel (clic droit) dans le fichier de script d’agent Local_Info_Agent.agent.
- Sélectionnez AFDX: Preview This Agent (AFDX : Prévisualiser cet agent).
Un panneau Agentforce DX s’ouvre sur la gauche.
- Dans la liste déroulante Select agent… (Sélectionnez un agent…), sélectionnez Local_Info_Agent qui est peut-être déjà sélectionné.
Notez son emplacement dans la section Agent Script (Script d’agent) de la liste. À moins que vous n’ayez créé un agent, Local_Info_Agent est le seul agent de la liste.
- Dans la liste déroulante, sélectionnez Simulation, puis cliquez sur Start Simulation (Démarrer la simulation) pour lancer l’aperçu.

- Dans la boîte de dialogue, entrez cette question afin de montrer ce que l’agent peut faire :
What can you help me with?(Que peux-tu faire pour moi ?)
L’agent réfléchit un moment, puis propose une réponse.
- Saisissez cette question :
What’s the weather like?
Vous obtenez un résumé de la météo, mais avez-vous remarqué que l’agent parle comme un pirate ? Par exemple, sa réponse commence probablement par « Eh, matelot ! ». Comme c’est étrange ! Si l’agent réagit ainsi, c’est parce que son fichier de script d’agent lui demande de parler comme un pirate lorsqu’il décrit la météo locale.
Bien qu’un personnage de pirate soit un moyen amusant de tester sa personnalité, les agents professionnels doivent adopter une voix de marque cohérente. Apprenez à modifier le fichier de script d’agent pour affiner les réponses conversationnelles de votre agent.
Codage du fichier de script d’agent
Si vous souhaitez modifier le comportement de l’agent, vous devez coder son fichier de script d’agent. Au fur et à mesure que vous codez, validez le fichier pour vous assurer que vous n’avez pas introduit d’erreurs. C’est probablement le bon moment pour empêcher l’agent de répondre en tant que pirate, êtes-vous prêt à apprendre comment ?
- Dans VS Code, analysez le fichier de script d’agent afin de déterminer si vous pouvez trouver l’instruction qui permet à l’agent de répondre comme un pirate lorsqu’il vous parle de la météo locale.
Indice : vérifiez les instructions de raisonnement pour local_weather. Vous ne l’avez toujours pas trouvé ? Vers la ligne 114, recherchez une phrase commençant par Finally, ALWAYS give answers (Enfin, donne TOUJOURS des réponses).
- Pour modifier le fichier, supprimez toute la ligne qui commence par Finally, ALWAYS give answers (Enfin, donne TOUJOURS des réponses). Ne procédez à aucun autre changement à moins que vous soyez sûr de ce que vous faites !
- Enregistrez le fichier.
- Ouvrez le menu contextuel (clic droit) du fichier de script d’agent et choisissez AFDX: Validate this Agent (AFDX : Valider cet agent).
Une petite fenêtre apparaît dans le coin inférieur droit de VS Code pendant que le fichier est en cours de validation. En cas d’échec de la validation, l’onglet Problems (Problèmes) s’ouvre avec les messages d’erreur et des indices pour vous aider à résoudre les problèmes. Cependant, si vous avez suivi les étapes, le fichier de script d’agent devrait être validé.
- Cliquez sur Restart Options (Options de redémarrage), puis sur Compile & Restart (Compiler et redémarrer) dans le coin supérieur droit de la fenêtre d’aperçu d’Agentforce DX.

- Posez la même question (
What’s the weather like?) (Quel temps fait-il ?) dans la boîte de dialogue. Vous pouvez également sélectionner la flèche vers le haut pour utiliser l’historique de chat.
Cette fois-ci, la réponse devrait être plus professionnelle, ce qui est une bonne chose, même si c’est un peu ennuyeux.
- Cliquez sur Stop Simulation (Arrêter la simulation) lorsque vous avez fini de poser des questions.
Aperçu de l’agent à l’aide du mode En ligne
Lorsque vous prévisualisez l’agent avec le mode En ligne, ce dernier utilise les classes Apex, les flux et les modèles d’instruction générative réels dans votre organisation de développement afin de fournir la vue la plus précise possible du comportement de votre agent.
Vous avez déjà déployé les classes Apex et les ressources connexes requises dans votre organisation dans le cadre de la configuration initiale de ce badge Trailhead. Si vous les modifiez par la suite dans votre projet DX local, vous devrez les redéployer pour vous assurer que l’aperçu en ligne les utilise.
Vous allez également utiliser un véritable utilisateur d’organisation dans cet aperçu en ligne, à savoir celui créé dans l’unité précédente. Cela nécessite une modification du fichier de script d’agent. Allons-y !
- Dans VS Code, ouvrez le fichier de script d’agent Local_Info_Agent.agent dans l’éditeur.
- Dans la section config (configuration) (vers la ligne 7), localisez la propriété default_agent_user.
- Modifiez le fichier de script d’agent en mettant à jour l’espace réservé UPDATE_WITH_YOUR_DEFAULT_AGENT_USER avec le nom d’utilisateur généré par le script dans l’unité précédente.
- Par exemple, si le nom d’utilisateur généré est afdx-agent@testdrive.org98eca4a312-3456xyz, la propriété mise à jour se présente comme suit :
default_agent_user: "afdx-agent@testdrive.org98eca4a312-3456xyz"
- Par exemple, si le nom d’utilisateur généré est afdx-agent@testdrive.org98eca4a312-3456xyz, la propriété mise à jour se présente comme suit :
- Validez l’agent, ce qui est recommandé lorsque vous modifiez un fichier de script d’agent.
- Si le panneau Agentforce DX n’est pas ouvert, sélectionnez le menu contextuel (clic droit) n’importe où dans le fichier script et sélectionnez AFDX: Preview This Agent (AFDX : Prévisualiser cet agent).
- Dans la liste déroulante, sélectionnez Live Test (Test réel), puis cliquez sur Start Live Test (Démarrer le test réel) pour prévisualiser l’agent.

- Posez à nouveau la question :
What’s the weather like?(Quel temps fait-il ?)
La réponse est semblable à celle obtenue lors de la simulation, mais cette fois-ci, la plage de température doit se situer exactement entre 18,5 et 27,2 °C. C’est parce que l’agent utilise la classe Apex réelle (WeatherService) dans l’organisation, qui, à des fins de test, code en dur la température dans cette plage. Vous voulez voir cela par vous-même ? Consultez le fichier force-app/main/default/classes/WeatherService.cls.
Affichage et modification de l’agent dans le générateur Agentforce
Revenez à l’interface utilisateur du générateur Agentforce de votre organisation. Ici, vous pouvez prévisualiser et coder votre agent tout comme vous l’avez fait dans VS Code. En fait, vous allez modifier l’agent pour qu’il réponde comme un clown, parce que nous avons décidé qu’il était temps de nous amuser un peu !
Mais avant cela, rappelez-vous que vous avez apporté quelques modifications au fichier de script d’agent local. Pour vous assurer que vous travaillez avec le même code lorsque vous utilisez le générateur dans l’organisation, vous devez déployer le paquet de création Local_Info_Agent dans votre organisation. Il est important que votre projet DX et votre organisation soient synchronisés lorsque vous utilisez simultanément des outils pro-code et à faible code.
- Dans VS Code, déployez le paquet de création mis à jour dans votre organisation en exécutant cette commande CLI dans le terminal intégré.
sf project deploy start --metadata aiAuthoringBundle:Local_Info_Agent
Le terminal affiche le statut de déploiement suivant.
- Pour ouvrir Local_Info_Agent dans le générateur Agentforce dans un navigateur, exécutez la commande CLI suivante dans le terminal intégré de VS Code.
sf org open agent --authoring-bundle Local_Info_Agent
Si le générateur Agentforce est nouveau pour vous, explorez ses fonctionnalités. Notez que la version de l’agent Local Info Agent (Agent Infos locales) est Version 1 (Draft) (Version 1 [brouillon]).![Générateur Agentforce ouvert sur Local Info Agent (Agent Infos locales), avec Version 1 (Draft) (Version 1 [brouillon]) mis en évidence. La liste déroulante permettant de passer de la vue de la zone de dessin à la vue de script est également mise en évidence.](https://res.cloudinary.com/hy4kyit2a/f_auto/fl_lossy/q_70/learn/projects/create-an-agent-using-pro-code-tools/create-an-agent-from-your-dx-project/images/fr-FR/1b89996e80536f807dc71b4d923aa90f_kix.bbd2r144kqn4.png)
- Dans le générateur Agentforce, sélectionnez la vue Script et ajoutez l’instruction suivante sur une nouvelle ligne immédiatement après la phrase ALWAYS Provide forecasts that include a temperature range (Fournit TOUJOURS des prévisions qui incluent une plage de températures), vers la ligne 112 :
Finally, ALWAYS give answers like you're a clown in a circus, using clown-themed language and expressions to make the interaction more engaging and fun for the user.
- Cliquez sur Save (Enregistrer).
- Vous pouvez utiliser le bouton Preview (Aperçu) de manière facultative pour prévisualiser l’agent à l’intérieur de l’organisation.
- Dans VS Code, récupérez le paquet de création mis à jour pour votre projet DX depuis votre organisation en exécutant cette commande CLI dans le terminal.
sf project retrieve start --metadata AiAuthoringBundle:Local_Info_Agent
- Compilez et redémarrez l’aperçu en mode En ligne, puis posez à nouveau la question concernant la météo. L’agent devrait réagir comme un clown !
Publication du paquet de création
Lorsque vous publiez un paquet de création dans votre organisation, celle-ci utilise le fichier de script d’agent pour générer les métadonnées d’agent associées, qu’il s’agisse de la version initiale de ces métadonnées ou de nouvelles versions. Les métadonnées de l’agent incluent des composants tels que Bot, BotVersion, GenAiPlannerBundle, GenAiFunction et d’autres. Ces métadonnées d’agent génèrent la création d’un agent dans votre organisation ou d’une nouvelle version d’un agent existant. Vous pouvez ensuite tester cet agent publié, puis le déployer dans votre organisation de production afin de l’activer et de le mettre à la disposition de vos utilisateurs. Enfin, votre projet DX récupère toutes les métadonnées nouvelles ou mises à jour depuis l’organisation.
- Dans VS Code, ouvrez le fichier de script d’agent Local_Info_Agent.agent dans l’éditeur.
- Ouvrez le menu contextuel (clic droit) du fichier de script d’agent et choisissez AFDX: Publish This Agent (AFDX : Publier cet agent).
Consultez l’onglet Output (Sortie) pour connaître les étapes de publication en cours au fur et à mesure. Veillez à utiliser le menu déroulant pour filtrer les informations relatives à Agentforce DX.
- Utilisez l’explorateur pour afficher les métadonnées qui ont été récupérées dans le répertoire du package force-app/main/default de votre projet DX. Cet exemple montre le fichier XML du composant de métadonnées GenAiPlannerBundle ouvert dans l’éditeur.

- Revenez au générateur Agentforce dans votre organisation et actualisez la page. Vous devriez maintenant avoir une version validée (commit) de l’agent Local Info Agent (Agent Infos locales) : Version 1 (Committed) (Version 1 [validée]).
La publication d’un paquet de création génère de nouvelles versions des métadonnées de l’agent, notamment BotVersion et GenAiPlannerBundle. Vous pouvez les identifier en tant que v1 dans l’image précédente.
Activation de votre agent
Mettez l’agent Local Info Agent (Agent Infos locales) à la disposition des clients de Coral Clouds Resort. Depuis VS Code, vous pouvez activer un agent à l’aide de son fichier de métadonnées BotVersion.
- Dans VS Code, utilisez l’explorateur pour accéder au répertoire force-app/main/default/bots/Local_Info_Agent.
- Ouvrez le menu contextuel (clic droit) du fichier Local_Info_Agent.bot-meta.xml et choisissez AFDX: Activate Agent (AFDX : Activer l’agent).

- Cliquez sur Version 1 dans le menu déroulant en haut de VS Code.
- Accédez au générateur Agentforce dans votre organisation et actualisez la page relative à Local Info Agent (Agent Infos locales). Vous devriez maintenant avoir une version active de l’agent, telle que Version 1 (Active).
Félicitations ! Vous avez utilisé Agentforce DX pour coder le fichier de script d’un agent, prévisualiser l’agent et le publier dans votre organisation. Avec ces outils pro-code dans votre boîte à outils, vous êtes maintenant prêt à créer vos propres agents. Avant de publier un agent de production, n’oubliez pas d’affiner sa voix pour vous assurer qu’elle est adaptée à votre cas d’utilisation spécifique.
Ressources
- Développeurs Salesforce : Élaboration d’agents avec Agentforce DX
- Développeurs Salesforce : Référence des commandes CLI de Salesforce | Commandes agent
- Salesforce Developers : Extension Agentforce Vibes
- Aide Salesforce : Conception et déploiement d’agents
- Trailhead : Découverte du nouveau générateur Agentforce