Build a Custom Search Component
What You’ll Do
With the vertical navigation in place, it’s time to work on a custom search component that queries several objects and returns record IDs that match the search term.
In this step, you’ll:
- Define a search component that implements forceCommunity:searchInterface.
- Create an Apex controller.
- Add a click handler to the search component’s controller method.
- Implement a search query with SOSL.
- Redirect to a custom page that contains the record names and links to the full record details.
- Test the search component.
Define a Custom Search Component
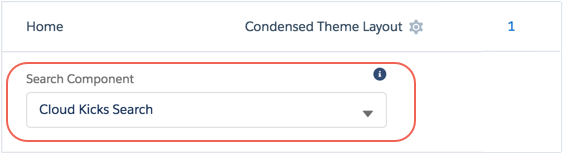
Remember in a previous step how we talked about the search region being a special, designated region in our theme layout component? When a search component implements the forceCommunity:searchInterface interface—which is what we’ll do here—it becomes available for use in any theme layout component that includes a search region.
In the Theme | Theme Settings area of Experience Builder, you simply select the available component from the Search Component dropdown. The page then refreshes and displays the new search component in the search region.

- In the Developer Console, click File | New | Lightning Component.
- Name the component customSearch and click Submit.
- Replace the contents of the component with this code.Code Highlights This code uses a <lightning:ButtonIcon> component and includes a click handler. It also includes an attribute called searchText to contain the search text and uses a <ui:inputText> component (instead of <input>) to bind the values.
<aura:component implements="forceCommunity:searchInterface">
<aura:attribute name="searchText" type="String" default=""/>
<div class="slds-form-element slds-lookup" data-select="single">
    <div class="slds-form-element__control">
        <div class="slds-input-has-icon slds-input-has-icon--right">
            <lightning:buttonIcon iconName="utility:search" variant="bare" onclick="{! c.handleClick }" alternativeText="Search" class="slds-input__icon" />
            <ui:inputText value="{!v.searchText}" class="slds-lookup__search-input slds-input" placeholder="Search" />
        </div>
    </div>
</div>
</aura:component>
- Save customSearch.cmp.
Create an Apex Controller
Next you need to create an Apex class for your search component.
- In the Developer Console, click File | New | Apex Class.
- Name the class CustomSearchController and click OK.
- Implement the searchForIds method by replacing the class contents with this code.Code Highlights: The searchForIds method takes a String searchText and returns a list of strings representing found IDs. For now, we just return the search string itself.
public class CustomSearchController {
    @AuraEnabled
    public static List<String> searchForIds(String searchText) {
      return new List<String>{searchText};
    }
}
- Save CustomSearchController.apxc.
- In customSearch.cmp, specify the CustomSearchController class as the component’s controller. Your component now looks like this.
<aura:component implements="forceCommunity:searchInterface" controller="CustomSearchController"> <aura:attribute name="searchText" type="String" default=""/> <div class="slds-form-element slds-lookup" data-select="single"> <div class="slds-form-element__control"> <div class="slds-input-has-icon slds-input-has-icon--right"> <lightning:buttonIcon iconName="utility:search" variant="bare" onclick="{! c.handleClick }" alternativeText="Search" class="slds-input__icon" /> <ui:inputText value="{!v.searchText}" class="slds-lookup__search-input slds-input" placeholder="Search" /> </div> </div> </div> </aura:component> - Save customSearch.cmp.
Add a Click Handler
Now that you’ve hooked up the customSearch component to an Apex controller, tell the component to execute that controller’s action when the Search button is clicked.
- To open the customSearch component’s controller method, click Controller on the right-hand side of the Developer Console.
- Replace the controller contents with this click-handler code.Code Highlight: This code reads the value of the input text, sends it to the server-side Apex controller, and waits for a response. If you test the example, you see an array logged to the browser console.
({
    handleClick : function(component, event, helper) {
      var searchText = component.get('v.searchText');
      var action = component.get('c.searchForIds');
      action.setParams({searchText: searchText});
      action.setCallback(this, function(response) {
        var state = response.getState();
        if (state === 'SUCCESS') {
          var ids = response.getReturnValue();
          console.log(ids);
        }
      });
      $A.enqueueAction(action);
    }
})
- Save customSearchController.js.
Implement a Search Query with SOSL
Simple string searches are fine and all, but how about making the server controller do something more interesting? Let’s use the Salesforce Object Search Language (SOSL) in our Apex class to create a query that finds objects whose fields contain the input search text.

- In the Developer Console, open CustomSearchController.apxc.
- Update the Apex class’s method as follows:Code Highlight: This code returns a list of record IDs for the accounts, contacts, and leads that match the search term.
public class CustomSearchController {
    @AuraEnabled
    public static List<String> searchForIds(String searchText) {
    List<List<SObject>> results = [FIND :searchText IN ALL FIELDS  RETURNING Account(Id), Contact(Id), Lead(Id)];
    List<String> ids = new List<String>();
    for (List<SObject> sobjs : results) {
      for (SObject sobj : sobjs) {
        ids.add(sobj.Id);
      }
    }
    return ids;
}
}
- Save the file.
Return the Search Results to a Custom Page
Nicely done! You’re almost there. Just one final puzzle piece to add and that’s the search results page. Let’s keep things simple and show you how to take the record IDs and redirect to a new page that contains the record names and links to the full record details. To do this, you need:
- A Lightning component that displays a single record with a link to the record details
- A drag-and-drop component for Experience Builder that lists the records
- A custom Experience Builder page that uses the drag-and-drop component to show the returned records
Create a Component That Displays a Single Record
- In the Developer Console, click File | New | Lightning Component.
- Name the component customSearchResultItem and click Submit.
- Replace the component contents with this code.Code Highlight: This code is based on an example for the Lightning Data Service.
<aura:component implements="force:hasRecordId" access="global">
    <aura:attribute name="record" type="Object"/>
    <aura:attribute name="simpleRecord" type="Object"/>
    <aura:attribute name="recordError" type="String"/>
    <force:recordData aura:id="recordLoader"
      recordId="{!v.recordId}"
      layoutType="COMPACT"
      targetRecord="{!v.record}"
      targetFields="{!v.simpleRecord}"
      targetError="{!v.recordError}"  />
    <!-- Display a header with details about the record -->
    <div class="slds-page-header" role="banner">
      <p class="slds-text-heading--label">{!v.simpleRecord.Name}</p>
      <h1 class="slds-page-header__title slds-m-right--small  slds-truncate slds-align-left"><a href="{!$Site.siteUrlPrefix + '/detail/' + v.simpleRecord.Id}">Go to details</a></h1>
    </div>
    <!-- Display Lightning Data Service errors, if any -->
    <aura:if isTrue="{!not(empty(v.recordError))}">
      <div class="recordError">
        <ui:message title="Error" severity="error" closable="true">
          {!v.recordError}
        </ui:message>
      </div>
    </aura:if>
</aura:component>
Create a Drag-and-Drop Component That Lists the Records
Create a drag-and-drop component that appears in the Components panel in Experience Builder. When added to the custom page, it displays the list of returned records for the search term.
- In the Developer Console, click File | New | Lightning Component.
- Name the component customSearchResultsList and click Submit.
- Replace the component contents with this code.Code Highlights:
<aura:component implements="forceCommunity:availableForAllPageTypes" access="global">
    <aura:attribute type="list" name="recordIds" />
    <aura:handler name="init" value="{!this}" action="{!c.init}"/>
    <h1>Search Results</h1>
    <aura:iteration items="{!v.recordIds}" var="id">
      <c:customSearchResultItem recordId="{!id}"/>
    </aura:iteration>
</aura:component>
- To appear in the Components panel in Experience Builder, a component must implement the forceCommunity:availableForAllPageTypes interface. If you select the Experience Builder Site Page checkbox when creating a new component, the interface is automatically added to the default code.
- Mark your resources, such as a component, with access="global" to make the resource usable outside of your own org. For example, if you want a component to be usable in an installed package or by a Lightning App Builder user or a Experience Builder user in another org.
- Save the file.
Now create a controller for customSearchResultsList.
- To open the customSearchResultsList component’s controller method, click Controller on the right-hand side of the Developer Console.
- Replace the controller contents with this code.Code Highlight: In this code, you’re relying on the record ID list to be passed to the component from the browser’s session storage. This method allows data to be passed from page to page without affecting any URLs.
({
  init: function(component, event, helper) {
    var idsJson = sessionStorage.getItem('customSearch--recordIds');
    if (!$A.util.isUndefinedOrNull(idsJson)) {
      var ids = JSON.parse(idsJson);
      component.set('v.recordIds', ids);
      sessionStorage.removeItem('customSearch--recordIds');
    }
  }
})
- Save the file.
Create a Custom Search Results Page
Create a page to contain the drag-and-drop component and display the list of returned records.
- In Experience Builder, click
 on the top toolbar and then click New Page.
- Select Standard Page and then click New Blank Page.
- Select 1 full-width column as the content layout for the page and click Next.
- Name the page Custom Search Results (which produces a page URL of custom-search-results) and click Create.
- Click the lightning icon to open the Components panel.
- Scroll to the bottom of the panel and drag the customSearchResultsList component into the Content region on the page. (If you can't see the component, refresh the page.)

 Tip You can even use the same custom theme layout component that you created in an earlier step, which the Home page is using.
Finalize and Use the Custom Search Component
- In the Developer Console, open customSearchController.js if it’s not already open.
- Replace console.log(ids); with this code, which sets the session storage value and fires a navigation event to the new page.The complete code looks like this.
sessionStorage.setItem('customSearch--recordIds', JSON.stringify(ids)); var navEvt = $A.get('e.force:navigateToURL'); navEvt.setParams({url: '/custom-search-results'}); navEvt.fire();({ handleClick : function(component, event, helper) { var searchText = component.get('v.searchText'); var action = component.get('c.searchForIds'); action.setParams({searchText: searchText}); action.setCallback(this, function(response) { var state = response.getState(); if (state === 'SUCCESS') { var ids = response.getReturnValue(); sessionStorage.setItem('customSearch--recordIds', JSON.stringify(ids)); var navEvt = $A.get('e.force:navigateToURL'); navEvt.setParams({url: '/custom-search-results'}); navEvt.fire(); } }); $A.enqueueAction(action); } }) - Save the file.
- Open customSearch.css by clicking Styleon the right-hand side of the Developer Console and replace the contents with these CSS rules.
.THIS .slds-input__icon{ margin-top: -.8rem; } .THIS { padding: 0 10px; } - Save the file.
- To give the component a UI label, open customSearch.design by clicking Design on the right-hand side of the Developer Console, and replace the contents with this code.
<design:component label="Cloud Kicks Search"> </design:component> - Save the file.
- In Experience Builder, refresh the browser window.
- To switch to the new search component, open Theme | Theme Settings, and then select Cloud Kicks Search in the Search Component dropdown.

 Tip You can also go to Settings | Theme | Configure and click
  beside the theme layout to edit its properties and select the search component.
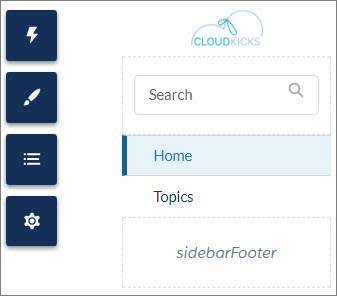
The page refreshes and search changes from this standard component:

To this sleek little number:
Test the Search Feature
Now to the fun part! Let’s test out the search feature.
- In Experience Builder, click Preview on the top toolbar.
- Enter United Oil in the search box and click
 . The search returns records for accounts, contacts, and leads that include the term.
- To view the details of an individual record, click Go to details.