Begin and Close Cases with Survey Invitations
Learning Objectives
After completing this unit, you’ll be able to:
- Send a survey invitation based on case auto-response rules.
- Send a survey invitation on case closure.
- View feedback provided by the contact associated with a case.
Know What a Customer Feels Before and After a Case
Gabriela wants to gather customer feedback during the lifecycle of a case. She has two requests for Maria. First, she wants to send survey invitations for the Net Promoter Score survey every time a case is created via Ursa Major Solar’s website. This helps the service reps determine what the customers think about their products before they start working on a case.
Next, she wants to send invitations for the Customer Satisfaction survey to gather feedback on a closed case. Both surveys must be sent to the customer who logged the case.
Maria gets back to Gabriela on the same day. Maria plans to use Case Auto-Response Rules to send survey invitations when cases are created via their website. To send survey invitations after cases are closed, she plans to use Support Settings.
Send Survey Invitations Using Case Auto-Response Rules
Ursa Major Solar’s website already captures cases using Salesforce’s Web-to-Case. Maria only needs to set up an auto-response rule that emails an invitation to the case’s contact when a case is created using Web-to-Case. Here’s how she does it.
- Click
 and select Setup.
- In the Quick Find box, enter
Case Auto-Response Rules.
- Select Case Auto-Response Rules.
- Click New.
- Name the auto-response rule. Enter
New Case (Product Feedback).
- Select Active and click Save.
- Click New Case (Product Feedback).
- In the Rules Entries section, click New.
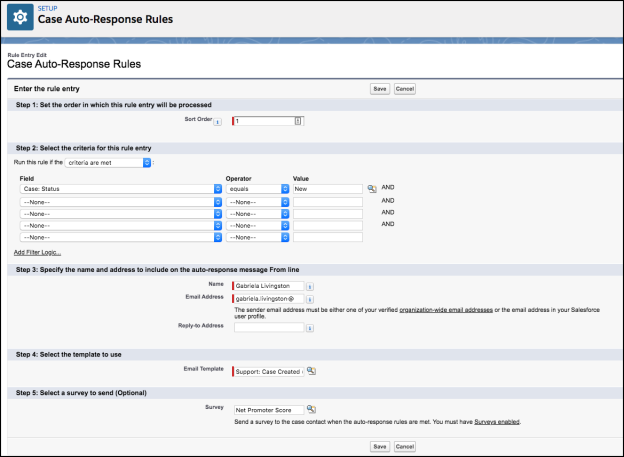
- In Sort Order, enter
1.
- Specify the following criteria:
- Field: Case: Status
- Operator: Equals
- Value: New
- Specify the following name and address for the auto-response message.
- Name: Gabriela Livingston
- In the Email Address field, enter your own email id. This information doesn’t appear in the email invitation.
- In the section Step 4, select the email template that you want to send. This email template is used to send out a separate email to the customer. You can use it to let the customer know that a case has been created.
- In the section Step 5, click
 .
.

- Select the survey you want to email on case creation. Maria selects Net Promoter Score.
- Click Save.
Send Survey Invitations on Case Closure
On the Support Settings page, Maria selects the survey that she wants to send when a case is closed.
- Click
 and select Setup.
- In the Quick Find box, enter
Support Settings.
- Click Support Settings.
- Click Edit.
- In the Customer Feedback Survey field, click
 .
.
- Select Customer Satisfaction.

- Click Save.
When a case is closed, an email containing a link to the Customer Satisfaction survey is sent to the contact associated with the case.
View Case Survey Feedback
Maria wants to make it easy for Gabriela to find the responses provided by the customers. Maria adds the Survey Invitations and Responses related list to the Case object’s page layout.
- Click
 and select Setup.
- Click Object Manager.
- In the Quick Find box, enter
Case.
- Select Case.
- Click Case Page Layouts.
- Click Case Layout.
- Under Case Layout, click Related Lists.
- Drag Survey Invitations and Responses to the Related Lists section.
- Click
 in the Related List section.
- Maria decides to display the following fields on the related list.
- Record Name
- Invitation Record
- Response Record
- Response Status
- Response Submitted By

- Click OK.
- Click Save.
- Click Yes to add these changes for users across your org and overwrite users’ personal customizations.
The customer feedback for survey invitations associated with a case can be found in the Related tab of the case record in Survey Invitations and Responses list.
Gabriela can now use the Survey Invitations and Responses related list to view the customer feedback for survey invitations associated with a case. In the next unit, we’ll find out how the team automates survey invitations sent to sales reps.
Resources
- Salesforce Help: Enable Digital Experiences
- Salesforce Help: Create an Experience Cloud Site
- Salesforce Help: Publish Your Experience Builder Site Customizations
- Salesforce Help: Activate Your Experience Cloud Site
- Salesforce Help: Considerations for Sending Email Invitations to Gather Feedback on Support Cases
- Salesforce Help: Add the Survey Invitations and Responses Related List to Object Record Pages
- Salesforce Help: Surveys are enabled, but they are not being sent via Case Support Settings