Manage Document Approvals and Recipient Visibility
Learning Objectives
After completing this unit, you’ll be able to:
- Submit documents for approval.
- Track and manage document approvals.
- Understand recipient visibility, including reps, team leads, and users.
- Send documents without approval requirements.
Send Documents for Approval
Once you finish creating and publishing your document templates, you can move on to sending the documents to your reps for approval. Salesforce Spiff Approvals covers how to create approval routes in Salesforce Spiff, so be sure to review those steps and create an approval route before sending out your documents.
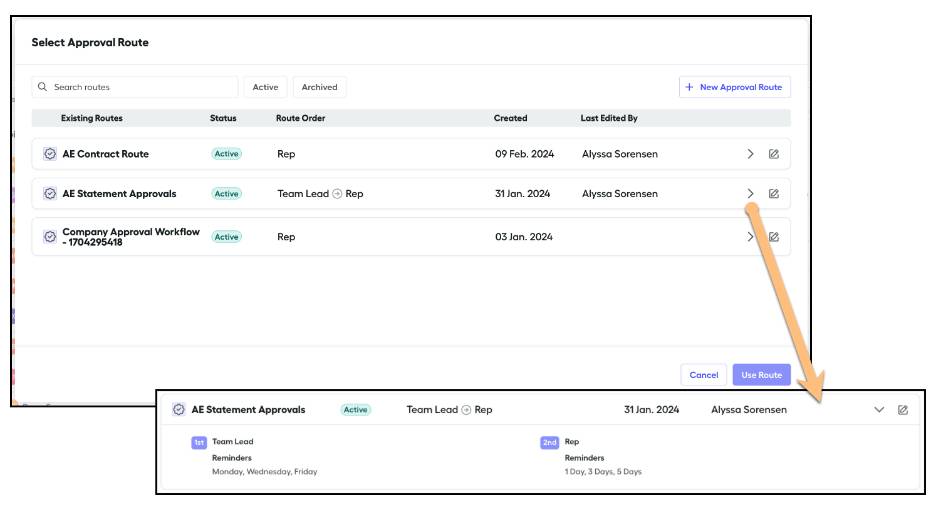
After you create an approval route for your document, navigate to Documents | Templates and select the document you want to send out for approval. Click Send for the document from the template tab. Select the Approval Route you wish to use for the given template. Approval Routes determine the following:
- The route name
- Who approves the document
- The number of approvers
- The order of approvers
- Whether or not approval reminders are sent (these can be toggled on or off only for representative approvers)
- The number of approval reminders (reps only, if reminders are enabled)
- The approval reminder cadence (reps only, if reminders are enabled)
- How to handle team lead routing (if enabled and team leads are set as approvers)
Click a route and select Use Route to continue. Click the dropdown to view more details about the route settings.
On the next step, select the recipient(s) and click Send Documents. Note: Users must exist on the Spiff platform to send the document for approval. Documents can’t be sent to external users at this time. Additionally, users must be active (that is, have logged in at least once) to receive notifications about documents that need to be approved.
A popup appears asking you to confirm you’re sure you want to send the selected documents. Confirm the action to proceed.
Track and Manage Document Approvals
Once the document is sent, you’re automatically taken to the Approval Requests tab, where you can track the progress of each document approval. You can track the date sent, status, and progress; trigger an additional reminder; delete; and export from this table. Track progress by clicking on the progress icon on the right side of the table, which includes time stamps of when each approval occurred. Please note the following for deleting and archiving documents.
-
Delete documents that have been sent for approval: Only documents that haven't been fully approved can be deleted. A document with a Completed status (fully approved) can only be archived.
-
Archive documents: When a document is archived, it’s archived for all users with visibility of that document, not just the user who performed the archiving. Only finance and admin users can archive a document.
The status column displays as completed if all required approvals are completed. Exporting a completed (approved) document from this table creates an audit trail, with time stamps for when the document was sent and approved by all required parties. The Approval Requests table can be exported to a .csv file using the export icon at the top right of the table. Export PDF copies, in bulk, of any documents needed by selecting each document or clicking the select-all check box in the column header. Then click Download Documents as PDF.
A message appears briefly in the lower-right corner of your window, letting you know that these documents won’t be downloaded immediately to your browser. Due to the processing time it can take depending on how many documents are selected, Spiff emails you once the full download is available. Don't click the button multiple times thinking it’s not working; this causes multiple emails to be sent to your inbox. An email is sent once the bulk download is complete and ready to be downloaded. Click Download in your email to immediately download the zip file that will contain the PDF exports of all the documents selected and the approval histories.
Recipient Visibility
Team leads, reps, or individual users who are listed as approvers will receive an email with a link to approve the document in Spiff. Again, keep in mind that only active users (users who have logged in at least once) will receive email notifications from Spiff. Users can click Approve in Spiff directly from the approval email, or log in to Spiff and navigate to the Documents tab. The document will have a Ready to Approve status in their Approval Requests menu. Clicking Ready to Approve will load the document, where users can click to approve the file.
View Documents After Approval
After an administrator sends a document, team leads and representatives can view their relevant documents anytime in Spiff. Note that representatives can only see their own documents. They can export or download the document (click the document name), and view the approval details (click the progress icon).
Team leads can view the documents of the reps they manage. This document visibility respects the effective dating of the team lead’s assignment, meaning that the team lead only has visibility of team members’ documents within the bounds of the lead’s effective dates. Once the assignment is effective, the team lead can view documents of their team members even when a document was sent before the lead’s assignment effective dates. For example, Team Lead A has an effective date of February 1. Rep A, who is a member of the team, has a document that was sent and approved in January. Beginning February 1, Team Lead A can view Rep A's document from the previous month.
If an individual is selected as a user approver in the document, the user sees the file in their respective Documents tab.
Send Documents to Reps for Visibility—No Approval Needed
You can have situations where you want to send a document or file to a user, but you don’t need their approval. Perhaps you only need them to see or have access to the document. You can accomplish this by creating an approval route, but only with an admin approver. Once you create your admin approval route, select the users that need access and send the document as normal. An admin needs to approve the document (that is, change the status to completed) for it to be visible and downloadable to the receiver. From their Documents page, reps can simply click the document name, and the receiver can view or export the file preview of the document if needed.