Premiers pas avec la planification de territoires
Objectifs de formation
Une fois cette unité terminée, vous pourrez :
- Concevoir une planification de territoire
- Créer un alignement de territoires
Une planification de territoires efficace peut entraîner une augmentation des ventes, une diminution des coûts de personnel et de déplacement, ainsi qu’une amélioration globale de la couverture client, menant ainsi à des relations plus solides.
Tenez compte de ces questions lorsque vous réfléchissez à la planification de territoires de votre entreprise.
- Votre organisation a-t-elle des territoires ?
- La planification de territoires est-elle chronophage pour les responsables des ventes et des opérations commerciales de votre organisation ?
- Êtes-vous souvent à la recherche d’une solution de planification de territoires plus efficace ?
Si vous avez répondu oui à l’une de ces questions, ne cherchez pas plus loin ! Vous êtes au bon endroit pour obtenir des réponses.
Dans ce module, nous supposons que vous connaissez les territoires de vente, anciennement connus sous le nom de gestion des territoires d’entreprise. Si ce n’est pas le cas, aucun problème. Pour plus d’informations sur les territoires de vente, consultez l’aide Salesforce.

Territoires dans la planification commerciale
Bien qu’il existe de nombreuses façons de diviser vos territoires de vente, il faut du temps pour parcourir manuellement les données de vente afin de réorganiser les territoires. Si ce processus n’est pas fait correctement, vous vous retrouverez face à une répartition inégale des opportunités, actuelles et futures, au sein de votre organisation. Les territoires déséquilibrés ont également un impact négatif sur votre entreprise, qu’il s’agisse d’une équipe commerciale trop dispersée ou d’un trop grand nombre de commerciaux couvrant un même territoire. Dans les deux cas, la planification de territoires est la solution idéale dans le cadre de la planification commerciale de Salesforce, car elle permet de gérer correctement les processus difficiles de planification de territoires auxquels les entreprises sont confrontées.

La planification de territoires vous aide à analyser et à concevoir des territoires de manière logique et évolutive. Elle fournit aux chefs d’entreprise les outils dont ils ont besoin pour gagner du temps et améliorer la précision en se concentrant sur trois fonctionnalités principales.
Fonctionnalités de la planification de territoires |
Fonctionnalité |
|---|---|
Accès à une gestion et une optimisation avancées des territoires |
|
Importation de territoires optimisés dans Salesforce Maps |
|
Gestion des territoires dans Salesforce |
|
Voyons comment ces fonctionnalités de planification de territoires fonctionnent dans un scénario réel.
Étude de cas : Organisation grâce aux territoires
Cloud Kicks, une entreprise de chaussures personnalisées, réalise actuellement un important exercice de réalignement des territoires. Elle a mis en place une planification de territoires afin de gérer ces changements.
Cloud Kicks élargit son équipe commerciale et ajoute des territoires supplémentaires. Cloud Kicks utilise actuellement la planification commerciale Salesforce pour définir sa stratégie annuelle, notamment pour organiser l’alignement de ses territoires en groupes de comptes et identifier les propriétaires de ces comptes. Dans le cadre de son réalignement, Cloud Kicks souhaite utiliser le champ de chiffre d’affaires annuel pour répartir équitablement les opportunités entre les commerciaux. Pour ce faire, Cloud Kicks se concentre sur trois aspects clés.
- Réaligner les territoires pour garantir que les commerciaux peuvent couvrir plus de comptes efficacement.
- Collaborer avec les dirigeants et l’équipe commerciale sur la conception des territoires.
- Établir des territoires qui attribuent des comptes en fonction des objectifs de croissance de l’entreprise.
Linda Rosenberg, administratrice Salesforce, utilise la planification de territoires pour mener à bien ce réalignement.
Création d’un rapport
La planification de territoires peut être directement intégrée aux rapports Salesforce. Ces rapports peuvent être créés pour tout objet à mapper et afficher n’importe quel champ sur cet objet. Lors de la création d’un rapport, certains champs sont obligatoires. Voici lesquels :
- Champ Object ID (ID d’objet)
- Champs utilisés pour attribuer des territoires, comme User Name (Nom d’utilisateur), User ID (ID d’utilisateur), Territory Name (Nom de territoire) ou Territory ID (ID de territoire)
- Champ Latitude
- Champ Longitude
Des enregistrements géocodés sont requis. Si les enregistrements ne sont pas géocodés avec des coordonnées de latitude et de longitude dans votre environnement, utilisez l’application principale Salesforce Maps pour géocoder les enregistrements. Passez en revue le badge Configuration de Salesforce Maps pour en savoir plus.
Dans ce cas, Linda crée un rapport Salesforce pour afficher les comptes avec les attributs clés suivants : chiffre d’affaires annuel, catégorie de compte et nombre d’employés. Elle ajoute l’ID de compte, l’ID d’utilisateur, la longitude, la latitude et quelques champs descriptifs supplémentaires tels que le nom, la catégorie, l’État, le pays et le code postal. Ces champs mesureront les territoires, puis rechercheront et réattribueront des comptes individuels.

Linda nomme le rapport enregistré Southeast Accounts by Annual Revenue (Comptes du Sud-Est par chiffre d’affaires annuel).
Planification de la conception
Dans la planification de territoires, le processus de conception comporte deux parties.
-
Jeux de données : une collection d’enregistrements qui définissent vos alignements de territoire.
-
Alignement de territoires : le modèle de territoire proposé pour le groupe d’enregistrements défini dans le jeu de données. Un alignement fournit le cadre visuel de vos classifications territoriales. Par exemple, les territoires peuvent être classés en régions ou en districts.
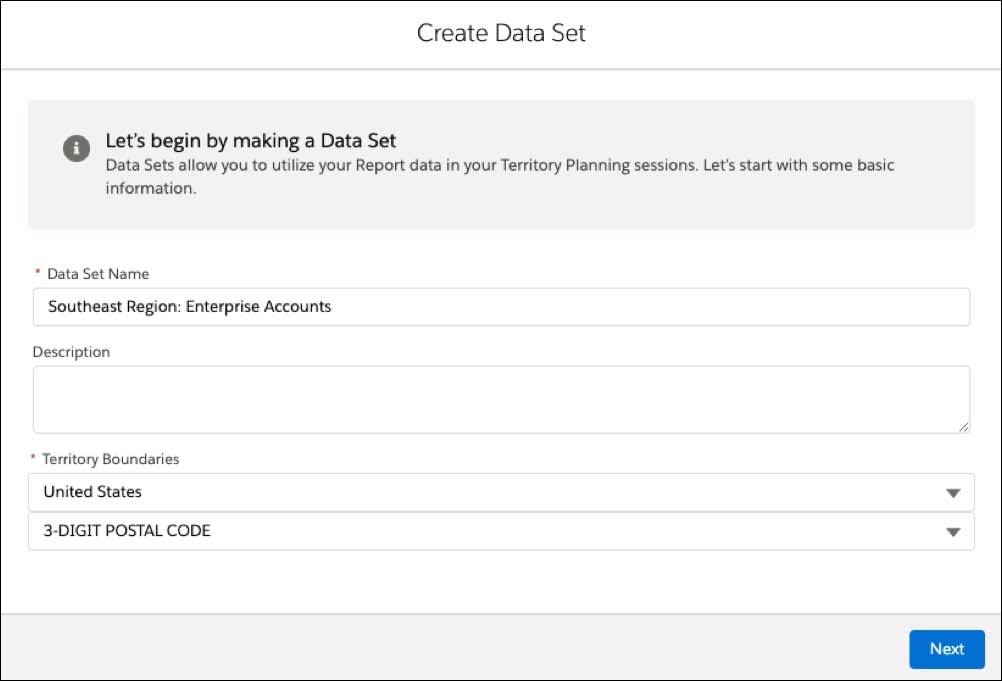
Linda sélectionne le bouton Create Data Set (Créer un jeu de données) et nomme son jeu de données Southeast Region: Enterprise Accounts (Région du Sud-Est : comptes d’entreprise).

Elle ajoute une brève description, puis définit l’étendue des limites de son territoire.
L’utilisation des limites de territoires est facultative. Si celles-ci sont définies, elles s’appliquent à un pays sélectionné et fournissent des options géographiques supplémentaires. Linda sélectionne les États-Unis comme pays et quatre options supplémentaires apparaissent : Postal Code (Code postal), State (État), County (Comté) et 3-Digit Postal Code (Code postal à 3 chiffres). Linda sélectionne 3-Digit Postal Code (Code postal à 3 chiffres) et continue sa conception.
Elle peut désormais sélectionner les rapports qui constitueront son jeu de données. Elle examine la liste des rapports affichés et sélectionne le rapport Southeast Accounts by Annual Revenue (Comptes du Sud-Est par chiffre d’affaires annuel) qu’elle a créé précédemment.
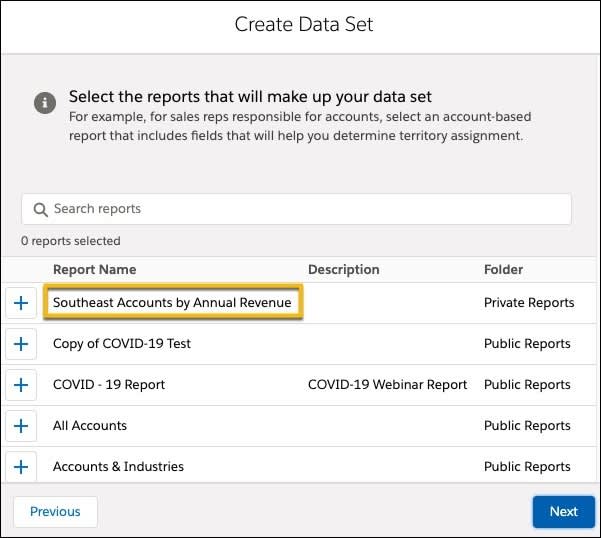
Vous pouvez sélectionner un ou plusieurs rapports lors de la configuration d’un jeu de données. Si vous sélectionnez plusieurs rapports, chaque rapport dispose de sa propre vue de légende et s’affiche sous forme de symboles différents sur la carte afin de distinguer les rapports. Cela permet aux utilisateurs de planifier des territoires en fonction des données de plusieurs objets si nécessaire.
Ensuite, Linda mappe ses champs d’objets. (1) Unit ID (ID d’unité) identifie la valeur unique associée à un enregistrement, comme l’ID de compte, (2) le champ Unit Assignment (Attribution d’unité) identifie l’attribution préexistante, comme le propriétaire du compte, (3) Billing Latitude (Latitude de facturation) et Billing Longitude (Longitude de facturation) spécifient les champs de géolocalisation, et (4) les champs Selected Attribute (Attribut sélectionné), tels que le chiffre d’affaires annuel, sont utilisés pour analyser ses territoires de vente.

Entraînement à la création d’un jeu de données
Maintenant que Linda a conçu son jeu de données, voulez-vous faire de même ? Vous pouvez utiliser le simulateur Trailhead pour vous entraîner à créer un jeu de données.
Découverte du simulateur Trailhead
Le simulateur Trailhead est différent d’un Trailhead Playground. Le simulateur ne stocke pas votre progression. Si vous fermez votre navigateur, la simulation recommence depuis le début à chaque fois qu’elle est lancée. Utilisez les commandes de navigation situées en bas du simulateur pour revenir là où vous vous étiez arrêté. Pour une expérience optimale, nous vous recommandons d’utiliser le simulateur Trailhead sur un ordinateur portable ou de bureau. Notez également que tous les éléments du simulateur ne sont pas cliquables : seuls ceux concernant les étapes décrites dans le simulateur le sont.
Lancez le simulateur Trailhead.
Création d’un alignement
Les entreprises disposent de plusieurs moyens pour organiser leurs territoires lors de la planification du cadre d’un alignement proposé. Voici quelques exemples courants :
- Par commercial ou technicien de service
- Par taille d’entreprise, comme les petites et moyennes entreprises
- Par responsables attribués à différentes équipes
Chez Cloud Kicks, l’alignement se concentre sur les commerciaux. Afin d’optimiser la croissance du chiffre d’affaires, l’alignement proposé comprend des territoires supplémentaires et un modèle permettant aux commerciaux d’améliorer la couverture des comptes.
Linda crée un alignement.
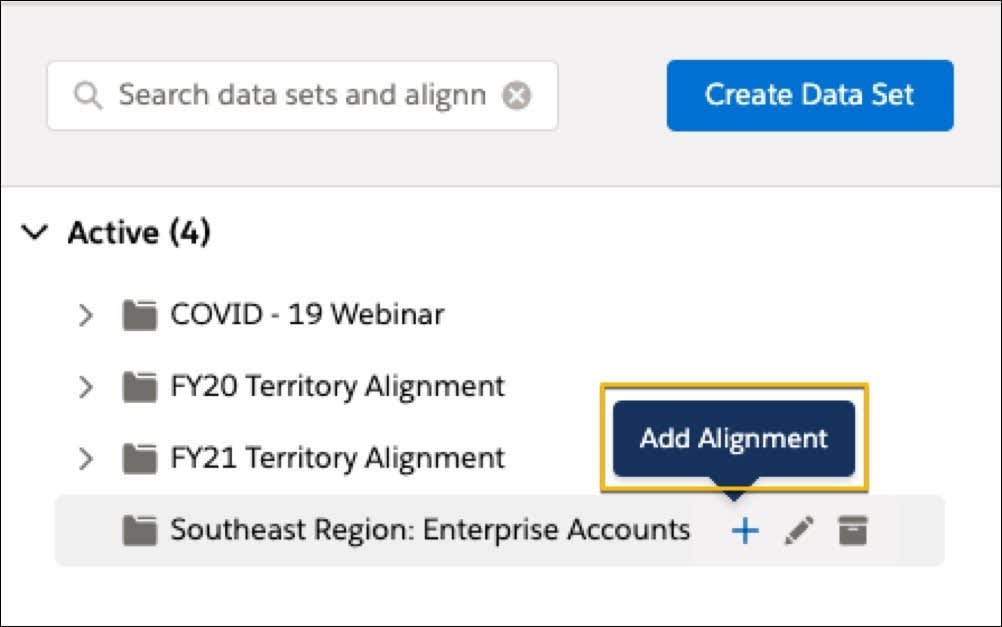
Elle le nomme Proposed Alignment (Alignement proposé) et démarre le processus de création.
Elle a désormais trois options.
- Remplir et personnaliser un exemple de modèle avec différents niveaux de hiérarchie déjà affichés.
- Importer et configurer un plan d’alignement existant. Cette option est souvent utilisée lors de la création d’une itération d’un alignement existant.
- Importer un modèle existant à partir des territoires de vente.

Étant donné que Cloud Kicks utilise déjà les territoires de vente, Linda sélectionne le bouton Import Salesforce Territory Model (Importer le modèle de territoire Salesforce). Ensuite, elle sélectionne la filiale du Sud-Est et identifie le responsable de compte comme propriétaire du territoire.
Puis elle définit le nom du propriétaire et la valeur d’attribution de l’unité. Elle utilise Account Owner ID (ID du propriétaire du compte), la même valeur d’ID d’attribution identifiée dans le jeu de données. Cette valeur garantit que chaque enregistrement du rapport Salesforce sélectionné est aligné sur le bon territoire.
Après avoir vérifié le nom du propriétaire de chaque territoire, elle sélectionne l’option d’attribution d’unité pour remplir automatiquement le champ Territory Owner ID (ID du propriétaire du territoire).

Enfin, avant de terminer la conception, Linda coche la case Automatically assign nearby containers (Attribuer automatiquement les conteneurs à proximité). Cette fonctionnalité associe automatiquement les codes postaux non attribués à un territoire en fonction de la proximité des comptes. Cela permet d’éliminer toute absence de couverture. Elle sélectionne Finish (Terminer) et le territoire du Sud-Est s’affiche sur la carte.
Exercice avec le simulateur Trailhead
Vous pouvez désormais suivre les étapes d’un simulateur Trailhead afin de vous familiariser avec la création d’un alignement dans la planification de territoires Salesforce Maps. Vous utilisez le simulateur au lieu d’un Trailhead Playground pour suivre et réaliser les étapes.
Lancez le simulateur Trailhead.
Prochaines étapes
Tout au long de cette unité, Linda a réalisé les étapes nécessaires pour lancer son projet de réalignement. Elle a créé son rapport, l’a ajouté au jeu de données et a importé la structure territoriale existante à partir des territoires de vente. Dans l’unité suivante, elle apporte des modifications en ajoutant et en supprimant des commerciaux afin de garantir une couverture de toutes les zones. Ensuite, Linda examine l’impact immédiat de ses modifications sur le chiffre d’affaires annuel et collabore avec les chefs d’entreprise avant de finaliser le territoire qu’elle propose.
Ressources
- Trailhead : Configuration de Salesforce Maps
- Site externe : Démonstration de la planification de territoires Salesforce Maps
- Aide Salesforce : Configuration de la planification de territoires Salesforce Maps
- Site interne : Installation de Salesforce Maps