Création d’un alignement de territoires optimal
Objectifs de formation
Une fois cette unité terminée, vous pourrez :
- Sélectionner et comparer les changements de territoire
- Ajouter de nouveaux territoires
- Optimiser et préserver les territoires
Dans l’unité précédente, Linda a établi le cadre de la planification des territoires en créant un jeu de données et en important son alignement de territoires existant. Il est maintenant temps d’apporter des modifications à son alignement de territoires.
Dans la planification commerciale, les données de la planification de territoires sont isolées des données de production et des attributions. Cela signifie que Linda peut apporter des modifications et voir l’impact immédiat de celles-ci sur le chiffre d’affaires annuel et le nombre d’unités. Les modifications ne sont pas mises à jour dans Salesforce tant que les données ne sont pas publiées et activées.
Linda commence le processus de réalignement en examinant la légende sur le côté droit de la carte. Elle affiche les champs clés du rapport Accounts by Annual Revenue (Comptes par chiffre d’affaires annuel) qu’elle a sélectionné dans son jeu de données. Dans la légende, elle voit chaque territoire représenté par une couleur différente sur la carte, ainsi que le nombre d’unités et le nom du propriétaire, mais il lui manque le champ du chiffre d’affaires annuel. Pour l’ajouter en tant que colonne visible, elle sélectionne  et met à jour la légende de la carte afin d’afficher le chiffre d’affaires annuel. Ce point de données clé est donc mis au premier plan dans le processus de conception. Elle peut intégrer d’autres champs Salesforce en plus ou à la place afin d’améliorer sa planification.

Attribution des conteneurs à proximité
Linda porte son attention sur la vue de carte. Elle est ravie de voir que toutes les zones de la région du Sud-Est se sont vu attribuer automatiquement un territoire.
Par le passé, la couverture du territoire était souvent incomplète en raison de codes postaux manquants dans son organisation Salesforce. Il fallait passer des heures à rechercher les zones non attribuées, localiser les comptes à proximité et attribuer la propriété. Maintenant, avec la planification de territoires, Linda sélectionne Automatically assign nearby containers (Attribuer automatiquement les conteneurs à proximité) dans le cadre de la conception de son alignement. Les codes postaux manquants sont automatiquement attribués à des comptes en fonction de leur proximité avec chaque territoire.
Chaque territoire affiche un cercle qui représente le centre du territoire. Les unités sont dispersées sur l’ensemble de la carte. Sous le panneau Legend (Légende), Linda sélectionne United States Postal Code (Code postal des États-Unis) pour afficher la liste des codes postaux manquants dans son organisation. Elle décoche toutes les zones qu’elle ne souhaite pas attribuer.

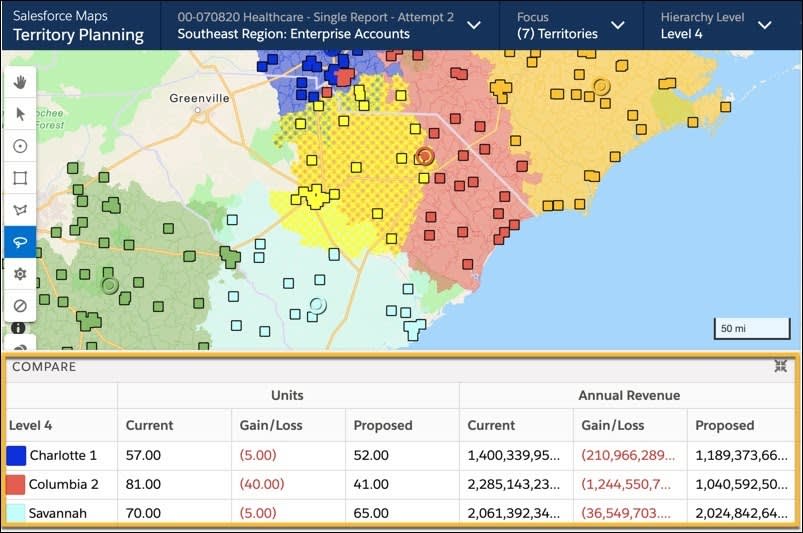
Données de comparaison
Elle est maintenant prête à apporter des modifications aux attributions de compte. En se concentrant sur une zone de la carte, elle utilise l’outil  permettant de capturer rapidement une zone spécifique pour l’analyser de manière plus approfondie.
Elle souhaite voir une comparaison entre les chiffres d’affaires annuels de son alignement actuel et les chiffres d’affaires annuels de n’importe quelle modification proposée. Pour visualiser cela, la planification de territoires affiche en option un tableau comparatif en bas de la carte. Linda déplace la zone sélectionnée vers différents territoires et utilise le tableau de comparaison pour visualiser l’impact de ces modifications sur le chiffre d’affaires annuel de chaque territoire sélectionné.
La légende, un outil puissant
Une fois satisfaite des modifications proposées, Linda sélectionne la région du territoire, l’attribue à un autre territoire et applique ses modifications. Les modifications s’affichent automatiquement dans les champs de la légende.

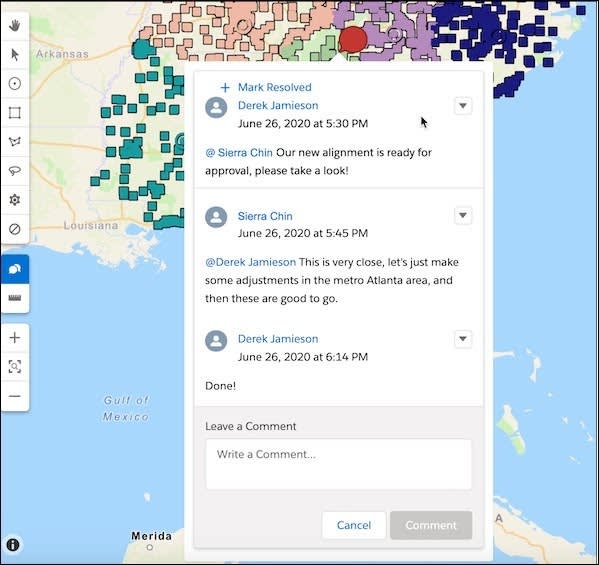
Avant d’effectuer des modifications supplémentaires, elle sélectionne  pour partager des commentaires et collaborer avec son équipe de direction.
Après avoir communiqué avec la direction, Linda utilise le bouton  sur le panneau Legend (Légende) afin de créer un territoire. Elle l’attribue ensuite à un nouveau commercial.

À ce stade, Linda a modifié l’attribution des territoires et créé un territoire. Elle voit la répartition des territoires entre les commerciaux et en jetant un œil au nombre d’unités et au chiffre d’affaires annuel du territoire, il est clair que la répartition n’est pas égale. Pour résoudre ce problème, elle sélectionne Optimize (Optimiser) afin d’assurer une répartition équitable des territoires en fonction du chiffre d’affaires annuel. Elle souhaite que chaque territoire bénéficie d’une couverture appropriée et elle doit également s’assurer que les commerciaux ont les mêmes chances de réussir. Cela se traduit en général par des clients plus satisfaits et une réduction significative de l’attrition coûteuse.
Exercice avec le simulateur Trailhead
Dans cette unité, Linda a apporté des modifications à l’alignement des territoires. Vous pouvez désormais vous entraîner à utiliser le simulateur Trailhead. À la place d’un Trailhead Playground, vous utilisez le simulateur pour suivre le module et réaliser les étapes.
Pour une expérience optimale, nous vous recommandons d’utiliser le simulateur Trailhead sur un ordinateur et non sur un appareil mobile. Le simulateur Trailhead est différent d’un Trailhead Playground. Le simulateur ne stocke pas votre progression ni les données que vous saisissez. Si vous fermez votre navigateur, la simulation recommence depuis le début à chaque fois qu’elle est lancée. Vous pouvez utiliser les commandes de navigation situées en bas du simulateur pour trouver l’endroit où vous vous êtes arrêté.
Lancez le simulateur Trailhead.
Optimisation intelligente fondée sur les attributs
L’optimisation est une fonctionnalité puissante de la planification de territoires ; elle optimise les territoires en fonction de l’attribut le plus important. Dans ce cas, Linda souhaite équilibrer ses territoires en fonction du chiffre d’affaires annuel et utilise la logique de distance pour déterminer le temps de trajet réel entre les comptes. La logique de distance offre deux options.
-
As the Crow Flies (À vol d’oiseau) : s’appuie sur des distances en ligne droite, point à point
-
Drive Time Network (Temps de trajet) : s’appuie sur les réseaux routiers locaux, la distance estimée et les temps de trajet estimés
Linda sélectionne Drive Time Network (Temps de trajet).

Elle peut désormais définir ses préférences en matière d’optimisation. Il y a trois options d’optimisation.
-
Solde : assure une répartition égale de l’attribut sélectionné sur les régions territoriales.
-
Continuity (Continuité) : fournit le montant minimal de réattributions d’unités/de conteneurs sur les régions de territoire. Si cette option est sélectionnée, elle améliorera l’équilibre avec un impact minimal sur votre alignement.
-
Compactness (Compacité) : fournit la distance minimale entre les unités et les conteneurs dans les régions de territoire. Les temps de trajet plus courts réduisent le kilométrage. Utilisez cette option si votre organisation cherche à limiter le temps de trajet.
Avec la planification de territoires, vous pouvez donner la priorité à une option, à une combinaison de deux options ou aux trois options. Linda sélectionne les trois.

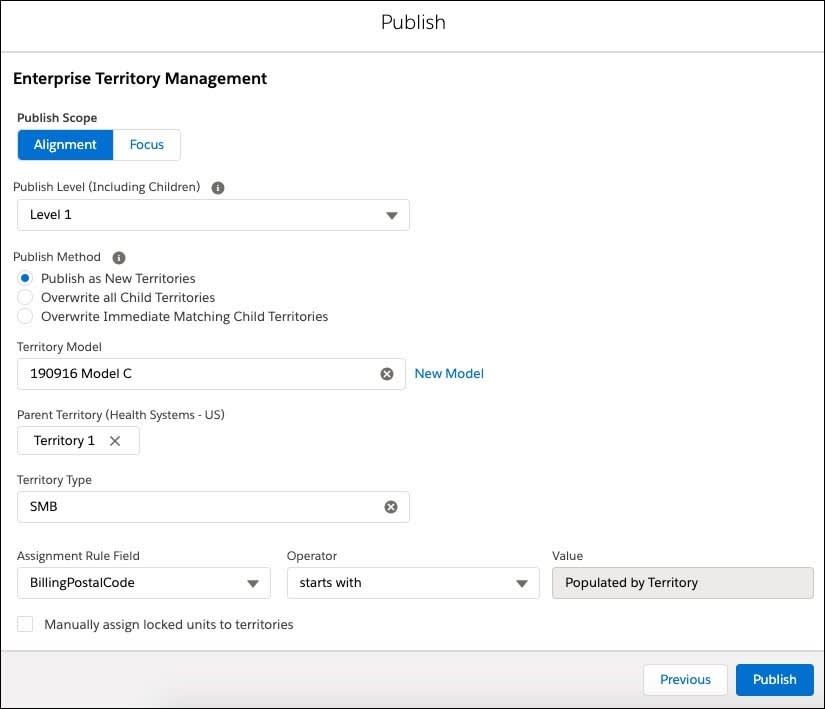
Satisfaite de sa conception, elle collabore avec la direction. Une fois sa conception finalisée, elle la publie. Elle doit choisir parmi les six options de publication suivantes.
-
Publish to Sales Territories (Publier dans les territoires de vente) : publie un modèle de territoire Salesforce dans les territoires de vente. Si vous sélectionnez cette option, les modifications doivent également être activées dans l’outil correspondant pour être appliquées.
-
Publish to Salesforce Maps (Publier dans Salesforce Maps) : enregistre les territoires en tant que calques de forme dans un dossier dans Salesforce Maps. Si les utilisateurs ont accès au dossier, ils peuvent afficher leurs territoires, superposer les informations de compte et créer des itinéraires et des planifications optimisés dans les territoires qui leur sont attribués. Cette option peut créer des règles d’attribution automatique afin d’acheminer géographiquement les enregistrements vers l’utilisateur approprié.
-
Publish to PDF (Publier au format PDF) : crée des représentations PDF de la carte et de la légende de la carte pour tous les calques spécifiés d’un alignement. Choisissez entre le niveau actuel ou les territoires individuels.
-
Publish to Salesforce Fields (Publier dans les champs Salesforce) : écrit les valeurs d’attribution de la planification de territoires dans les champs trouvés dans les enregistrements Salesforce tels que les comptes, les opportunités, les pistes et les objets personnalisés.
-
Publish to CSV File (Publier sous forme de fichier CSV) : crée un extrait CSV pour votre alignement et inclut des informations sur la zone, les limites et/ou l’unité.
-
Publish to Field Service (Publier dans Field Service) : crée des territoires de service et des polygones de territoire de service à partir de vos limites attribuées dans la planification de territoires à utiliser dans Field Service.
Linda sélectionne les territoires de vente et clique sur Next (Suivant).

La boîte de dialogue Sales Territories (Territoires de vente) contient les options suivantes.
-
Publish Scope (Portée de publication) : vous pouvez décider de publier l’intégralité de votre alignement ou la partie spécifique sur laquelle vous travaillez.
-
Publish Level (Niveau de publication) : cette option sélectionne un niveau de hiérarchie pour la publication.
-
Publish Method (Méthode de publication) : cette option publie de nouveaux territoires, écrase les territoires existants ou écrase les territoires correspondants.
-
Territory Model (Modèle de territoire) : il s’agit du modèle sur lequel les territoires sont publiés.
-
Parent Territory (Territoire parent) : cette sélection détermine le territoire parent pour le niveau sélectionné.
-
Territory Type (Type de territoire) : il s’agit du type de territoire attribué à chaque territoire de l’alignement.
-
Assignment Rule Field (Champ de règle d’attribution) : cette option sélectionne un champ de compte standard ou personnalisé sur lequel fonder vos règles d’attribution de territoire, telles que le code postal ou l’État.
-
Publish locked units as manually assigned accounts (Publier les unités verrouillées en tant que comptes attribués manuellement) : si un territoire contient des comptes verrouillés, il est alors possible de publier ces attributions manuellement. Cela concerne généralement les comptes d’exception qui ne correspondent pas aux règles d’attribution géographique (c’est-à-dire un compte avec un code postal géré par un autre commercial).
Linda complète la boîte de dialogue et publie son nouvel alignement.
Dans ce cas, elle choisit également Publish to Salesforce Maps (Publier dans Salesforce Maps). Elle enregistre les calques de forme de territoire dans un dossier accessible par l’équipe commerciale. Désormais, l’équipe commerciale de Cloud Kicks peut utiliser ces calques de forme supplémentaires dans Salesforce Maps pour visualiser graphiquement ses territoires et créer des itinéraires et des planifications optimisés afin d’améliorer la productivité et le chiffre d’affaires.
Conclusion
Tout au long de cette unité, Linda a œuvré à réaligner les territoires pour Cloud Kicks. Elle a réussi à visualiser de nouveaux territoires et à apporter facilement des modifications grâce à la planification de territoires. Les modifications apportées aux attributs clés ont été automatiquement mises à jour et elle a pu constater l’impact immédiat de chaque modification. Pendant ce temps, ses réalignements ont été isolés des données de production afin que Linda puisse effectuer en toute sécurité autant de modifications que nécessaire et partager les réalignements avec la direction avant d’activer les modifications finales.