Customize Your Workspace
Learning Objectives
After completing this unit, you’ll be able to:
- Personalize your Workspace list view to focus on the records that matter most.
- Filter, search, and update records directly in your Workspace list for streamlined productivity.
Setting up the Sales Cloud Everywhere browser extension for maximum productivity is simple. Once Anaiya accesses the side panel and turns on contextual insights, it analyzes the web page she’s on, delivering contextual insights about accounts and prospects. From this one place, she can easily add Salesforce records like accounts, contacts, leads, and so on. Additionally, it includes a space to review action items and plan her day for success.
The extension also lets her access list views, just like in Sales Cloud. This means she can create and work with personalized views that simplify her workflow. She can focus on the records that matter most, filter, search, query, and even update them directly—all with greater flexibility and control. Let’s see it in action.
Get Familiar with Your Workspace Layout and Key Tools
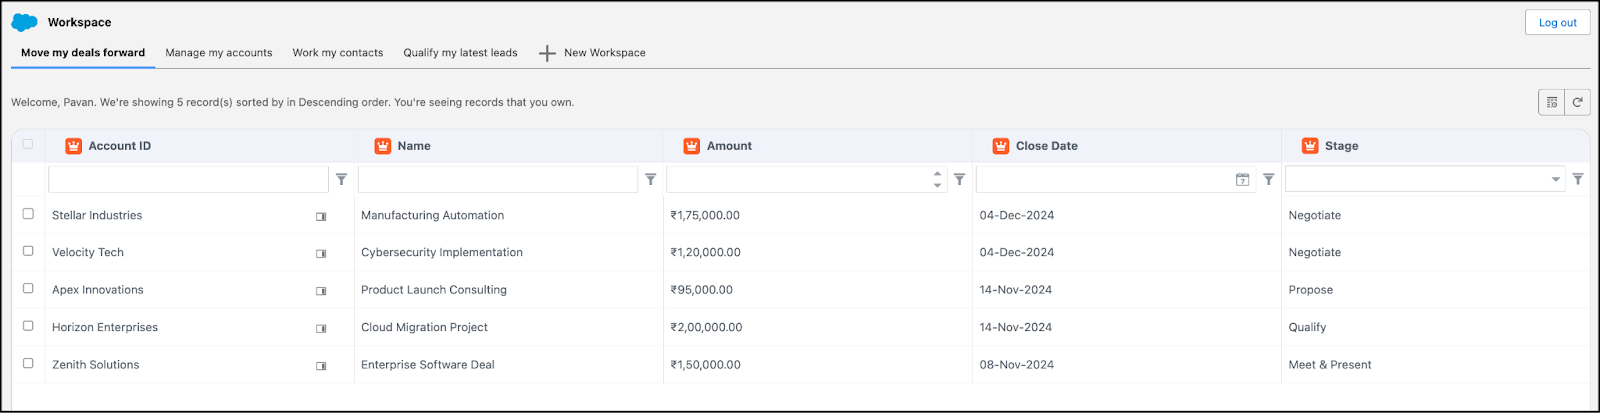
Workspace is an intuitive space where Anaiya dives into her key lists. She accesses it from the side panel, and it opens in a new tab. Right from the start, it’s got a few ready-made views, like Opportunities for moving deals forward; Accounts and Contacts for managing relationships; and Leads for qualification. And Anaiya has full control over her Workspace. She can create custom views, choose the fields that matter, filter for specific values, and make quick updates. It’s all designed to give a fully personalized setup that boosts sales efficiency.
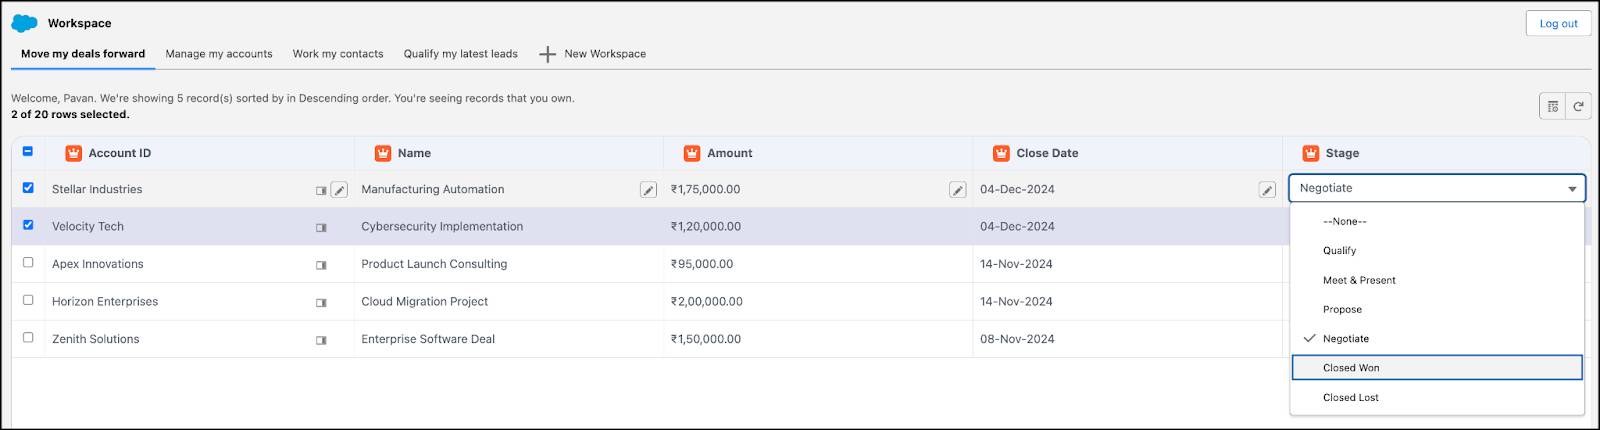
This view lets Anaiya update multiple records at once. She just selects the records she needs, makes a change to one, and that change is applied to all the selected records. It’s a quick way to keep everything aligned without repetitive updates.
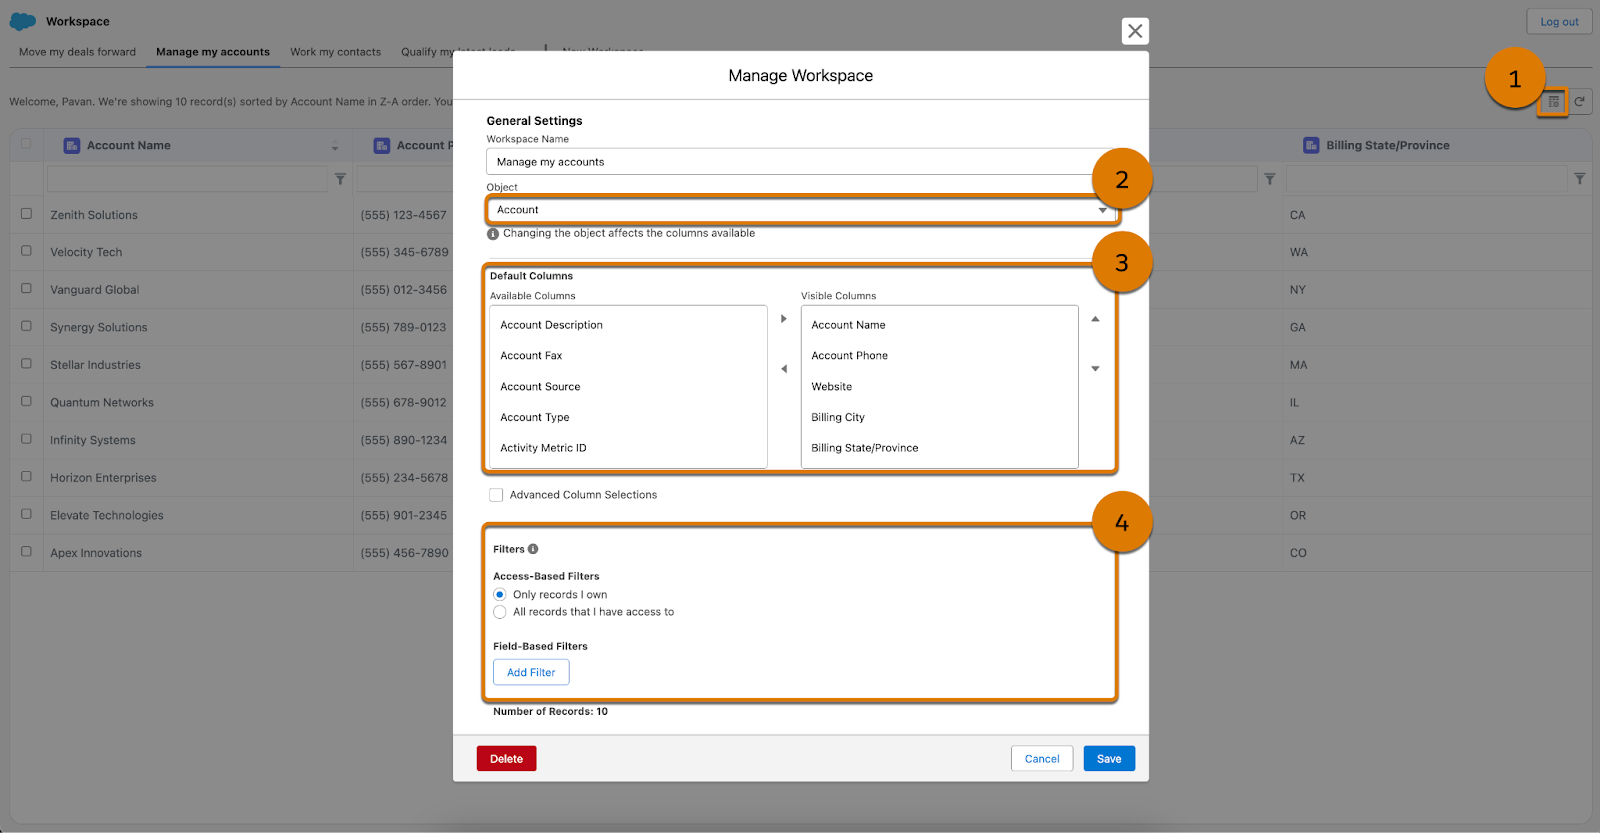
This view also gives her full control over what she wants to focus on. With the Manage Workspace (1) feature, Anaiya can select the object to display (2), customize the columns in her list (3), and filter specific records (4). For example, she can set up separate views for the same object, like creating different Workspaces for Boston and New York accounts since she manages them differently by location. It’s all about making Workspace fit exactly how she works best.
Even with its minimalist design, the interface is packed with key features that sellers can tailor Workspace to fit their processes. Anaiya can pull up just the records she needs, make quick updates, and keep her sales flow streamlined. The default views work great for her, especially since she can easily filter out accounts and contacts from regions outside her scope.
As part of a small team without dedicated service agents, Anaiya also needs to keep a close eye on all cases related to her accounts. That’s where a custom Workspace comes to her rescue, making it much easier to track and manage her cases efficiently.
Set Up Your Custom Workspace
As a senior seller at Northern Trail Outfitters, Anaiya handles high-stakes clients with care. She’s not only responsible for managing sales but also oversees all communications and resolves any issues. Given her team’s small size and lack of dedicated service agents, all cases raised by these clients land squarely on her plate. A tailored view that consolidates all the cases assigned to the accounts she manages would greatly improve her workflow. Let’s see how she sets it up.

- Click New Workspace.
- Enter a Title.
- Select the Salesforce object you want to pull data from. Anaiya chooses Case so she can track all her assigned cases.
- Select columns to display the information you need in your view.
- Set filters to bring in specific data, using Access-Based and Field-Based Filters as needed.
- Click Save.
With this new view, Anaiya can now track all her open cases at a glance.

Conclusion
With her customized Workspace in the Sales Cloud Everywhere extension, Anaiya plans her days more effectively, monitors action items, researches prospects, and seamlessly adds them into Sales Cloud—all in one place. This Workspace view gives her control over every essential task in her sales process: moving deals forward, managing accounts and contacts, qualifying leads, and keeping tabs on cases.
By using the extension to access Sales Cloud directly in her browser, Anaiya stays focused and productive, efficiently responding to new opportunities and staying organized wherever she’s working.