Show Quote Line Data in a Table
Learning Objectives
After completing this unit, you’ll be able to:
- Create a line item table to display products and prices in a quote template.
- Determine which quote-line fields appear in the line item table.
- Show or hide line item table columns based on conditions.
- Use out-of-the-box options to change styling of the line item table.
Designate a Line Item Table Location
Your quote template is coming together quite nicely, but you have yet to show your customer the products and prices you’ve negotiated for the quote. A table of quote line data would work great, so let’s designate a place for where the table should go. You start by creating a special kind of template content.
- In the navigation bar, click Template Content.
- Click New.
- Choose Line Items.
This type of content acts as a simple placeholder for a table that will grow automatically when you add more lines to the quote. Later you determine what information appears within the table.
- Click Continue.
- For Content Name, enter
AW Line Items.
The few other options on this record will effect the styling of the table, overriding the template defaults. For now you leave them unchanged.
- Click Save.
Good start, now let’s make a template section for the line item table.
- In the navigation bar, click Quote Templates.
- Click AW Proposal.
- Click the Related tab.
- In the Sections related list, click New.
- For Section Name, enter
Line Items.
- For Content, find and select AW Line Items.
- For Display Order, enter
30.
- Click Save.
OK, that’s the bare minimum you need to do in order to get line items into your proposal. If you were to preview your proposal for Q-00053, it would look like this.

It almost seems too easy! It does raise a few questions though. Like, how did CPQ decide which line item fields to show? And what can we do about the text overlapping in the Part # column? The answers to those questions and more reside in the quote template’s Line Column records.

Every time you create a quote template, CPQ automatically creates a set of related line column records. Each line column corresponds to a column in the table. They start with some important values, which you can change as you see fit.
-
Column Heading: The text in the header row, which repeats across pages.
-
Display Order: Sequences columns from left to right.
-
Width: The amount of space used between the margins, as a percent. Always make sure the total amount of width across all visible columns is no more than 100, otherwise the table extends outside the margins.
-
Field Name: The quote line field that supplies the data for the table cell.
These out-of-the-box columns are a good start, but let’s tweak the columns a bit for a nicer output, starting with the part number line column.
Back on the AW Proposal quote template:
- In the Line Columns related list, for the PART # record, click Edit from the menu.
- For Column Heading, enter
PRODUCT.
- For Field Name, enter
SBQQ__ProductName__c.
This will display the user-friendly name of the product, instead of a part number that may not mean much to the customer.
- For Width, enter
35.
Now the column has a bit more room for text so it’s less likely to overlap the next column.
- Click Save.
Now, update the remaining columns with a few similar tweaks.
Record |
New Column Heading |
New Field Name |
|---|---|---|
UNIT PRICE |
<leave as is> |
SBQQ__ProratedListPrice__c |
DISC (%) |
DISC |
SBQQ__TotalDiscountAmount__c |
EXTENDED |
CUSTOMER TOTAL |
SBQQ__CustomerTotal__c |
The unit price now appears prorated to account for subscription terms. The discount column now shows not only manually entered discounts, but contracted pricing and discount schedule adjustments too. Finally, the last column shows totals based on Customer Price. You might remember from the Pricing Methods for Salesforce CPQ badge that Customer Price does not include partner or distributor discounts. You deal with those later.
Since your CPQ-enabled org doesn’t have many products with descriptions, let’s remove the description line column to make room for other useful information.
- For the DESCRIPTION column, click Delete from the menu.
- Click Delete again.
Great, by making just a few changes to your line column records, your line item table looks like this when Q-00053 is previewed.

Show Columns Conditionally
You may have noticed that your table is only 75% wide. That’s so we can add two more columns for Partner Discount and Partner Price fields. These will be special though, only appearing if there are actually partner discounts applied. Otherwise it’s useless to show them. The key to toggling columns is the Conditional Print Field field on the line column record. This field points to a quote-level field, and works just like the Conditional Print Field for sections. If the field is non-zero (for numbers/currency), equals "true" (for text/picklists), or checked (for checkboxes), then CPQ knows to show the column.
For your template, you will use the quote field SBQQ__AveragePartnerDiscount__c to drive the partner-related columns. If it’s zero, the columns will disappear. You start by making a new line column record.
- In the Line Columns related list, click New.
- For Column Heading, enter
PARTNER DISC (%).
- For Display Order, enter
70.
- For Field Name, enter
SBQQ__PartnerDiscount__c.
- For Width, enter
10.
- For Alignment, choose Right.
- For Conditional Print Field, choose SBQQ__AveragePartnerDiscount__c.
Team Trailhead added this value into the picklist to save time, but in real life you have to update it yourself.
- Click Save & New.
- For Column Heading, enter
PARTNER PRICE.
- For Display Order, enter
80.
- For Field Name, enter
SBQQ__PartnerTotal__c.
- For Width, enter
15.
- For Alignment, choose Right.
- For Conditional Print Field, choose SBQQ__AveragePartnerDiscount__c.
- Click Save.
Quote Q-00053 has a few products with partner discounts, so when you preview the proposal the table now looks like this.

Something surprising happens if you print a quote that doesn’t have partner discounts. By default, CPQ adds the missing column width to the widest remaining column. So that non-partner-discount quote will look like this.

If you don’t want the missing width to expand the table, check the Discard Width When Hidden field on the line column record.
Other Appearance Tweaks
Each line column record has a number of styling-related fields for the text and cell properties. Along with these, there are a number of fields throughout the quote template and related records that can quickly change the structure of the line items table.
Separate Line (Line Column checkbox)
Place the quote line data in its own row, beneath the normal columns. Each separate line column gets its own new row, and if the field doesn’t have data, the row is automatically removed.

Hide On Product Options (Line Column checkbox)
Replace the $0 value with the word “Included” if the quote line is an option in a bundle, like these laptop options.

Table Style (Template Content picklist, appears only for Line Items type)
Show subscription products that have multiple segments in a table specially formatted to show each segment’s details. The table only appears if your quote contains segmented products. The first example is the Price Dimensions as Columns style.

Or you can choose the Price Dimensions as Rows with Summary style.

Hide Column Header (Template Section checkbox)
Remove headers if you think the line item data speaks for itself.

Show Discount Schedule (Quote Template checkbox)
Place a table-within-a-table of discount tier details for any line item that has volume-based pricing.

Line Sort Field (Quote Template picklist)
Sorts fields alphanumerically based on the selected field instead of the Line Number field. For example, you could add and use SBQQ__ProductName__c to organize lines.

Setting Up Multiple Line Item Tables
With all the different ways you can customize a line item table, it’s not surprising that some businesses might want to show more than one version throughout the proposal. For example, a simplified table might be light on details.

While another table might have a lot of pricing details and extended descriptions for each item. Two tables means having two sets of line columns. Each line column can be associated with a distinct template section using the Section lookup field. In the screenshot below columns for product name, quantity, and net price are related to a section named Simplified Table. Those fields have columns specific to the Detailed Table section, which includes several other columns too.
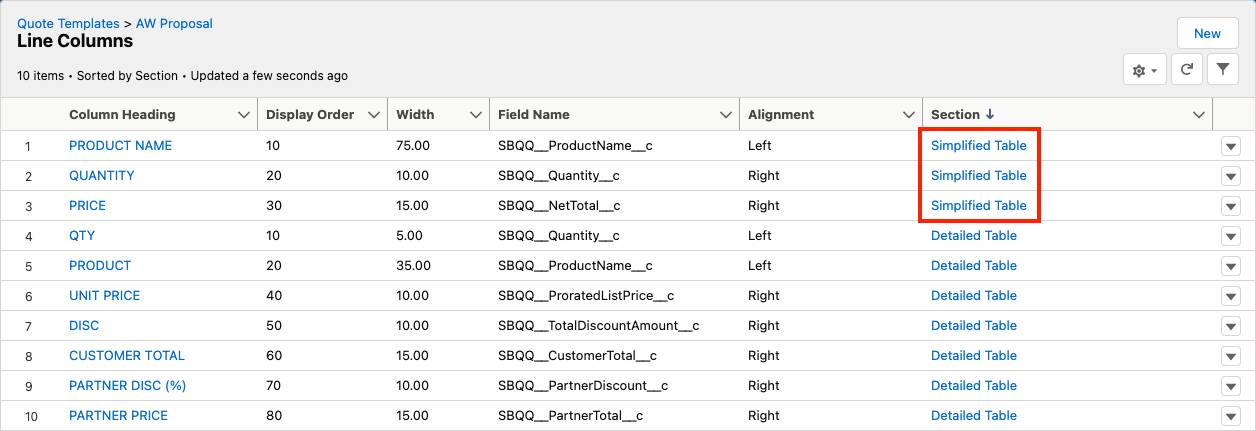
Technically, a line column will appear in all sections if you leave the Section field empty. That works well if a column such as Quantity has exactly the same properties for all sections.
Now that you know how to create a tidy table of products, in the next unit you learn ways to group lines together and limit which lines even appear.
Resources
- Salesforce Help: Template Line Columns
- Salesforce Help: Conditionally Display Quote Line Columns
- Salesforce Help: Line Item Print Options