Build Your Data Model
Learning Objectives
After completing this unit, you’ll be able to:
- Set up data sources and data extensions.
- Build an attribute group in Contact Builder.
- Identify data relationships and define cardinality.
Let’s Start Building
Get out your data model design and any notes about your data, it’s time to build your data’s new home. Like you, Maggie Quinn, a solution architect for shoe retailer Cloud Kicks, is ready to begin using Contact Builder. She’s been asked to create a new data model for customers. Let’s follow along as she completes this assignment.
Set Up Data Sources and Data Extensions
To begin, Maggie navigates to the Data Sources tab to enter in all the custom data sources Cloud Kicks will use in their model. Once done, she navigates to the tab for Data Extensions, to create the company’s planned data extensions. While she completes this task, she confirms the following info against her data model blueprint.
- Is sendable? is checked, if needed
- Data retention is applied, if desired
- Data type is correct (especially for fields that will be used as foreign keys)
- Length is appropriate for data
- Primary key is selected, where appropriate
- Send relationship is set to the correct contact key
Create Attribute Groups
Once the setup of sources and data extensions is complete (and with a fresh cup of coffee in hand), Maggie creates an Attribute Group for her customer data model. Let’s review the steps she follows.
- In Data Designer, click the Create Attribute Group button.
- Enter a name for your attribute group.

- Select an icon to visually represent the data.
- Click Create.
Link Data Extensions
Next, Maggie needs to link all the available data to her new attribute group. Since she already created data extensions, she follows these steps.
- Click Link Data Extensions.

- Select a data extension to connect to the contact model.
- Choose the attribute (or foreign key) that connects your data to that model.

Remember, the attributes need to be the same data type in order to make the connection.
Specify Data Relationships
Whenever you link contacts to attribute sets or to other attributes, you need to set the relationship cardinality. Cardinality is a fancy way of saying how data relates to one another. Let’s review the options.
| Relationship Cardinality | Example |
|---|---|
| One-to-one | A contact (or customer) exists once in a data extension. |
| One-to-many | A contact (or customer) can have many purchases over time and can exist multiple times in a data extension. |
| Many-to-many (not used with contacts) | A purchase can contain more than one product and a product can be part of more than one purchase for a single contact over time. |
With this in mind, Maggie continues her steps.
- Select the desired data relationship.

- Click Save.
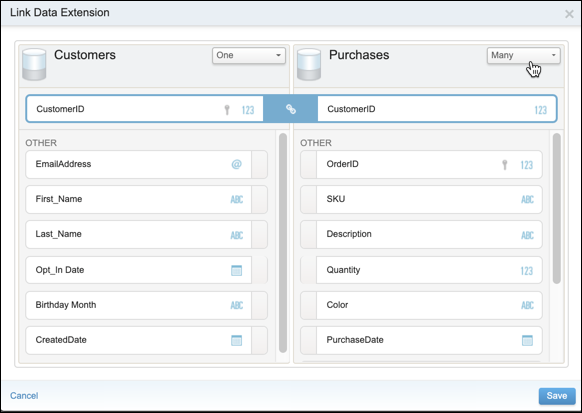
Now that the first data extension is linked, Maggie moves on to link the customers data extension to the purchases extension by clicking the Set Relationship icon.

She follows the same steps as above to connect attributes. This time, however, Maggie sets the cardinality to one-to-many, since a customer can have multiple purchases.

When she’s finished, she clicks Save.
To make sure that all the data she plans to import has a home, Maggie goes back to her data model to review what additional data extensions need to be linked. She follows the steps above until all data points are accounted for and linked appropriately.
Now it’s your turn. You can create your company’s own unique data model by following a similar process to the one Maggie used. And it doesn’t stop there. Once your data has a home, you’ll want to tidy up. Here are some pointers for getting your data in tip-top shape for moving day.
- Create a standard naming convention across platforms to help with consistency. For example, determine if you will use: Email Address or Email or EmailAddress.
- Deduplicate data before importing.
- Establish any email verification or validation systems that will be used before importing into Marketing Cloud Engagement.
In the next unit, you dig into temporary storage and the file import process. Get ready for the big move!
