Perform a Test Migration to a Sandbox
Learning Objectives
After completing this unit, you’ll be able to:
- Migrate an org using multiple article types.
- Consolidate article fields by mapping them together.
- Check the migration summary.
- Validate and accept the migration.
Time to Migrate
Maria is now finished with her planning and prework. She completed the pre-migration checklist, making changes where necessary. She double-checked the limitations in Lightning Knowledge to make sure that they didn’t affect her group. She’s made her lists, and she’s checked them twice. Now she watches a quick video of the migration process.
In this module, we assume you’re a Salesforce administrator with the proper permissions to migrate into Lightning Knowledge. If you’re not an administrator for Lightning Knowledge, that’s OK. Read along to learn how your administrator would take the steps in a production org. Don't try to follow these steps in your Trailhead Playground. Lightning Knowledge Migration isn't available in the Trailhead Playground.
Start the Lightning Knowledge Migration Tool
Now that she’s seen a migration in action, Maria starts the Lightning Knowledge Migration Tool. The tool steps her through each part of the migration process.
- In the org you’re migrating from, switch to Lightning Experience. For Maria, that’s Ursa Major’s service org.
- From Setup, in the Quick Find box, enter
data, and click Lightning Knowledge Migration Tool.
If you’re following along in your Trailhead playground or trial org, you can’t use the Lightning Knowledge Migration Tool. Those orgs are already running Lightning Knowledge.
- Select the checkbox to verify that you have read the documentation and agree to the Terms of Service.
- Click Start.
- Review the list of article types and custom fields to migrate. Maria is using two article types and has 10 custom fields.

- Click Next.
Next step? Consolidating article fields by mapping them together.
Map Article Fields
Remember the spreadsheet that Maria created to show how to consolidate fields during migration? It lists the fields she wants to consolidate, the field names, and what values to map the fields to. Remember, for the fields to combine, they must have the same field type and functionality. Right now, Maria has eight rich text fields she wants to consolidate into four. Her goal is one field for details, one for cause, one for resolution, and one for comments.

This step is where she sets up those mappings.
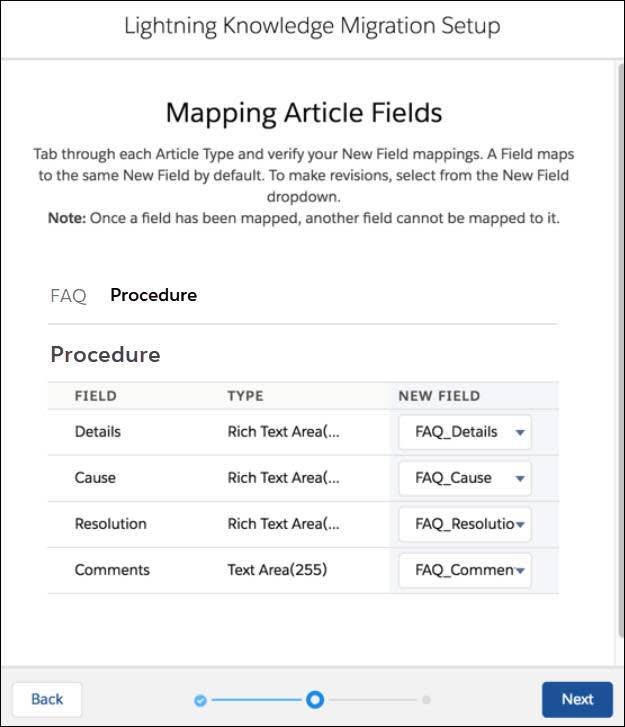
- In the Lightning Knowledge Migration Tool, examine the fields. There’s a placeholder field for each new field named Article Type_Field Name. In the FAQ tab, Maria sees FAQ_Details, FAQ_Cause, FAQ_Resolution, and FAQ_Comments placeholder fields.

- Click the proper tab to access the article type with the fields to map. Maria clicks Procedure to find her fields.
- Map the fields to consolidate. In the Procedure tab, for the Details field, Maria selects FAQ_Details in the New Field column. This selection maps the Procedure_Details field to the FAQ_Details field. She repeats the process for the Cause, Resolution, and Comments fields.
- Click Next.
Set the Default File Visibility
Next, Maria chooses the default visibility for migrated files. During migration, Classic files move from Classic File Fields to the Files Object and Related List in Lightning Knowledge. She must decide the permissions the files should have after migration. She has two choices.
-
Internal users only. Only internal users see the files after migration. If permissions were granted to Experience Cloud users, those users no longer see the files.
-
All users who had permissions before. Everyone who could see the files in Classic still sees them after migration.
Maria chooses the setting that corresponds to most of her existing files as the default. She has a list of files with nonstandard permissions and she’ll change permissions for them individually after migration.
- In the Lightning Knowledge migration tool, choose the file visibility. Maria chooses All Users.

- Click Next.
- The final screen displays two reminders: don’t change the knowledge base during migration and you can’t turn off Lightning Knowledge after migration. Maria has done her homework. That’s why she disabled user authoring permissions in the Article Actions setup node in Classic earlier. It’s also why she’s migrating to a sandbox first to test the process before completing it in production. She’s ready to begin.
- Click Begin.
The migration is officially in progress. Maria can reload the Lightning Knowledge Migration Tool page to check the status and the tool sends her an email when the migration is complete.
Activate the Migration
Maria is in the office bright and early the next Monday morning with a big cup of coffee. She’s happy to see the email informing her that the migration finished. She goes to the Lightning Knowledge Migration Tool and views the Data Migration Summary.
She takes a screen capture in case she needs it later for troubleshooting. She doesn’t think she will, but she’s careful by nature (remember all those to-do lists?).
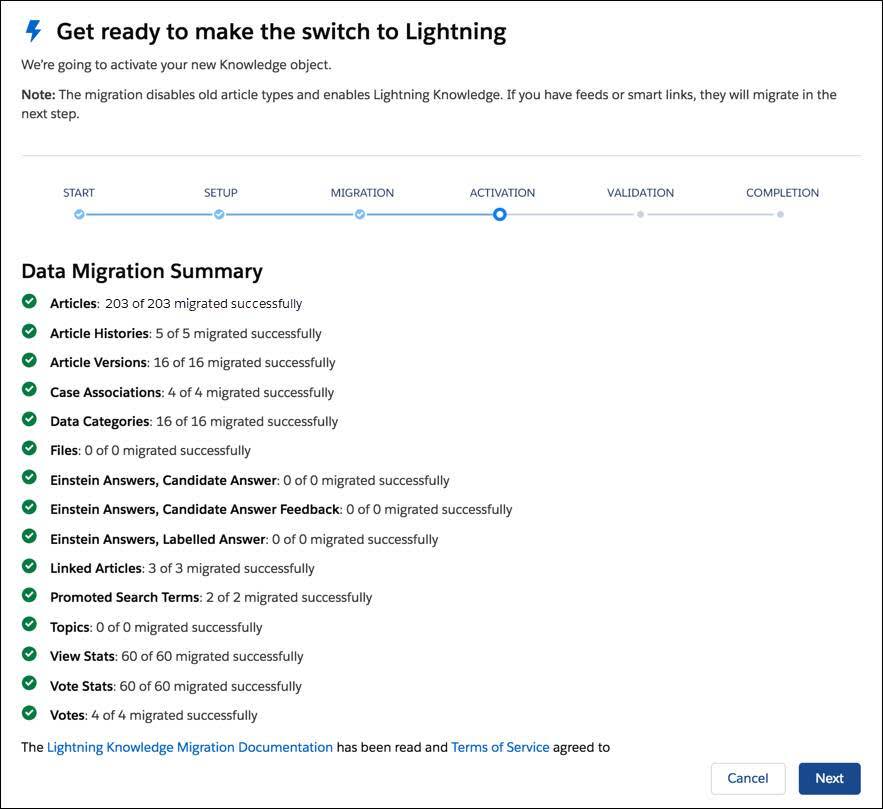
- Check the icon next to each line. If there are problems, yellow warning flags appear. But Maria sees only green check marks. That means she’s ready for the next step.
- Click Next to activate Lightning Knowledge.
- Click Activate to confirm that you’re ready.
The migration tool activates the new Knowledge object and Lightning Knowledge user interface. It deactivates existing article types. It migrates feeds and smart links. The article’s feed component disappears temporarily while feed posts migrate. When that’s complete, the feed component reappears.
Validate the Migrated Org
Maria has a list of items to validate. It’s not in any particular order, but it must all be valid before she can accept the migration results. First off, she must update all customizations that refer to article types. She can remove these references and fix them after migration, or she can point them to the new Knowledge object now.
Feature |
How to Update References to Article Types |
|---|---|
Customizations |
Inspect custom applications and ensure nothing references old article types. Check Apex code, Experience Builder sites, Sites, and data flows. Check processes, flows, workflows, and approval processes. |
In the Developer Console, update references to Article Type objects. |
|
Verify that all old article types have a deployment status of In Development. |
In Classic Setup, enter |
Verify that the Knowledge_kav object has a deployment status of Deployed. |
In Lightning Setup, go to the Object Manager tab, and click Knowledge. |
Update your SOQL. |
If you had multiple article types, the migration tool created a Knowledge_kav object. Your new code must reference the new Knowledge_kav object. Also, the code must filter SOQL queries by the appropriate record type ID where necessary. Remember that SOQL queries must filter by record type IDs instead of record type. Record type IDs can be different between sandbox and production, so include code that looks up the ID of the record type by object. Ideally, put this code in a reusable utility class. |
Verify the migrated articles in the validation stage |
Compare the old and new articles in the browser. Use an API client such as Postman to query for the new and old IDs. |
 and select Developer Console.
Maria finishes these tasks. Everything looks good. She makes a note of what she’s changed. If she decides to undo the migration process later, she can use this list to undo all these steps.
Now she has to validate the metadata and data to see how they migrated. She can’t change them until she’s accepted the migration, but she’s ready to take notes she can use later.
Feature |
How to Validate |
|---|---|
Metadata setup |
|
Data |
Use the new Knowledge tab to view and validate migrated articles. Maria consults the list of representative articles she identified during planning. She compares articles in the migrated sandbox org to the same articles in the Knowledge in Salesforce Classic production org, making note of any differences. |
Maria performs her validation tasks successfully. She’s read the Lightning Knowledge Migration Tool FAQ and knows that undoing a migration at this point can take several days. She knows she can’t undo the migration after this step, but she’s ready. She clicks Accept.
After Maria clicks Accept, the migration tool deletes old article types and Classic versions of the articles, including versions that weren’t migrated.
Maria has completed her migration! She started the process, validated the results, and accepted the migration. She’s ready to start her post-migration tasks.
Resources
- Salesforce Help: Lightning Knowledge Migration Tool
- Salesforce Help: Lightning Knowledge Migration Tool FAQ
- Salesforce Help: Migrate Multiple Article Types
- Salesforce Help: Verify Migrated Articles in the Activation Stage
- Salesforce Help: Lightning Knowledge Post-Migration Checklist