Customize Your View
Learning Objectives
After completing this unit, you’ll be able to:
- Change the time horizon for the appointments displayed in the service appointment list.
- Set the number of days displayed on the Gantt.
- Customize the Gantt’s color palette.
Change the Time Horizon
Jacinta loves to have a larger context for her schedule. Currently, she sees appointments for the current day in her list. She wants to expand her time horizon so she can see appointments over the past few days. At Ursa Major, a lot can happen in a few days.
She wants to see appointments with a time horizon of 3 days—from 3 days ago to today. First, she sets the number of days in the time horizon.
- From the App Launcher, find and select Field Service to open the dispatcher console.
- In the service appointment list, click
 and select Dispatch Console Settings.
- For the Scheduling window length, enter the time horizon. Jacinta enters
3.
- Click Save.
- Click
 , and select the fields to fall into your time horizon. Jacinta selects Due Date, Scheduled Start, and Scheduled End.
- Next to Horizon, select today’s date.

Jacinta sees appointments that have a due date, a scheduled start date, or a scheduled end date in the past 3 days. She checks all the appointments due in the last 3 days and makes sure they’re completed or ready to complete. She then looks at appointments that should have started or ended in the last 3 days to make sure that they’re on schedule.
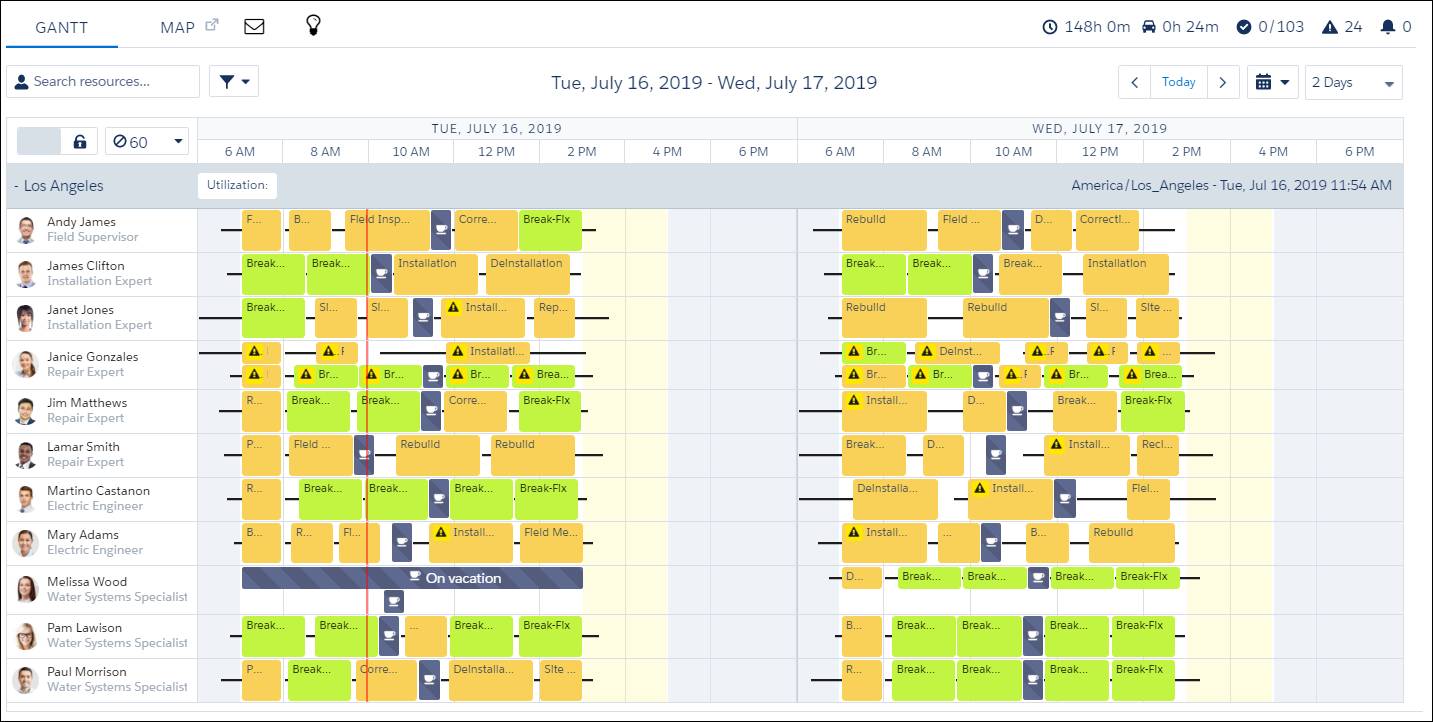
Show More Days on the Gantt
The Gantt shows appointments, appointment times, and the mobile workers who are completing those appointments. It’s Jacinta’s favorite part of the dispatcher console, because it gives her a good visual overview of who’s doing what and when.
Just like with her service appointment list, Jacinta prefers to show her Gantt appointments in a larger context. The Gantt gives her several ways to do so.

-
The date displayed in the Gantt (1)—Usually, Jacinta views today’s schedule, but sometimes she skips back a day or two to see more context.
-
Ways to set the day displayed (2)—Use the arrows to move forward or backward a day at a time. Use the calendar to select a date to view.
-
Ways to change what is displayed in the Gantt (3)—Jacinta usually displays two days at a time to get a better scope of how changes affect her schedule.
Here’s Jacinta’s schedule showing two days.
Adjust the Gantt’s Color Palette
Jacinta wants to see at a glance which jobs have their due date approaching to make sure that nothing is missed. She decides to create a custom color palette for her Gantt based on the appointment due date.
- In the dispatcher console, click the filter icon at the top of the Gantt.
- Click the Palettes tab.
- Click Open palette editor.

- Click New Palette.
- Enter a name and description. Jacinta enters
Due Date Approaching.
- Select the field on which to base the palette. Jacinta selects Due Date.
- Define the color spectrum. Jacinta is using a picklist field, so she assigns a color to each picklist value. Here’s what she uses.
- Minimum Value:
0days
- Minimum Value Color:
#ff0000 - Maximum Value:
7days
- Maximum Value Color:
#ffff00 - No value:
#40bfbd - Number of Colors:
7Tip: We recommend creating a high-contrast spectrum to assist users with color vision difficulties.
- Select Active to make the palette available to dispatchers.
- Click Save.
She’s created the palette. Now she must apply it to her Gantt so she can see it. Applying a palette changes the background color of appointments on the Gantt and adds an appropriately colored horizontal bar above appointments on the map.
- Click the filter icon at the top of the Gantt, and then click the Palettes tab.
- Select the palette in the dropdown list. Jacinta selects Due Date Approaching.
- Click Apply Palette.
Here’s Jacinta’s Gantt using her new palette. She sees a couple of appointments she wants to take a closer look at.
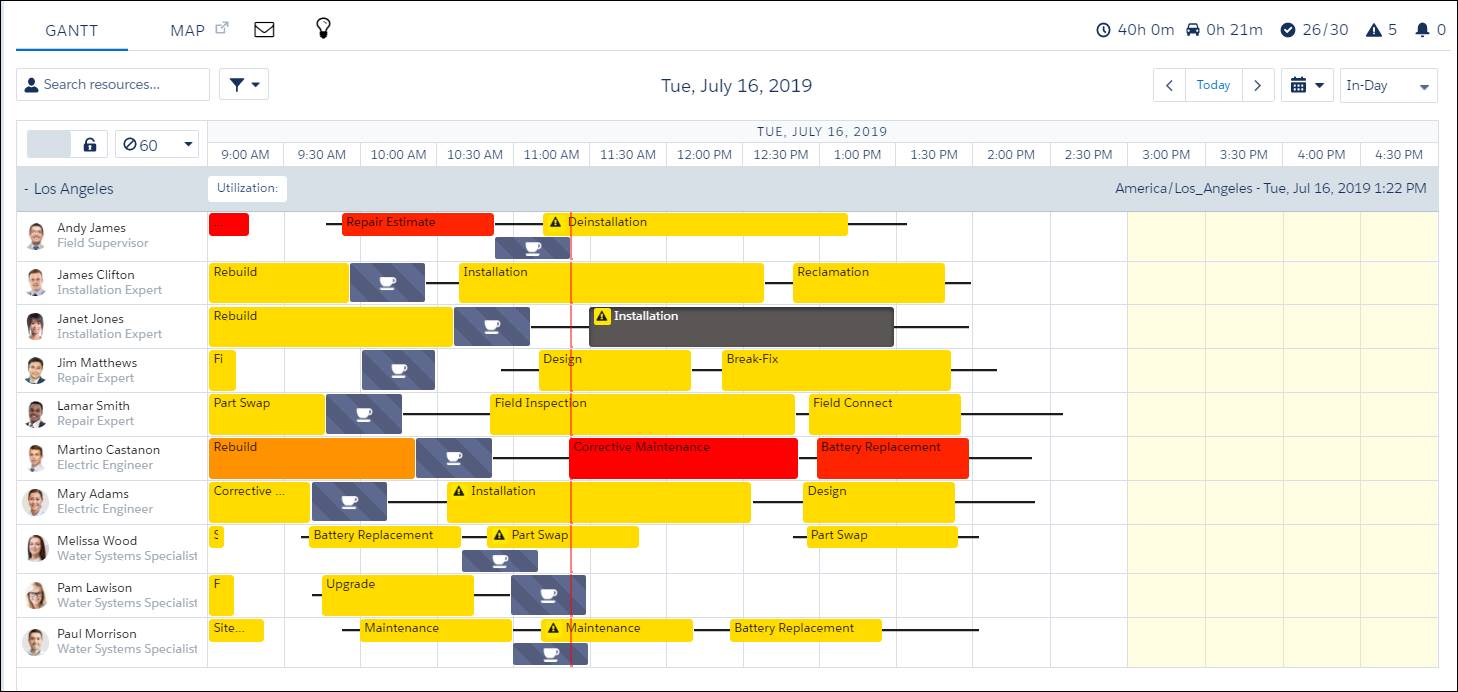
Reloading the Gantt or changing which service appointments are shown in the appointment list reverts to the default color palette. Jacinta has seen what she needs to, so she refreshes the Gantt to return to the default palette.
Jacinta customized her view to create a larger context for her day. She changed the time horizon for her service appointments, changed the days displayed in the Gantt, and customized the color palette.
Resources