Configure EDA Settings
Learning Objectives
After completing this unit, you’ll be able to:
- Explore tabs in EDA Settings.
- Describe how EDA Settings can be used to customize EDA for your institution.

Best Practices for EDA Settings
One of the things that is great about the Education Data Architecture (EDA) is that it’s designed to meet the needs of all different types of educational institutions. EDA is flexible and entirely configurable to your school. And with great power comes great responsibility, so there are some decisions that you and your team will need to make to configure EDA Settings for your institution’s specific use case.
In the Education Data Architecture Basics module we take a high-level tour of EDA Settings and review some key terms. If you haven’t yet completed that module, we recommend you pause, check out that content, and then meet us back here. (There’s a link in the Resources section at the end of this module.)
If you’ve already wet your whistle with the introductory info—then toot, toot! Let’s get started!
Keep in mind that the settings selections reviewed in this unit are considerations and options, not requirements. Exploring EDA Settings with us will help you determine which settings choices are right for your institution.
Affiliations Settings
In EDA, organizations like academic departments, administrative departments, sports teams, and other institutions are represented as accounts, and you connect accounts to contacts through affiliations. You also have the ability to highlight a particular affiliation by marking it as Primary.
EDA lets you see all of a contact's primary affiliations in one place: the Primary Affiliations section on the Contact record (accessed from the Details tab of the contact record).

You can customize your primary affiliations section on the contact record to display the primary affiliation for any record type you use at your institution. What appears and what does not appear in this section is controlled by your Affiliation Mappings settings (in conjunction with page layouts).
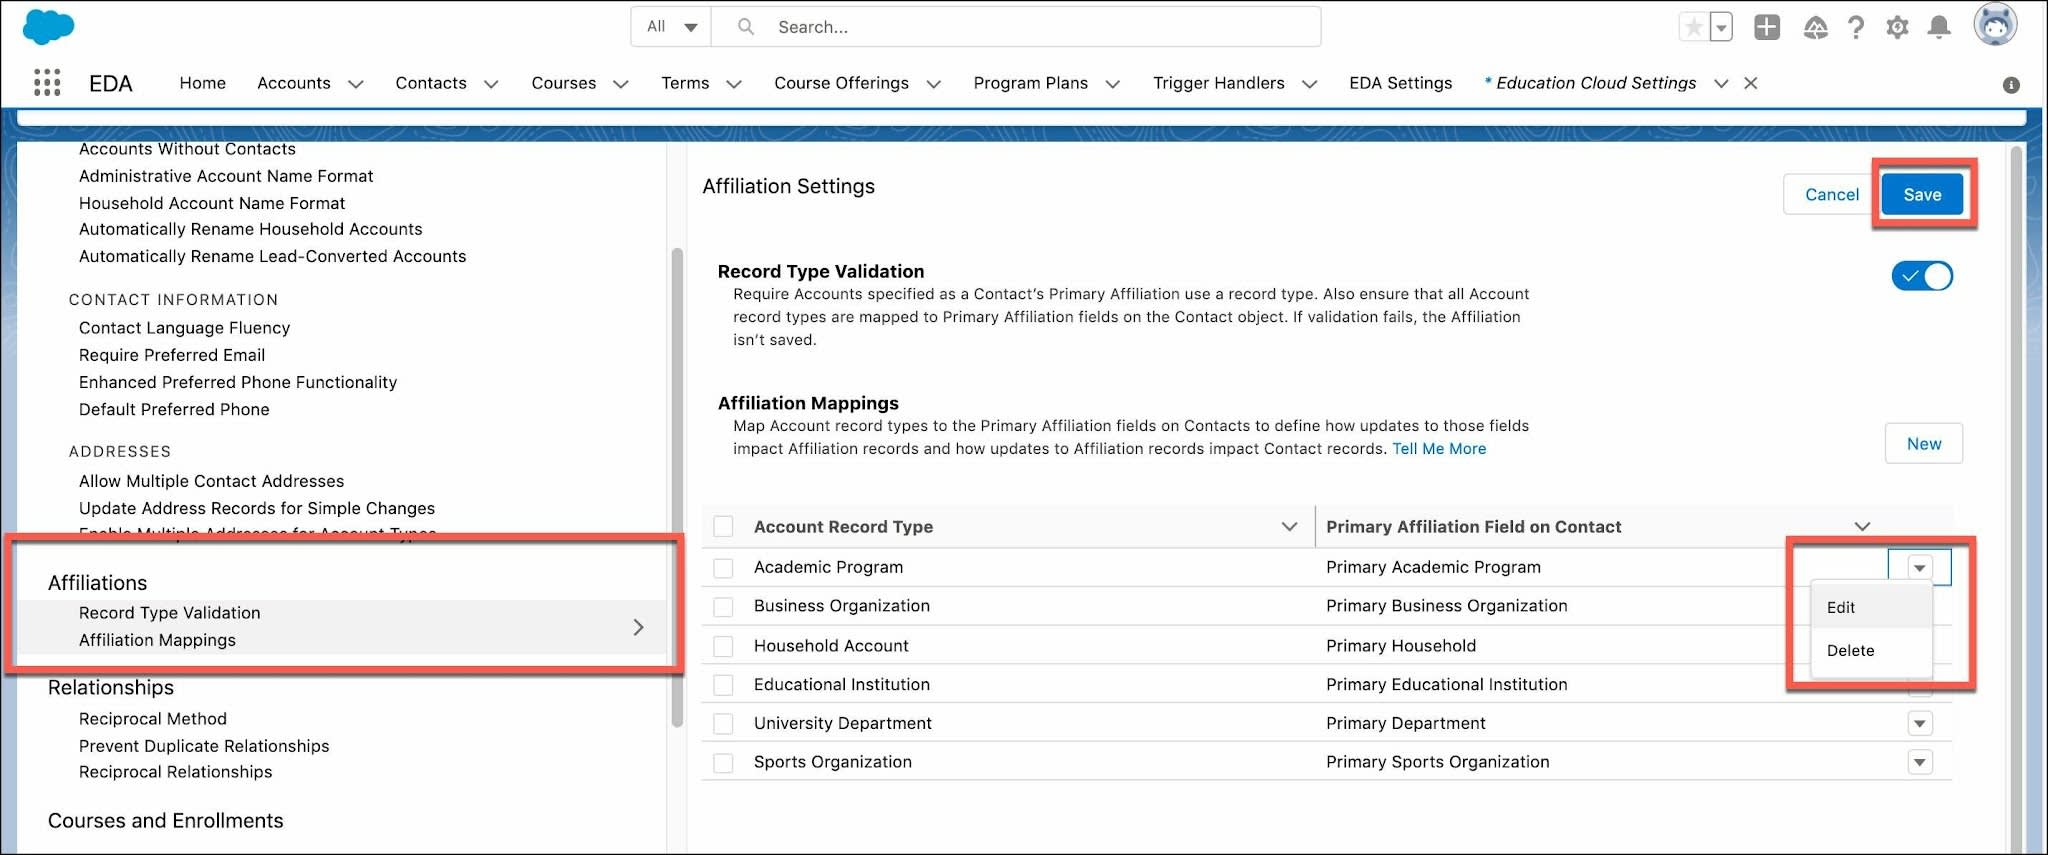
You can create or edit Affiliation Mappings to fit your institution’s needs by navigating to the Affiliations section on the EDA Settings page.
- From the Affiliations section, click Affiliation Mappings.
- Review the default affiliation mappings displayed. Six default account record types are listed. The account record type list shows you all of the account record types whose primary affiliation values map to that special section on the contact record.
- To add an affiliations mapping of your own, click the New button.
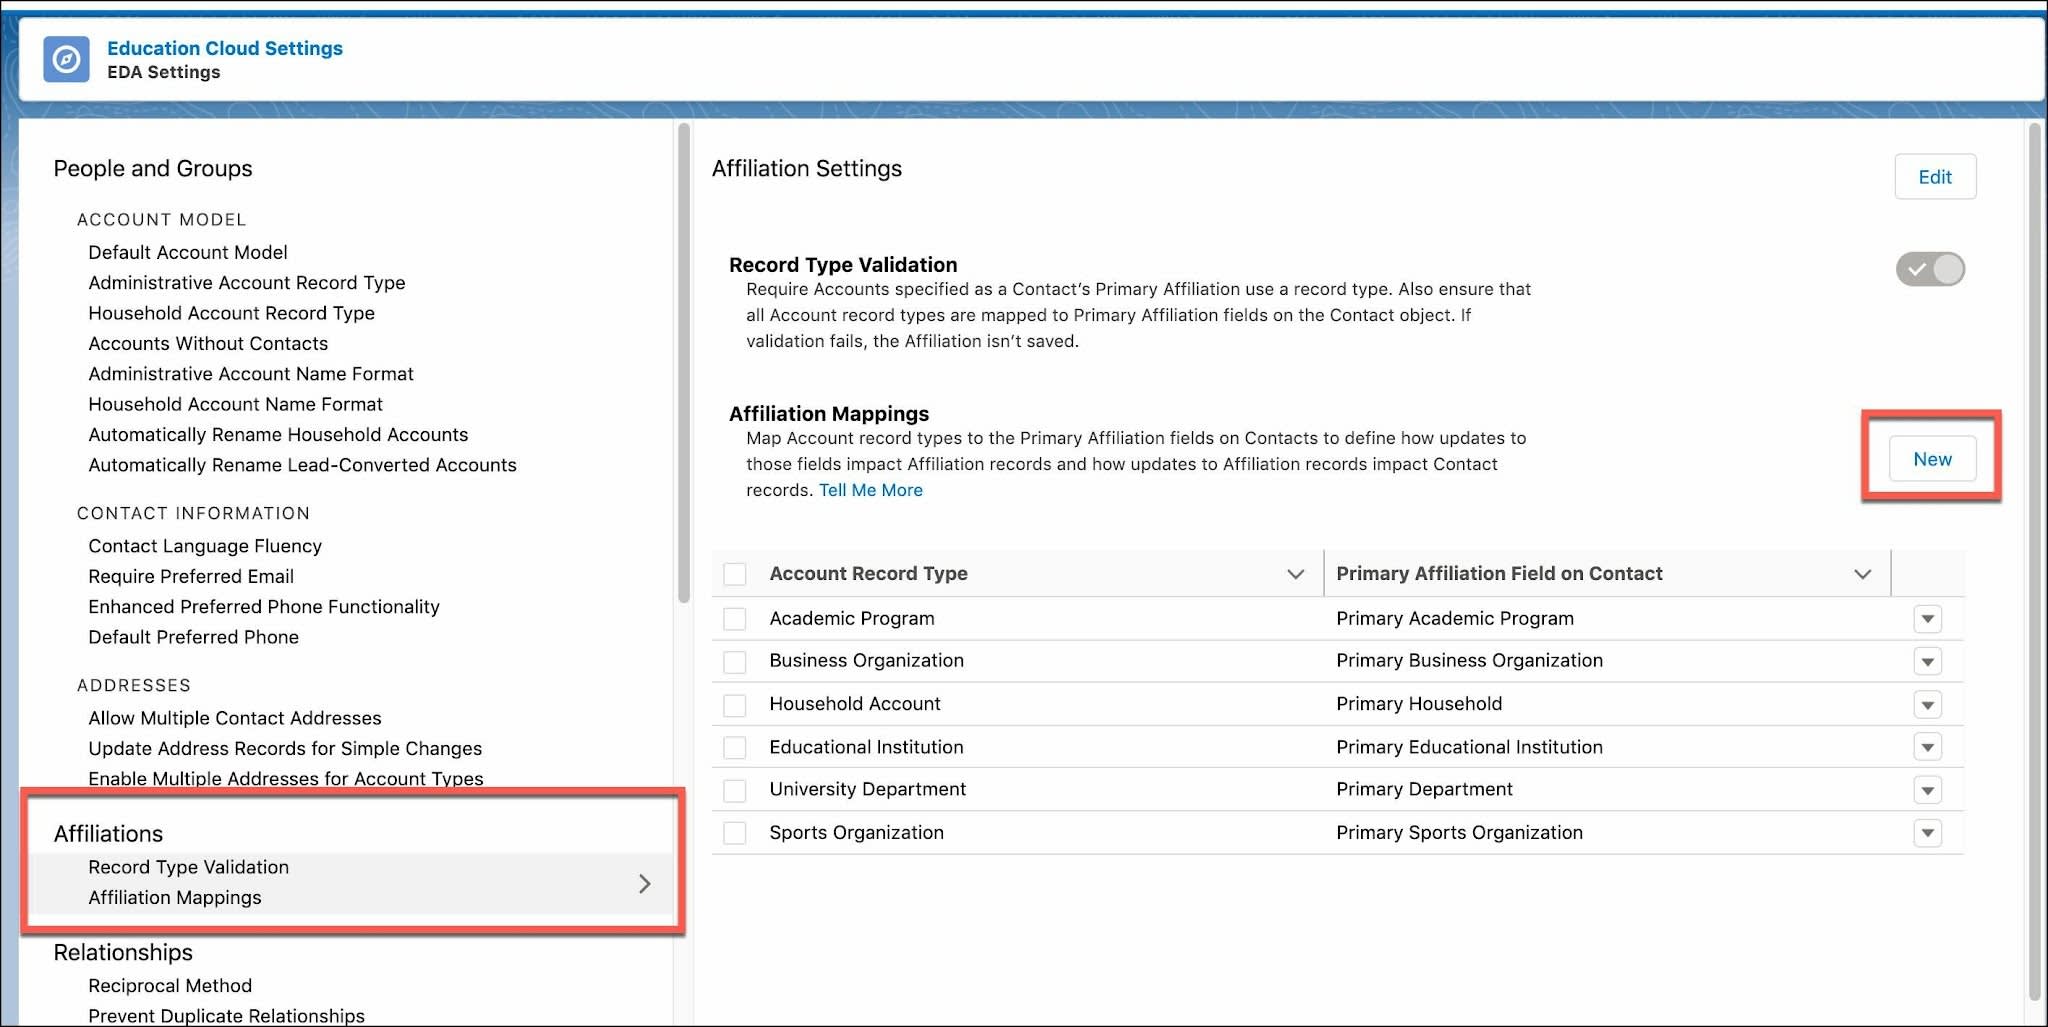
- On the New Affiliations Mapping pop-up, select the account record type and the primary affiliation field (on the contact record) you want to map to, and click Save.

- To delete an existing mapping, click the Edit button.

- Click the arrow on the mapping you want to modify, then select Delete. Click Save to save your changes.
Relationships Settings
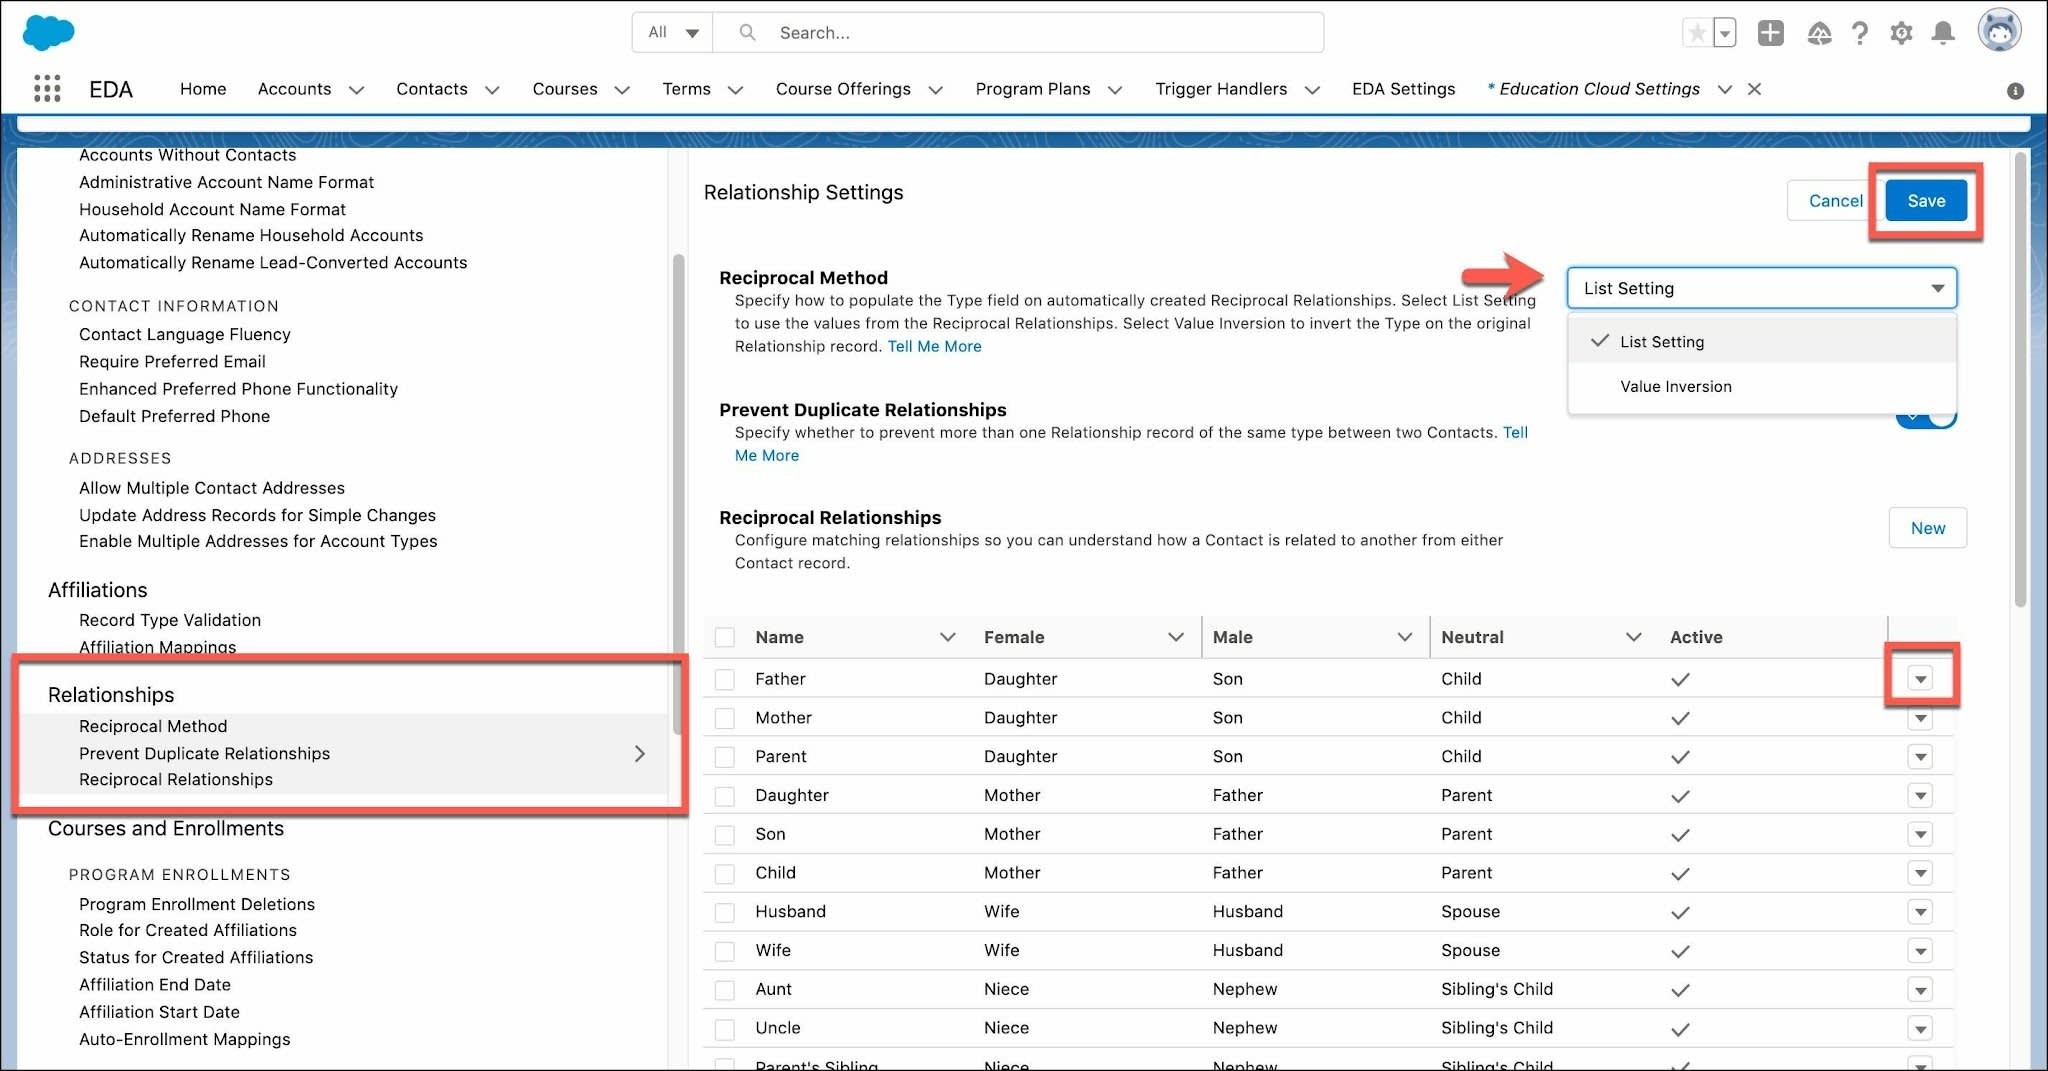
Relationships represent contact-to-contact connections. When you create these connections, you can also define the type of relationship (friend, family, mother, daughter, and so on), and the relationship status (current, former).
Whenever you create a relationship record, Salesforce automatically creates a reciprocal relationship, which reflects this same relationship in the other direction. For example, if you create a relationship from Daniel Thompson's contact record, and specify Lucy Snow as his wife, Lucy's contact record automatically reflects that she has a husband, Daniel. While the reciprocal relationship will be created automatically, you do have a choice to make about the reciprocal method that’s used.
The Reciprocal Method setting is perhaps the most important of the relationships settings, because it determines whether reciprocal relationships are generated using the List Setting or Value Inversion method.
List Setting
The values in the Reciprocal Settings list determine the type of reciprocal relationship created. For example, if you create a son type relationship from a male-gendered contact record, a reciprocal relationship of father is created automatically on the son's record. Father and son are preconfigured values in the Reciprocal Settings list. Most orgs use List Setting, which is the default Reciprocal Method.
Value Inversion
When you select this method, the type value on a relationship record is reversed to reflect the reciprocal relationship. For example, a mother-daughter type of relationship creates a reciprocal type of daughter-mother. Value Inversion ignores the Reciprocal Settings list. Instead, you create picklist values on the relationship object's type field for mother-daughter, daughter-mother, and all other possible combinations. This example shows the word pair inverted around a hyphen, which is the default delimiter separating the relationship roles.
Here are the steps to verify that the selected Reciprocal Method is appropriate, and to change it if needed.
- In the Relationships section of EDA Settings, click the Edit button for Relationship Settings.
- Review your existing reciprocal relationships and edit or delete by clicking the dropdown arrow for a relationship.
- If you need to change from List Setting to Value Inversion or vice versa:
- Click the dropdown arrow for List Settings dropbox.
- Select a different value.
- Click Save to save your changes.
Courses and Enrollments Settings
If you’re using EDA to track student enrollment or a faculty member’s involvement in a particular course, navigate to the Courses and Enrollments section of EDA Settings and select Course Connections. Click Edit, then use the slider to enable or disable Course Connection Record Types. In EDA, a course connection links a contact (say a student or professor) to a course offering. Enabling this feature is a necessary first step to get you up and running.

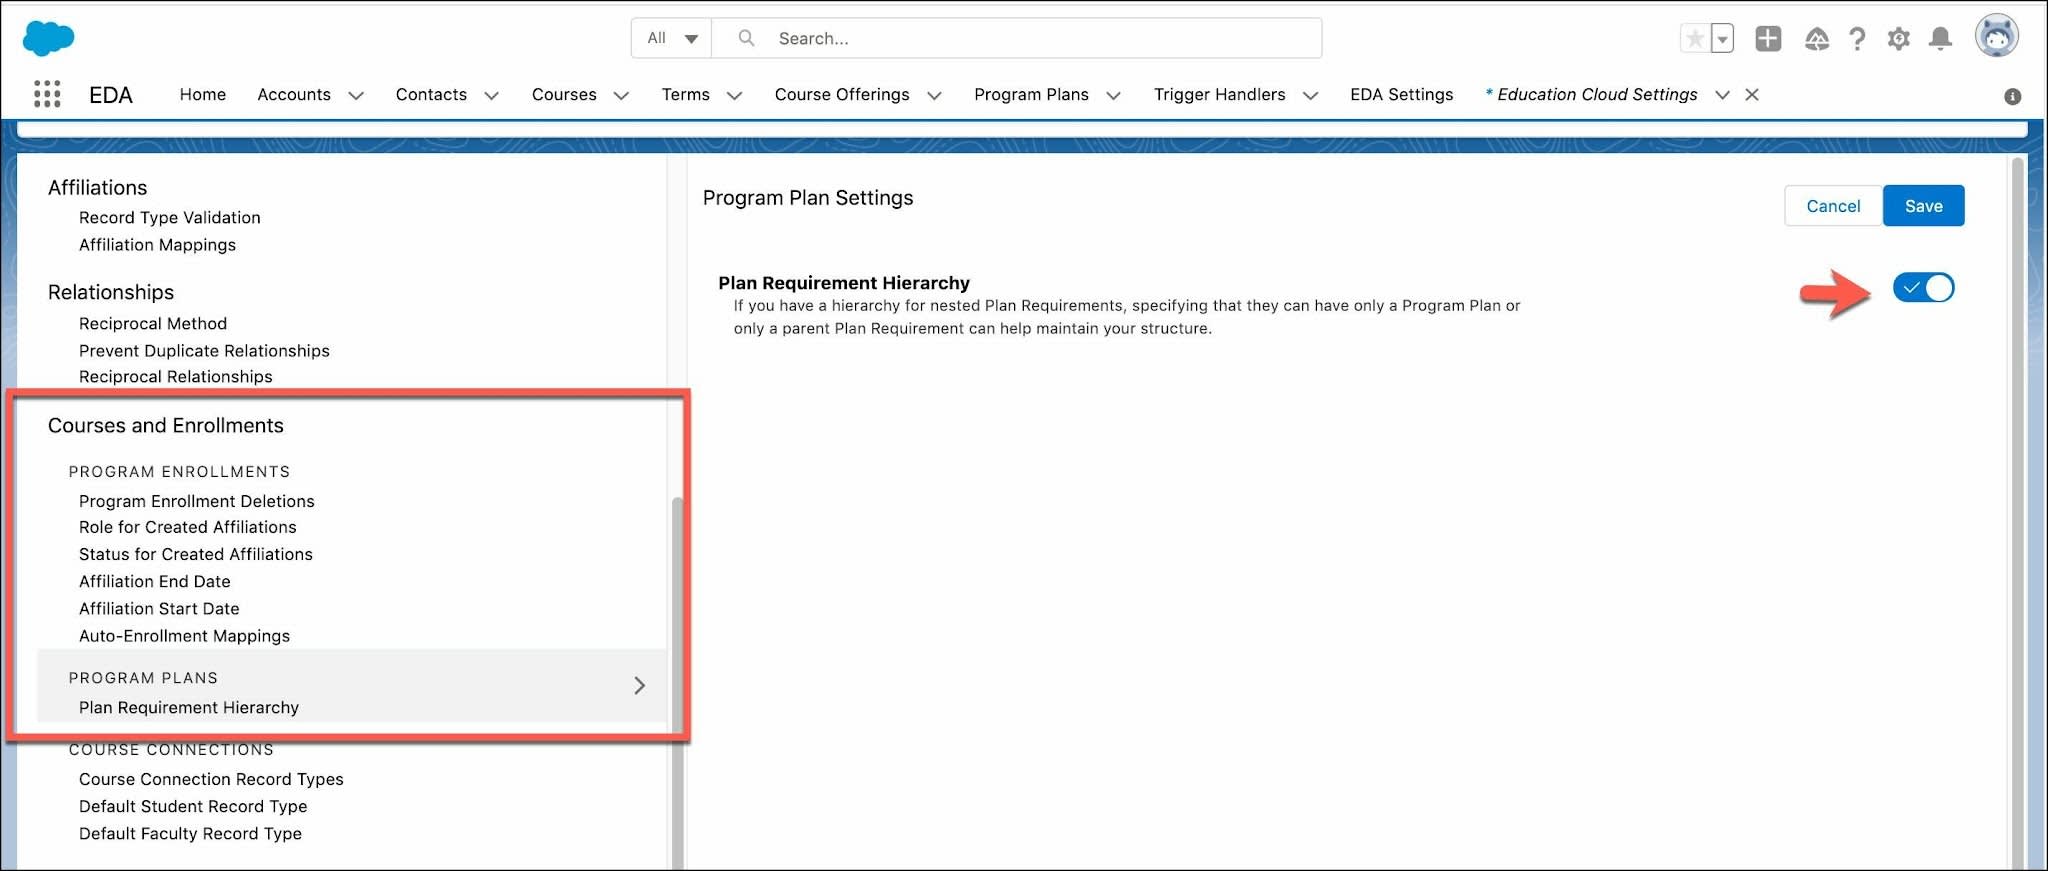
Program Plan settings are also in the Courses and Enrollments section. A program plan in EDA represents a specific offering for a degree or certification. To create a path for students to follow, program plans use plan requirements which can link to courses. When a program enrollment is created for an advisee, the primary program plan associated with that program is automatically linked to the program enrollment.
In Program Plans settings you can manage the Plan Requirement Hierarchy feature. When this setting is active (which we suggest) it specifies that when you have a hierarchy for nested Plan Requirements, they can have only a Program Plan or only a parent Plan Requirement. This can help maintain your structure.
People and Groups Settings
One important aspect of building a connected campus is mastering outreach. Institutions may decide to integrate a marketing tool such as Marketing Cloud Engagement or Account Engagement to manage communications, and integrating a marketing tool will require you to define a preferred email. To do this, select Contact Information in the People and Groups section of EDA Settings. Click Edit to use the sliders to manage respective settings for Require Preferred Email, Enhanced Preferred Phone Functionality, and Require Preferred Phone.

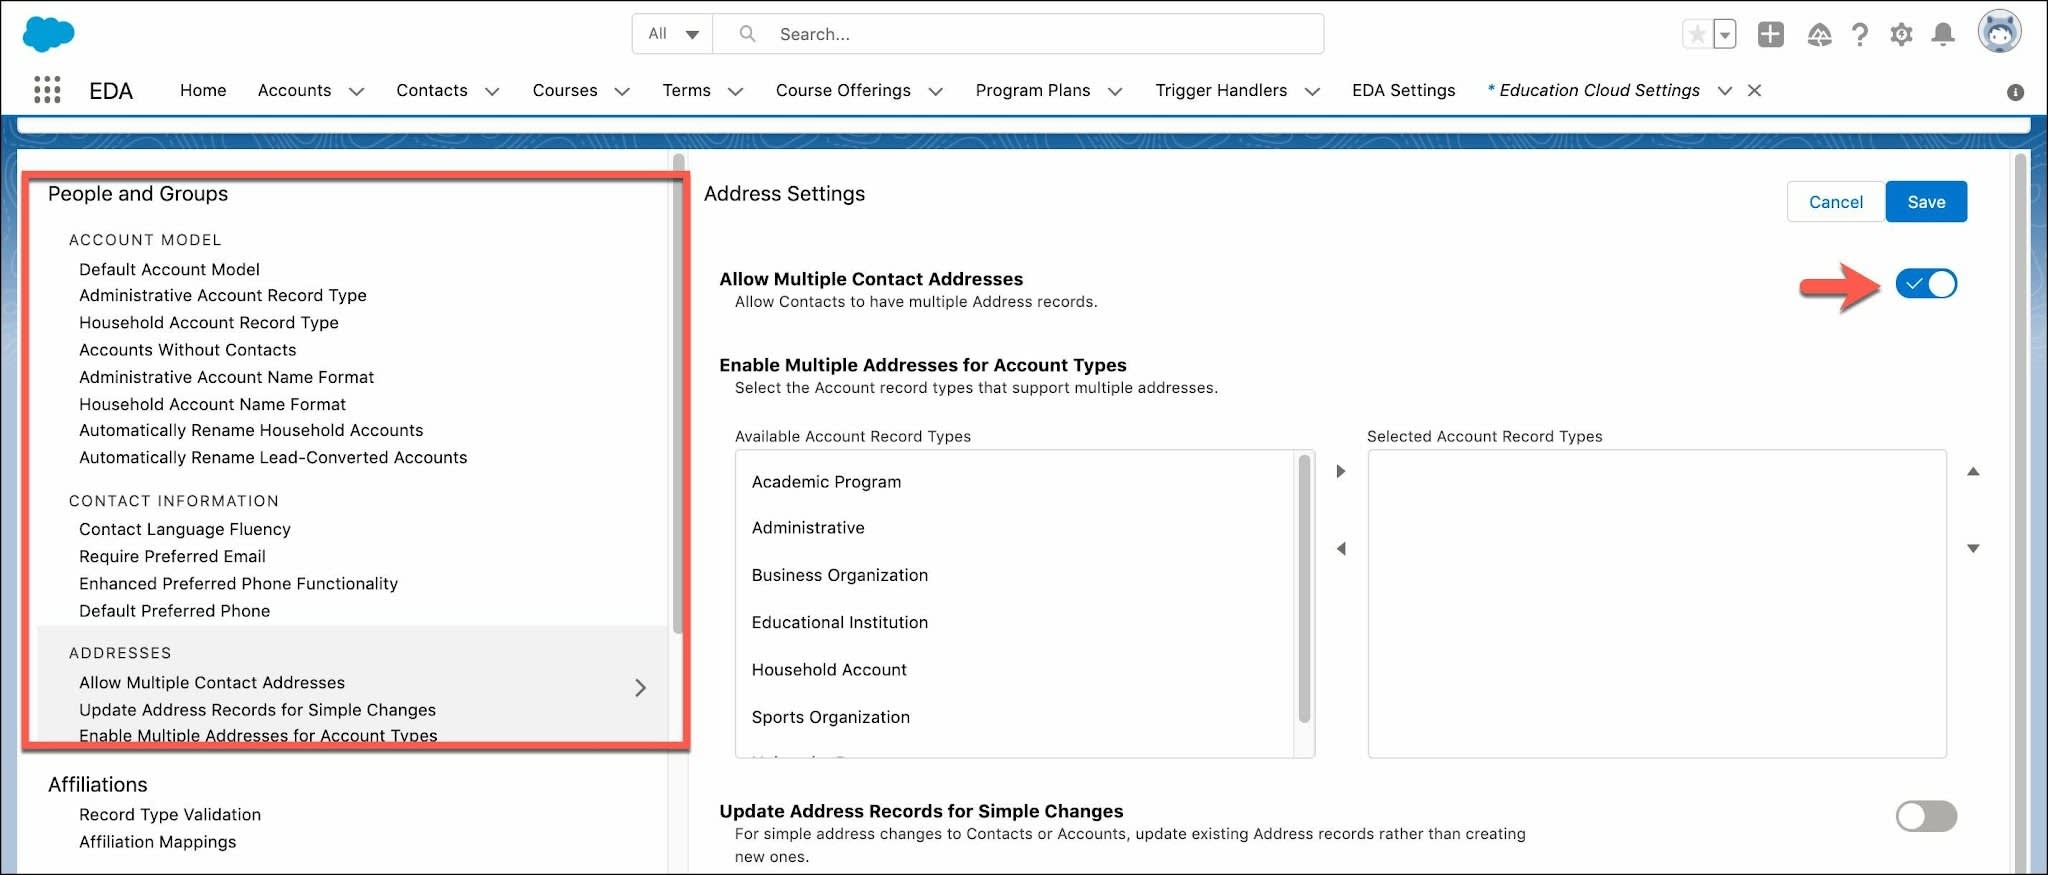
While in the People and Groups section, consider selecting Addresses to review the settings for Allow Multiple Contact Addresses. When you disable this setting, it prevents additional address records from being created, which is particularly useful when managing a campus.
There's a lot of potential action in the People and Groups section of EDA Settings, so don't leave just yet. You can also change the default record type for accounts in this section. By default, EDA assigns the Administrative record type to administrative accounts and the Household account record type to household accounts. If you need to, you can change the default account record type.
To change the default record type, select Account Model in the People in Groups section.
- Click Edit.
- From the dropdown menu, specify the Administrative Account Record Type and Household Account Record Type as needed, depending on which account's default you're changing.
- Click Save.

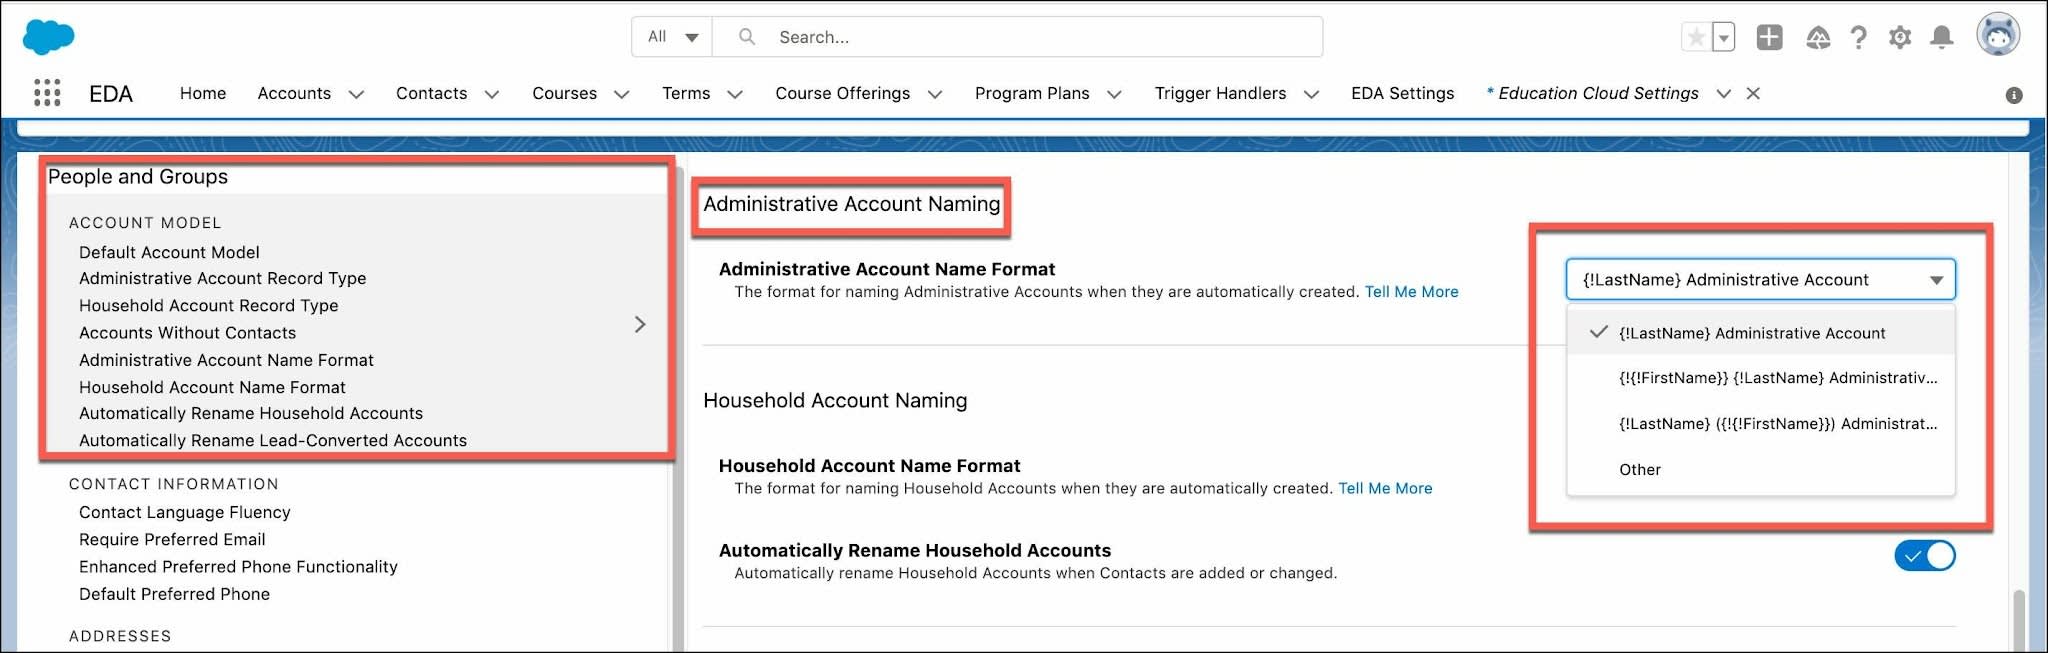
There's one last thing we suggest you check out while you're in the Account Model settings. Consider updating the Administrative Account Naming format. By default, this is set to Last Name Administrative Account. At institutions with a very large student and constituent body, using only the last name as the default naming convention may get confusing. Here’s how you can change it.
- In the Account Model settings section, click Edit, then scroll to the section for Administrative Account Naming.
- Click the dropdown menu for Administrative Account Name Format and select the naming format you want to use.
- Scroll back to the top of Account Model settings to click Save.
System Settings
Certain EDA jobs, such as most Apex jobs, run asynchronously in the background so they don't impact critical processes. EDA includes error handling for these types of jobs, but the results aren't stored, by default. If you want to store the results of asynchronous jobs so you can view them at a time that's convenient for you, you can update the error handling settings in the System section of EDA Settings.

That concludes the tour EDA Settings, so that’s a wrap on best practices and considerations for EDA Settings management. It’s time to move on to a new configuration topic: TDTM. Head to the next unit to learn more.
Resources