Get Started with Salesforce Maps Permissions
Learning Objectives
After completing this unit, you’ll be able to:
- Create and assign group permissions.
- Assign button sets to permission groups.
- Plan, configure, and assign folder permissions.
Your company just purchased Salesforce Maps, a product that provides location intelligence technology to Salesforce users, allowing for the visualization of Salesforce standard and custom objects—accounts, contacts, leads, and more! You’ve been tasked with the job of configuring Salesforce Maps in your organization. Let’s start your configuration journey by reviewing permissions.
Even though Salesforce Maps follows the same overall security structure as your Salesforce org, there are some permission settings that are specific to Salesforce Maps. Before we can review these permissions, you need access to the Salesforce Maps configuration menu. If you don’t have access, contact your Salesforce admin to request access.
In this module, we assume Salesforce Maps is installed and Salesforce Maps permission set licenses are assigned. If it's not, sign up for a free Developer Edition org with Salesforce Maps. In the Salesforce set up menu, take the following steps and be sure to follow the order of operations. Add the Permission Set License before the Permission Set.
- In the Quick Find search bar, search for and select Users.
- Select the User you wish to assign the Permission Set License.
- Locate the Permission Set License Assignment section and edit the assignment.
- Select one or more rows and save. For example, for Salesforce Maps, users will need the Salesforce Maps Permission Set License assigned.
- Next scroll to Permission Set Assignments and select Edit Assignment.
- Assign the Permission Set to match the license you assigned. For example, for Salesforce Maps, the Salesforce Maps Permission Set is required.
Salesforce Maps Permission Groups
Navigate to Salesforce setup, search for Installed Packages, and then select Configure next to Salesforce Maps.
Once in the configuration menu, select permission groups to grant access to features in Salesforce Maps. If you wish to restrict access to certain features, you can do so by editing existing permission groups or creating a new one. Determine which features your specific users and profiles need, and then assign the user or profile to the corresponding permission group.

Let’s look at how Cloud Kicks, a custom shoe company, configures permission groups. Cloud Kicks purchased Salesforce Maps for its Sales and Marketing teams.
They were interested in the various configurations across their groups.
-
Folder Administrator gives a select group of users the ability to manage user access and visibility to shared folders.
-
Allow Marker Exports helps the outside sales team export marker layer data into a .csv file.
-
Edit Details Tab Field allows users to make inline edits to Salesforce fields from the tooltip menu in Salesforce Maps. For example, users can update the status of an opportunity stage from Negotiation to Closed Won.
-
Enable Weather Tab helps users prepare for travel by viewing current and forecasted weather conditions.
In addition, the number of markers a user may return in a single marker layer must be set to a maximum of 50,000 for all groups.
Linda Rosenberg is the Salesforce admin responsible for configuring Salesforce Maps at Cloud Kicks. She creates permission groups and assigns users and profiles based on features identified in the following chart.
Users/Profiles |
Folder Admin |
Allow Exports |
Hide Personal Folder |
Editable Tooltips |
Show Weather |
Max Query Size— 50,000 |
|---|---|---|---|---|---|---|
Marketing Team |
x |
x |
x |
x |
||
Outside Sales |
x |
x |
x |
x |
||
Inside Sales |
x |
x |
x |
|||
Admin |
x |
x |
x |
x |
x |
|
Jose Figueroa (Sales Manager) |
x |
x |
x |
x |
x |
Linda creates a permission group for the Marketing team. She selects the required features and keeps all other default values. Where available, she selects the Allow User Override checkbox. This lets users customize specific features in their Salesforce Maps user interface. For example, Linda selects the Default Basemap value as Street, but users can optionally change this basemap selection to display Imagery as their map preference. Finally, she selects the assignment tab and adds the Marketing user profile to that permission group.

She repeats these steps for inside sales, outside sales, and admins. Since Jose Figueroa is a sales manager and requested his access be the same as the admin permission group, Linda simply adds him as a user to the admin permission group. All other features on the group permissions list are left unchecked.
Creating and Assigning Button Sets
Button sets are actionable buttons assigned to permission groups. When creating a button set, focus on adding role-specific buttons that help users with their job on a daily basis. In most organizations, sales teams have access to buttons like Create Routes, Create Schedules, and Add New Events or Tasks. Likewise, marketing teams often have access to the Add to Campaign button so that customer reachout can be easily tracked at scale.
At Cloud Kicks, Linda determines which actions each team needs in Salesforce Maps, and then creates a button set for each team. Configuring a button set is similar to configuring a page layout in Salesforce; simply drag buttons from the available button list to one or more of the available sections.

As a best practice when naming a button set, your nomenclature should clearly identify the relevant permission group it’s meant for. In this case, Linda chooses Outside Sales as the name for the button set meant for the outside sales team. Once button sets are created and saved, Linda returns to Permission Groups and assigns the correct button set for each permission group.

Access to Folder Permissions
Once you have completed assigning features and actions to users through permission groups, you are now ready to configure another level of access by setting up folder permissions. Folders are located in the Salesforce Maps user interface. Users can have access to all folders or specific folders based on folder permissions allocated to them. Understanding the importance of each folder level helps you determine the best way to organize folders in your environment.
There are three folder levels in Salesforce Maps.
-
Personal folder: Contains private folders and layers unique to an individual user. Remember, visibility into this folder is granted or restricted in permission groups, as discussed in the Salesforce Maps Permission Groups section.
-
User folder: Contains personal user folders and follows the Salesforce role hierarchy set forth in your Salesforce org. This folder allows admins and managers to create layers for individual users and can provide visibility into personal folders. Visibility into this folder is granted or restricted in permission groups.
-
Corporate folder: Contains public shared folders across the organization. All users with Salesforce Maps access have access to all subfolders and layers in the Corporate folder, unless folder level permissions are set.

As a recommendation, grant users access to folders that contain content relevant to their business needs. For instance, the folder assigned to the sales team might include opportunity and account marker layers, where content for services teams may include cases and service requests. Create subfolders in the Corporate folder, one for each team and grant user or profile access to the relevant folders.
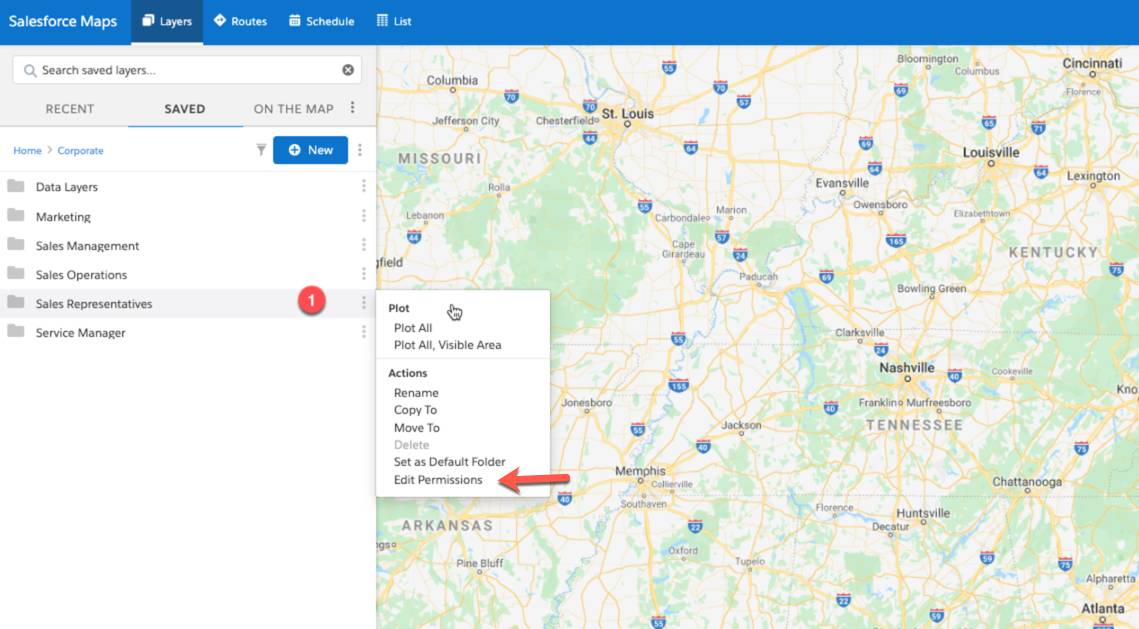
The most common use of folder permissions is by controlling access to subfolders in the Corporate folder. This starts by enabling the folder permission checkbox on the settings page of the Salesforce Maps configuration menu. Once checked, any user with folder admin permission can create subfolders in the corporate folder and assign folder permissions.

Let’s look at how Linda sets up folder permissions for Salesforce Maps licensed users. She starts by creating subfolders in the corporate folder, one for each team: Inside Sales, Outside Sales, Management, and Marketing. Next, she grants the following levels of access based on user profile or specific users.
Folder Location and Name of Subfolder |
Access Granted to Following Profiles or User |
Level of Access |
|---|---|---|
Corporate folder | Inside Sales |
Inside Sales |
Read |
Corporate folder | Outside Sales |
Outside Sales |
Read |
Corporate folder | Inside Sales and Outside Sales |
Sales Management |
Read/Create |
Corporate folder | Management |
Sales Management |
Read/Create |
Corporate folder | Marketing |
Marketing |
Read |

The permissions configuration process is complete, and you are now one step closer to introducing Salesforce Maps to your users!
Resources
- Salesforce Help: Manage Permission Groups
- Salesforce Help: Manage the Action Buttons Available to Users
- Salesforce Help: Set Up Salesforce Maps
- Salesforce Help: Give Users Access to Salesforce Maps and Related Products