Collect the Data
Learning Objectives
After completing this unit, you’ll be able to:
- Summarize how to collect initial data for quoting.
- Explain how to prepare data to support the quoting process.
- Describe the record creation process.
- List the steps to load census data for group insurance.
Prepare the Data
You’ve recorded the overall plan, including all the needed variables and information about their uses. This plan helps you maintain accuracy and avoid mismatched data. You and others can reference the plan while setting up the product model, rating, and OmniScripts so it all works together.
For a quoting OmniScript, add steps and various input components to collect desired data, including customer details, what or whom to insure, and rating data. Add a step component for each page and input components matching the needed data types.
As you configure input element properties, pay special attention to rating data. For elements related to rating, match element names and values to those set in the rating configuration.
Justus, the solution architect for Cumulus, sets up an OmniScript input element for a business type variable. This variable plays a role in rating, with different rates returned depending on the business type selected. When used for rating, the available input element values must match the matrix input values exactly.
Here, the element’s name is busType, which matches the header for the decision table column. Likewise, the set value for the OmniScript input element is office, which matches the rating input value. When it’s time to rate the product, the rating service looks up the appropriate input value and returns the output value. Always try to match values between OmniScripts elements and rating procedures, otherwise, you must add additional transform elements to make the rating work.
Some collected data must be reformatted or combined with other data. Here are a couple of examples.
Justus initially collects the Quote Effective Date, 05-05-2024, from the user in a standard date format, MM-DD-YYYY. However, the quoting services require effective dates in the form YYYY-MM-DD HH:MM:SS.

To format this date, he adds a Formula component to build the new key using the formula, %quoteEffectiveDate% + '00:00:00'. This component reformulates the effective date of 05-05-2024 to 2024-05-05 00:00:00.
Justus wants to build a process that supports multiple instances of insureds. So, he defines unique instance keys by combining multiple inputs into a single variable.
For the instance key of vehicles, he combines the Year, Make, and Model fields with the formula, CONCATENATE(%autoYear|n%, " ", %autoMake|n%, " ", %autoModel|n%).
Create the Object Records
Use component to create new object records, such as new accounts, contacts, and opportunities. Quote creation requires an opportunity, and an opportunity requires an account.
Justus configures a Data Mapper Load component to create records required for quote creation later in the process.
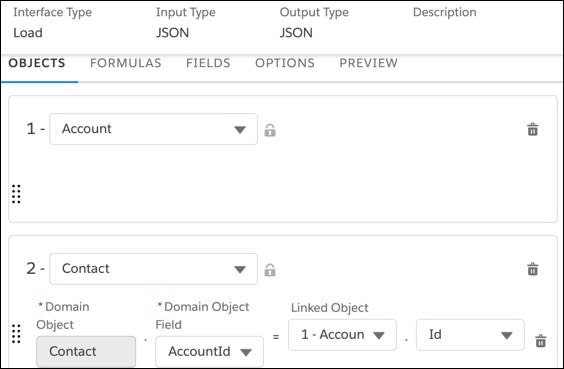
This component creates an account and contact record, which are automatically linked to each other.
For group insurance, you collect information about group members, called census data. A census record, along with census members, stores the census information. Create the census record before filling it with data.
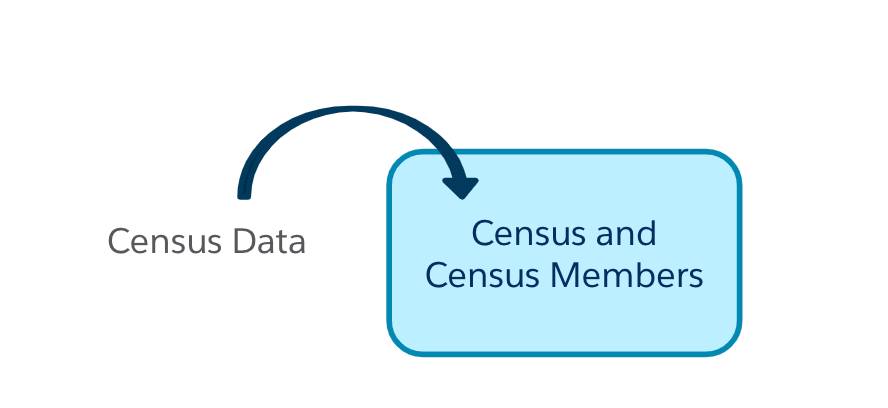
Use a Data Mapper Load component along with the Data Mapper Post Action component to create the new census record.

Justus sets up a Data Mapper Load component that creates a new census record that links to an existing account.
Load the Census Data
Collecting and loading data in a census record is a common requirement. There’s a provided Lightning web component, insOsCensus, to make it easier.
The insOsCensus component provides a user interface for uploading members from a file and manually adding, deleting, and updating census members. When a user uploads a census file, spreadsheet column headers map to census member fields.

After uploading the census file, verify field mappings. If a matching field is not available for a column, select from available census member fields in a dropdown list.

On the Census Details window, Justus maps the Data of Birth column to the Birthdate field.
After Justus confirms the file mappings, the data uploads into census and census member records, with the census members listed on the web component.
He expands members to view dependents and review details for each plan participant. If desired, he can customize the columns of data.
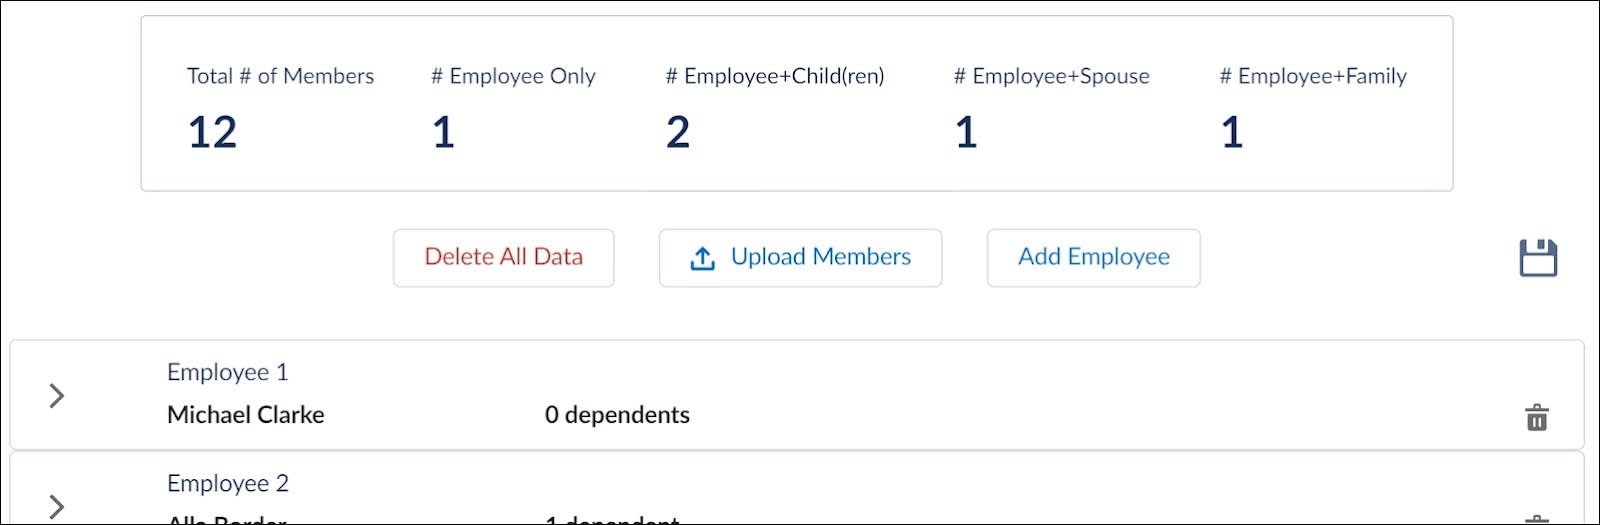
After Justus confirms the mappings, 12 total members appear on the census screen, along with summary information about the census. He can customize the summary information if needed.
You can add service calls to the insOSCensus web component by configuring the element properties in JSON. In the JSON, the services are set in corresponding action nodes.
Here’s a sample JSON for configuring the services using three action nodes.

JSON properties are not just about the services. There’s an optional property to categorize member fields for display. All fields are in the Details group when you expand a member’s information. You can configure an array of custom categories under a displaySettings node by simply specifying the name for each category and listing the fields you want in it.

Justus adds an Applicant Demographics category containing the fields for first name and last name. On the corresponding census list, the category and fields appear as desired.
Now that you've learned how to collect data for quoting, it’s time to learn how to return rated products.