Add Steps to a Workflow
Learning Objectives
After completing this unit, you’ll be able to:
- Describe the three types of workflow steps.
- Customize steps with buttons and variables.
Workflow Steps
After choosing a trigger for your workflow, you can add steps to send messages, collect information with forms, or take actions with other tools and services to automate tasks beyond your Slack workspace.
Workflow steps are the actions people interact with to complete a business process. Once your workflow starts, it presents the steps you've added in the order you’ve specified.

Add one or more steps to your workflow, depending on the complexity of your business process.
Types of Workflow Steps
You can add three types of steps to a workflow: Slack steps, connector steps, and custom steps. Add one step for simple processes, or a series of steps for more complex processes.
Step type |
Description |
Who can add this step |
|---|---|---|
Slack step |
Take an action in Slack, like sending a message or adding someone to a channel. |
Everyone (by default) |
Connector step |
Take an action in a third-party service, like adding a row to a Google spreadsheet or creating a new Zoom meeting. |
Everyone (if approved) |
Custom step |
Built specifically for your organization to take whatever action the developer specifies. |
App collaborators (once the app is approved) |
Let’s explore each type of step in detail.
Slack Steps
Slack steps are used to take action within your Slack workspace. Many steps are available to automate a variety of business processes. Review a few common Slack steps below and create your own workflow in Slack to see more.
Slack Process Area |
Purpose of Step(s) |
|---|---|
AI |
|
Canvas |
|
Lists |
|
Channels |
|
Users |
|
Messages |
|
Forms |
|
Workflow controls |
|
Sales Elevate |
|
Slack Step: Dig into the Details on Messages
Messages are an effective way to communicate workflow actions with your team. Use message steps to automate recurring communications, ensuring that important information is consistently and automatically shared.
Send messages to the person who initiated the workflow or others in Slack who need to take action related to the workflow.
Message Recipient |
Example Use Cases |
Slack Suggestion |
|---|---|---|
The person who triggered the workflow |
|
Send these messages as DMs so the message recipient knows their request has been completed and is communicated any follow-up action required. |
People who need to take action based on the workflow |
|
Send these messages to channels or threads so it’s easy for others to monitor progress. |

Variables
Use workflow variables to customize your workflow message and other workflow steps. Variables allow you to reference information from previous steps, giving you the flexibility to personalize your workflows and create a unified experience from start to finish.
You can add different variables to different types of steps depending on how your workflow starts, who interacts with the steps, and what information passes into the workflow (like responses to a form).
Message steps are a common place to include workflow variables. For example, you can use a variable to message the person who started the workflow, to message the channel where the workflow started, or even to include responses to a form in the message body.
Revisiting the previous example, let’s focus on the workflow welcoming new hires to the team channel. It has two message steps with variables:
- Message step: Send a message to { }The user who joined the channel
- Variable A: The variable in this step dictates who receives the workflow message. In this case, the message will be sent to the person who joined the channel.
- Variable A: The variable in this step dictates who receives the workflow message. In this case, the message will be sent to the person who joined the channel.
- Message step: Send a message to { }The channel that the user joined
- Variable B: The first variable in this step dictates which channel the message will be sent to. The variable references the same channel where the workflow started.
- Variable C: There’s a series of variables in the body of the message that will display the form questions and the new hire’s responses to each.
- Variable B: The first variable in this step dictates which channel the message will be sent to. The variable references the same channel where the workflow started.
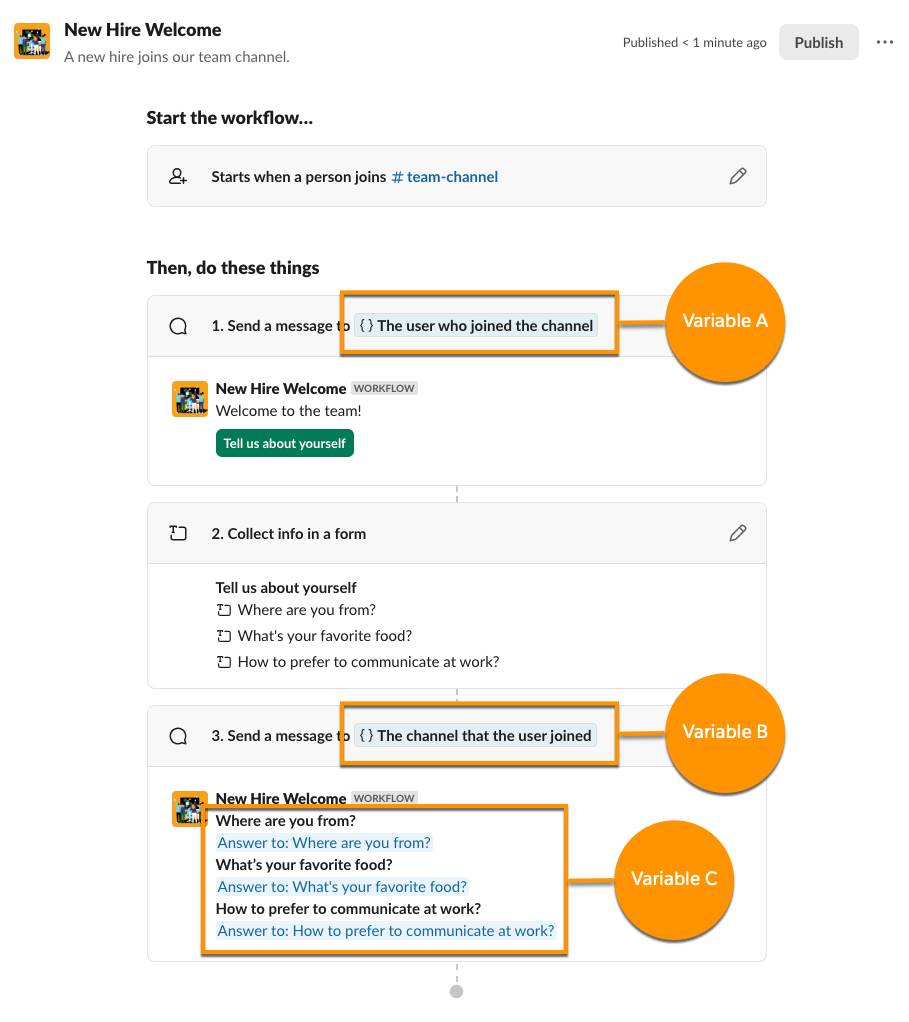
The way you use variables depends on the process you're automating and the different steps you have in your workflow.
Buttons
To create message steps, add buttons to control the progression of the workflow. By adding a button to a step, the workflow is paused until someone clicks it. Buttons can be used to continue the workflow or open a link.
Here’s how you add a button.
- When adding or editing a step, click Add Button.
- You can edit the text that appears on the button or change the button color.
- To choose an action for the button, click the dropdown menu below Behavior.
- Click the toggle next to Single-click to disable the button once one person has clicked it.
- Buttons will be multi-click by default, meaning the same button can be used by multiple people.
- Buttons will be multi-click by default, meaning the same button can be used by multiple people.
- Select Advanced options to restrict clicking the button to certain people or set an expiration date to disable the button at a certain date and time.
- Click Done, then click Save.
Slack Step: Dig into the Details on Forms
Forms allow you to organize and collect information via a workflow, which can standardize how you collect information and reduce the back-and-forth of requesting information from others. Forms are highly customizable and include space for custom responses and selecting options from a list.
A form step is particularly useful when you want to standardize and automate how you collect:
- Requests and incidents
- Use cases and customer stories
- Feedback
- Questions and agenda items
- Status updates
- Personalized team introductions
Once a form has been submitted, you can include the responses as variables in future steps of the workflow. For example, you can automate the submission of incidents to your IT team by asking people to fill out a form and send a message to your incident channel with the incident details.

You can choose where to send form submissions, such as sending form responses to a third party like Google Sheets and sending confirmation to the person who submitted the form. You can also customize the text sent with the form.
Connector Steps
Automatically take action in other third-party services from your Slack workflow. Easily connect steps to popular tools like Calendly, Google Sheets, Zoom, and more. Each Connector offers unique steps to seamlessly integrate your workflows.
Benefits of connector steps:
- Keep all your tools in one place for a more streamlined workflow.
- Reduce the need to switch between tools for complex tasks.
- Customize Slack processes without the hassle of creating a custom app.
When a Connector is approved for use in your workspace, you can authenticate your account to take actions in the connected service without leaving Slack. By adding a step from a Connector to a Slack workflow, you can send information collected by your workflow to the Connector or pull information from that Connector into Slack—without anyone needing to copy any information between tools.
In the next screenshot, the workflow is triggered by a link in Slack to create a new task in Asana. By filling out a form with task details in Slack, the task is automatically created in Asana. The person who created the task also receives a confirmation message with the task details and a button to view the new task in Asana.

There are many connector steps available in Workflow Builder for popular apps, including:
Connector |
Examples of Steps |
|---|---|
Asana |
|
DocuSign |
|
Calendly |
|
Giphy |
|
Google Sheets |
|
Jira Cloud |
|
PagerDuty |
|
Salesforce |
|
Zoom |
|
Open Workflow Builder to see all the connectors available and the steps for each.
In some cases, connector steps require you to approve or deny their use, or to configure additional details to enable them for your members. You can manage details for setting default availability, configuring steps, reviewing requests, setting access permissions, and managing domains and authentication.
Custom Steps
With connector steps, you can easily integrate your Slack workflows with many public third-party services. If your business process involves internal tools or other services that aren't already offered as connector steps, you can develop code for your own custom steps and make them available to your team in Workflow Builder.
Workflow steps are required to determine what actions take place to complete your business process. Employ Slack steps for actions within Slack, connector steps for actions outside Slack, or a combination of both to simplify your processes effectively. In the next unit, you put all of the workflow components together to create a common workflow in Slack.
Resources
- Slack Help: Slack administration: Manage access to Workflow Builder connectors
- Slack App Directory: Automate your way to a shorter day
- Slack API: connector functions
- Slack Help: Create a workflow in Slack
- Slack Help: Edit and manage your workflow
- Slack API: Custom steps dynamic options in Workflow Builder
- Slack API: Custom functions for workflow apps
- Slack Templates: Feedback intake and triage