Edit and Create Gift Entry Templates
Understand Gift Entry Templates
Gift Entry supports different types of gifts with templates tailored to the situation, in order to collect the information you need.
In this project, you work to create a template for direct mail gifts. You could also set up a major gifts template that includes fields from the Opportunity, Payment, and GAU Allocation objects to record complex deals.
Gift Entry comes packaged with one template—the Default Gift Entry Template—for all single gifts that you enter using the New Single Gift button and quick actions on records. You can set up as many additional templates as you need for batch Gift Entry.
In this step, you start by editing the default template to create a new template, and then test single and batch gift entries.
Create a Backup of the Default Template
The Default Gift Entry Template is the only template you can use for single gifts, but you aren’t limited to the pre-packaged fields on that template. You can edit the Default Gift Entry template, but it’s a good practice to first save a backup copy of it to preserve its original settings.
- From the App Launcher (
 ), find and select Gift Entry.
- Click the Templates tab.
- Click
 in the Default Gift Entry Template row and select Clone.
- Edit the copied template to indicate this template is a backup of the default.
- Template Name:
Backup of Default Gift Entry Template - Description:
Backup of the default Gift Entry template, with all fields unchanged.
- Click Next: Form Fields.
- Review the settings, but don’t change anything. Then click Next: Batch Settings.
- Move at least one field to Visible Fields by selecting it and clicking
 . We recommend including Donor Name, Donation Name, Status, and Failure Information. Adding at least one field will remove the
  icon from the Batch Settings tab.
- Save your work.
Edit the Default Gift Entry Template
Now you can edit the Default Gift Entry Template to add our new field.
- Click the Templates tab in Gift Entry.
- Select Default Gift Entry Template from the table.
- Click Next: Form Fields.
- In the Configure Form Fields area, select the Donation Information section. Select this section then scroll away from it to add the field, so it won't stay on the screen for the next step.

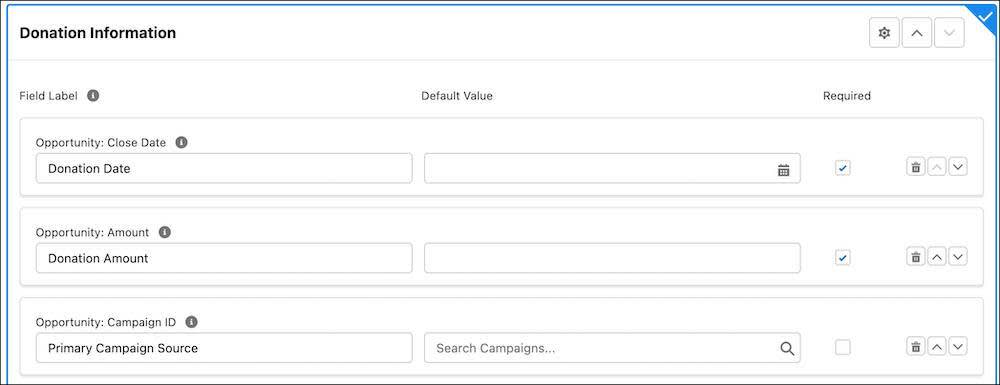
- In the Form Fields menu, select Opportunity then select the field you created, Source Code. The field appears last in the Donation Information section.

- Find the Donation Information section again in the Configure Form Fields area. Move the Source Code field above the Allocations field bundle by clicking
 .
.
- Remove
Opportunity:from the field label so it contains onlySource Code.
- Click Next: Batch Settings.
- Move at least one field to Visible Fields by selecting it and clicking
 . Again, we recommend including Donor Name, Donation Name, Status, and Failure Information.
- Save your work.
Your new field is now accessible when you use the New Single Gift button, and for batch gifts when this template is selected. You'll try that soon, but let’s create another template first.
Create a New Gift Entry Template for Batch Gift Entry
Remember, the Default Gift Entry Template is the only template you can use to enter single gifts, but if you’re entering a batch of gifts you can select which template you want to use.
Create a direct mail template that includes our new Source Code field.
- Click the Templates tab in Gift Entry.
- Click Create Template.

- Enter a name and description for the template.
- Template Name:
Direct Mail - Template Description:
For processing direct mail responses.
- Click Next: Form Fields.
- Several fields are included in the new template by default. If you want to create a template for your organization, you should first work with your fundraising team to get a list of what fields they need and how they want them to be organized. For this project, you make only a few small changes to the default.
- Change the default field label of Data Import: Donation Donor to
Donor Type. This change will make the template easier to use and understand for your users.
- Change the default field label of Data Import: Account1 Imported to
Donor Account.
- Change the default field label of Data Import: Contact1 Imported to
Donor Contact.
- Click Add Section at the bottom of the screen and then
 .
.
- In the Section Name field, enter
Direct Mail Appeal Detailsthen click Save.
- With the Direct Mail Appeal Details section selected, select Opportunity in the Form Fields menu, then select Source Code. The field appears in the section.
- Edit the field label so it contains only
Source Codefor consistency with the other template.
- If you were making your own form in your organization’s Salesforce instance, other fields might also go in the Direct Mail Appeal Details section, such as information about the campaign or the contact’s address. Leave the rest of the template in our Trailhead Playground alone for now, and click Next: Batch Settings.
- Leave the Batch Settings as the defaults (which includes a few more fields than we recommended so far) and save your work.
You have everything you need to enter gifts with your new field. You go through single and batch gifts using your template in the next step, but first be sure to Verify your work before you move on.
Resources