Deploy Your Integration in Anypoint Platform
It's time to get this integration going. For this project, we provide you with a completed Mule application. Click here to download the completed solution.
You now have a Java Archive (JAR) file downloaded. JAR files are used to distribute Java applications, libraries, and extensions. Although you build Mule applications using a graphical user interface, they’re Java applications. But you don’t need to know Java to build Mule applications.
Recall that in an ideal world, you’d create a separate Mule app for each Salesforce org to avoid point-to-point integrations. But since this is introductory, let’s create a simple solution. So what does the solution look like? The beauty is in its simplicity.
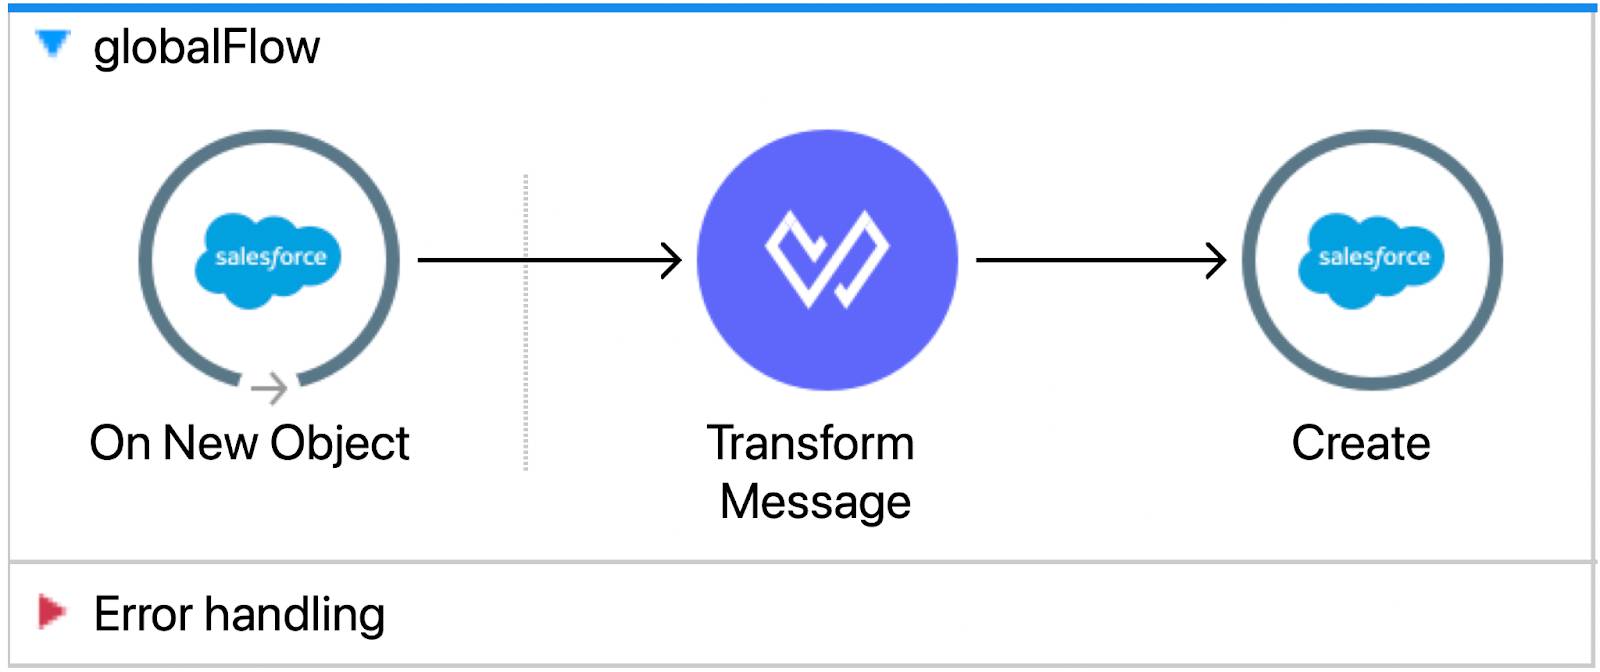
Let’s take a peek inside the JAR file. Mule applications are built in a flow where components call other components. In the following flow screenshot of the solution, we start on the left-hand side with the trigger event. In this use case, a new record is added to the first Salesforce org. The On New Object component listens for new records in an object.
When Anypoint Platform detects a new record, it passes the record to the Transform Message component. The Transform Message component prepares the data for the next component, which is the Create Salesforce record component to the right. This component will create a record in the second Salesforce org.

In a matter of minutes, you’re able to build a complete and powerful integration using an intuitive, drag-and-drop interface. This is the power of MuleSoft.
How does the Mule application identify the first and second Salesforce orgs? You provide that information in Runtime Manager, which is a part of Anypoint Platform. The application is set up to expect the username and password for your two Salesforce orgs.
Let’s Get Hands-on with Anypoint Runtime Manager
Anypoint Runtime Manager provides a unified view of your applications, servers, and APIs. With Runtime Manager you deploy, manage, and monitor your Mule applications in a sandbox, staging, or production environment from one central location, whether your apps are deployed in the cloud or on-premises.
- If you’re not already logged in to Anypoint Platform, go to the Challenge section at the bottom of this page and click Launch.
- Next, on the Anypoint Platform splash screen, click Runtime Manager.

- Click Sandbox to choose your environment.
Note: If you’re logging into an existing account, confirm the Sandbox environment is selected.
- Click Deploy application. The screen that appears allows you to provide a unique name for your application, select a location to host your application, upload the solution JAR file you downloaded, and provide your credentials to the Mule app.

- Complete the fields in the Deploy Application section.
- Application Name: Name your application using the following formula:
sf2sf-myname-todaysdate. Like this:sf2sf-lindarosenberg-aug30Note: The application name must begin with sf2sf and be unique across all MuleSoft apps.
- Deployment Target: Leave default values.
- Application File: Choose JAR file you downloaded.
- Click the Properties tab. You need the credentials you captured in step 2 of this project to complete this part.
- Enter the following field names and corresponding values.
Note: You can only add a new field after you’ve provided a value for the current field.
-
org1.username= Trailhead Playground 1 username
-
org1.password= Trailhead Playground 1 password
-
org2.username= Trailhead Playground 2 username
-
org2.password= Trailhead Playground 2 password
 For the passwords, click Protect after entering the value. Don’t click Protect for the username fields because they’re used to check your work in this project.
Note: If you don’t see the Protect button, turn off your ad-blocker. As a best practice, you should also protect usernames in real-life scenarios. Never share your credentials with anyone. Protected values can’t be viewed or retrieved by any user. This action can’t be undone, but you can replace or delete the value.
- Click Deploy Application.
After you deploy your application, which takes 2–3 minutes, it’s hosted in CloudHub 2.0. CloudHub 2.0 is a fully managed, containerized, managed cloud service, where you can deploy and run MuleSoft applications.
- Click Applications and then click the name of your application.
Your application is ready when its status is set to Running. It is automatically provided with a secure endpoint.
After you’ve completed the previous steps, click Verify Step to check your work.
Take It Further
It’s not required to complete this project, but if you’re interested in looking inside the solution JAR file, download Anypoint Code Builder for Desktop, select View > Command Palette…, select MuleSoft: Import a Project, Mule Project Type, select the downloaded JAR file, and select the folder where you would like to store the project.
Alternatively, use the Anypoint Studio desktop IDE. Upload the JAR file using File > Import and select Packaged mule application(.jar).
