Build Dynamic Top-N Queries and Add a Greeting
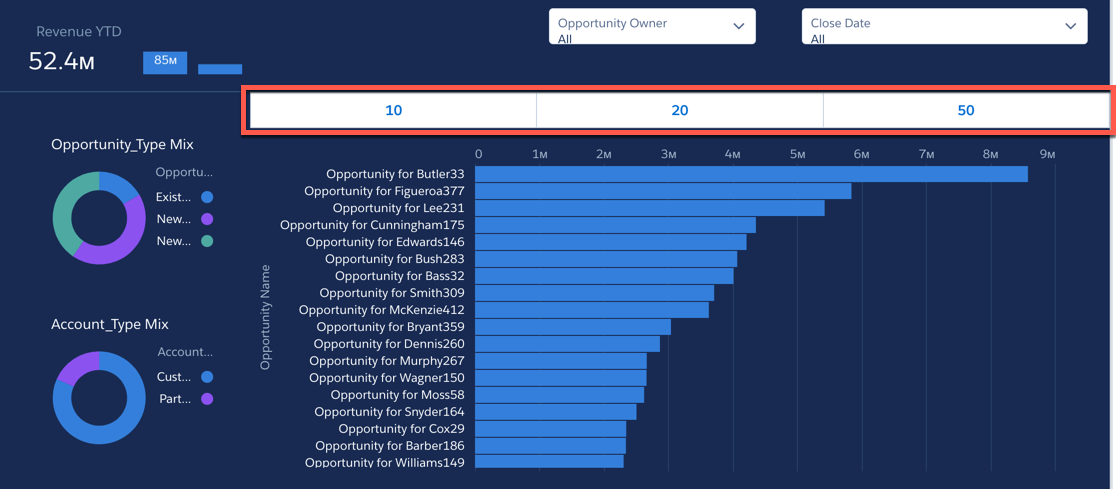
Top-N filters give users limiting options when viewing the number of rows in a dashboard. For example, you can have a top 10, 20, and 50 button. When you click 10, the dashboard dynamically reduces the number of items you see to the top 10. This is ideal for making your dashboard readable and giving users the power to manipulate it in a way that suits them.
In this step, you create a Top-N toggle that dynamically filters the chart widget. Then, you set up a fun greeting to make the dashboard even more personal.
Set up a Query Limit
First, set up a placeholder query limit.
- Double-click the column chart on the dashboard.
- Click
 to open the Charts options.
- Select Bar.
- Click Close Date (Year) under Bars.
- Click the back arrow to select a group.
- Search for and select Opportunity Name.
- Click the down triangle on Sum of Amount to open sorting options.
- Select Sort Descending.
- Scroll down to Query Limit and click Edit.
- Enter
20and click Apply, then click Update.
Create a Top-N Toggle
Create a toggle with Top-N values.
- Click an empty area of the dashboard, then click Create Query.
- Click Create Custom Query.
- Type in display values:
102050
- Add a Text column with
10,20, and50to correspond with the Display values.
- Click Done.
Add the Toggle to Your Dashboard
Add a toggle to your dashboard.
- Drag a Toggle widget to just above the bar chart.
- Drag the static_# lens into the widget. The hashtag (#) represents the numeric suffix added to your query.
- Resize the toggle to the length of the bar chart.

- Click the toggle widget.
- Now, click the Query tab.
- Under Selection Type, select click Single selection (Required) from the dropdown menu.
Set Up Dynamic Binding
Bind the toggle to the bar chart.
- Click the bar chart.
- Click the Advanced Editor button.
- Click the Query tab.
- Under Source Query, select static_#.
- Click Source Data then make the following selections:
- Data selection: Cell
- Row Index: 0
- Column: Text2
- Click the back arrow next to Select Data.
- Under Interaction Type, click Selection.
- Next, expand More Options and confirm Data Serialization Functions is asString.
- Click the Copy button in the CREATED INTERACTION section of the page.
- Then, click a line in the query and search for "limit".
- Delete the limit value, then type
"".
- Paste the copied code between the quotes.
- The limit value should now look similar to this:
"limit": "{{cell(static_1.selection, 0, \"Text2\").asString()}}" - Click Save and save the dashboard.
Test the Dashboard
- Click Preview.
- Change the Opportunity Owner list widget to All by unselecting your name in the list.
- Click each of the values in the toggle to test. Notice the amount of opportunities that show up correspond to the value you choose.

Create a Customized Greeting
Remember, you have the LoggedInUser query that holds the logged-in user information. You use it to create the greeting.
- Click Edit to put the dashboard in edit mode.
- Add a text widget under the dashboard headline. Move the headline up if the text widget doesn't fit.
- Enter
Hello,in the widget’s Text property.
- Click Add Query Data.
- Click Select Query and select LoggedInUser_#.
- Now, click the Select Field dropdown menu and select Full Name.
- Confirm Interaction Type is Result.
- Click Done then save the dashboard.
- Preview the dashboard.

Well Done!
You created intelligent dashboard interactions and customizations with minimal coding. Now that you know what’s possible with the Advanced Editor, feel empowered to create SOQL queries and complex bindings.
Resources
- Salesforce Help: Create Interactions with Clicks
- Salesforce Help: Create a Custom Query with User-Defined Values
- External Site: salesforceblogger.com: Get a little help on the binding syntax
- External Site: salesforceblogger.com: Einstein Analytics: Demystifying Bindings–Part 1