Elaborar un agente con Script del agente
Objetivos de aprendizaje
En este insignia:
- Aprenderá sobre Script del agente y paquetes de creación.
- Obtendrá una vista previa del agente mediante su archivo de Script del agente.
- Programará un agente mediante la actualización y validación de su archivo de Script del agente.
- Publicará un agente en una organización.
- Visualizará el agente publicado en la IU del Generador de Agentforce de la organización.
Para este paso, utilice la misma organización de Developer Edition que creó en el Paso 1.

Presentamos Script del agente, el plano del agente
Se sigue un ciclo de vida específico para crear un agente.
-
Desarrollo: Programe el archivo de Script del agente para definir las instrucciones y la lógica de su agente.
-
Publicación: Implemente el archivo de Script del agente en una organización de desarrollo para crear los metadatos del agente.
-
Pruebas: Verifique el comportamiento del agente en una organización borrador o un entorno sandbox.
-
Implementación: Migre los metadatos del agente a su entorno de producción.
-
Activación: Active el agente de modo que esté disponible para sus clientes.
Esta insignia se centra en los pasos de desarrollo y publicación.
Script del agente es la base de la próxima generación de agentes de Agentforce. Es un lenguaje que combina la flexibilidad de usar lenguaje natural para hacer vibe coding con la confiabilidad de las expresiones programáticas para gestionar reglas de negocio. Script del agente ofrece todas las ventajas de acceder a un modelo de lenguaje grande (LLM) y, al mismo tiempo, maneras de agregar comportamientos más determinísticos a su agente.
Como casi todo en Salesforce, el archivo de Script del agente de un agente es parte de un componente de metadatos denominado AiAuthoringBundle o, simplemente, paquete de creación. Puede generar un paquete de creación desde cero con VS Code o comandos de la CLI en su proyecto de DX, o bien mediante vibe coding. También puede crear primero un agente en su organización con el Generador de Agentforce y, luego, recuperar el paquete de creación en su proyecto de DX. El paquete de creación incluye un archivo con la extensión .agent; este es el archivo de Script del agente que sirve como el plano del agente.
En esta insignia de Trailhead, comienza con un paquete de creación y un archivo de Script del agente que se encuentran en el repositorio que duplicó en la unidad anterior. ¿Preparado para profundizar?
En VS Code, abra el archivo de Script del agente con el nombre Local_Info_Agent.agent, ubicado en el directorio force-app/main/default/aiAuthoringBundles/Local_Info_Agent del proyecto de DX que duplicó en la unidad anterior.
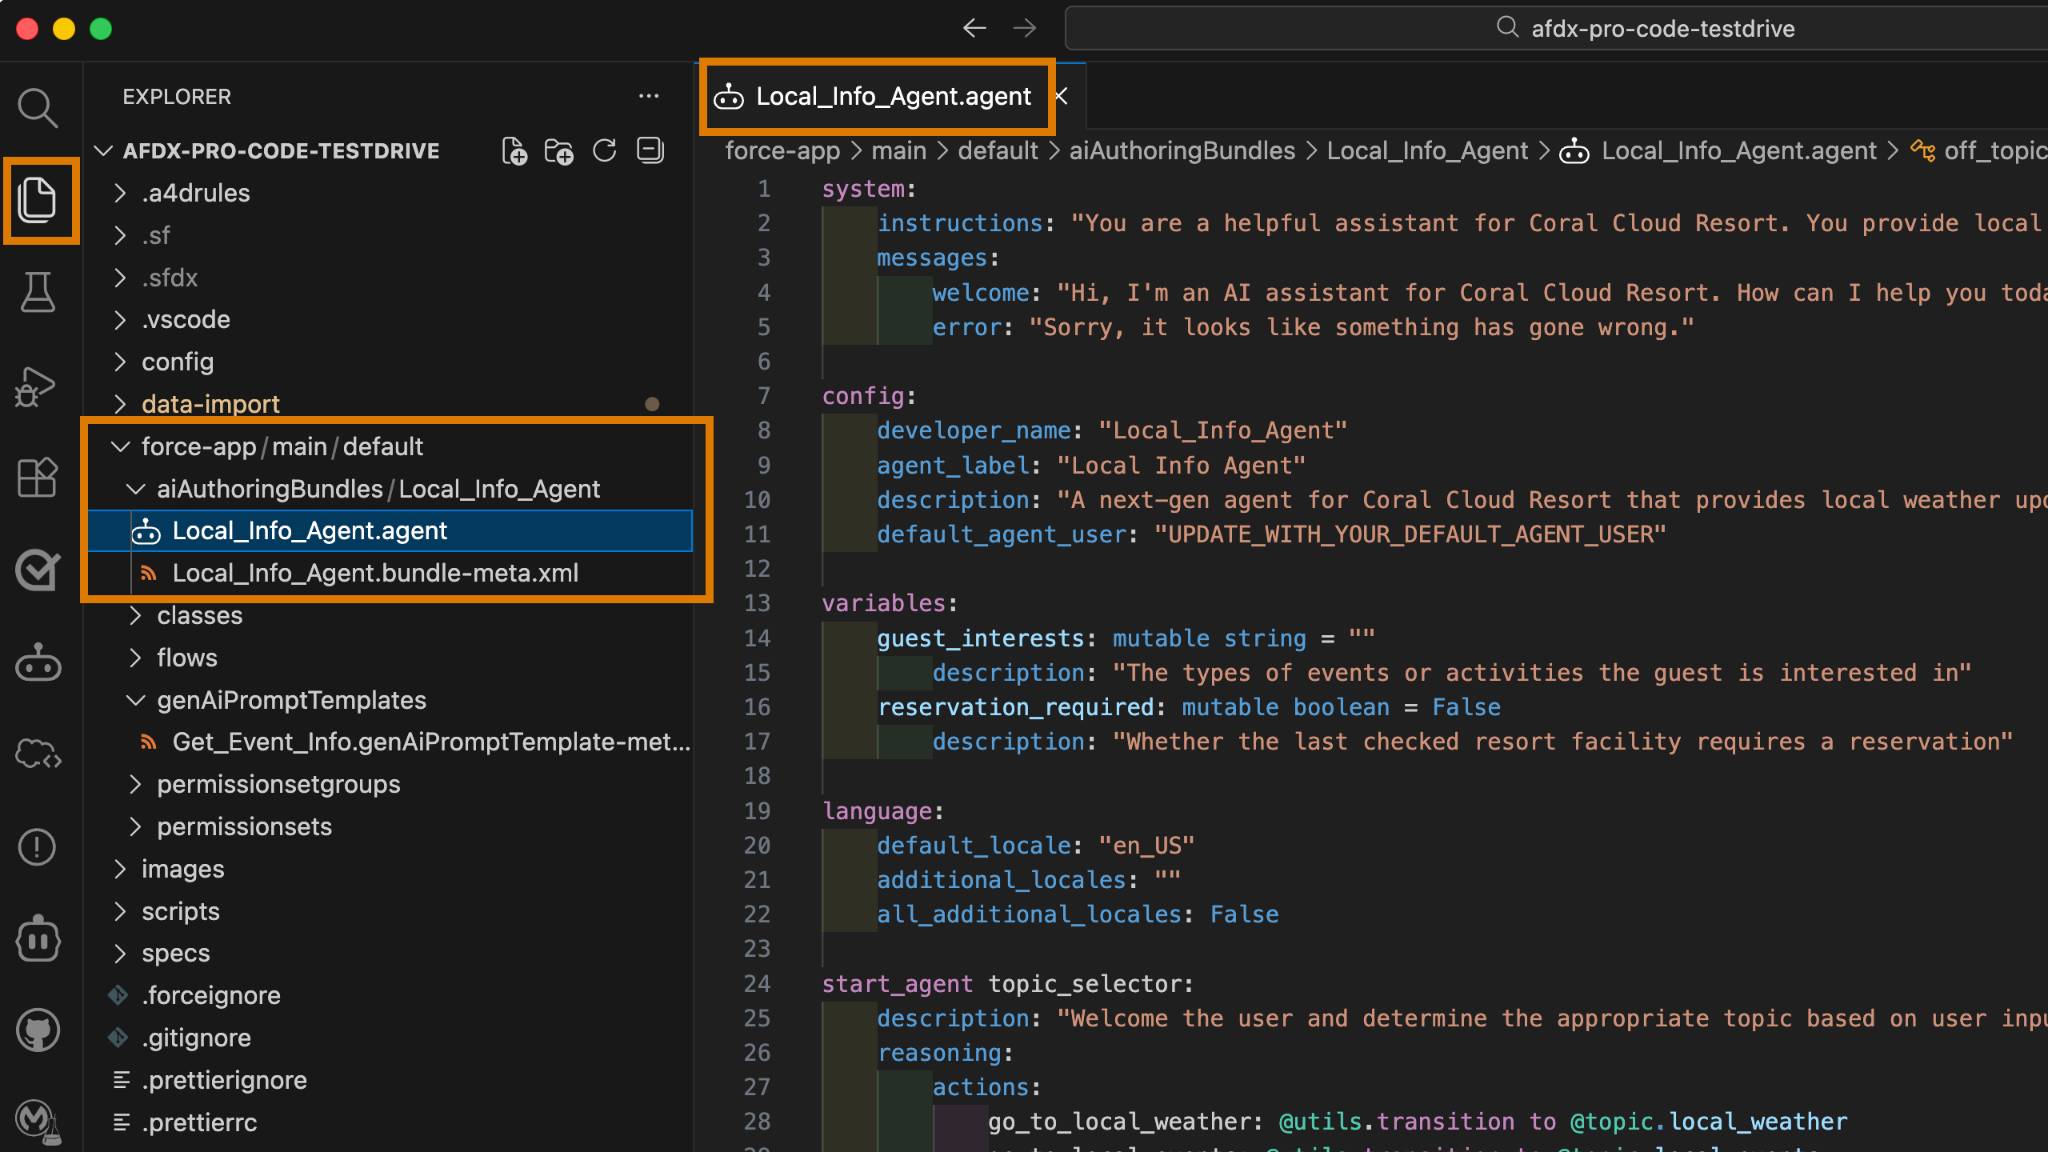
Observe que el archivo de Script del agente muestra resaltado de sintaxis en colores, indicadores visuales (como garabatos rojos) para errores de sintaxis, navegación de código, etc. Estos colores se muestran porque las extensiones de VS Code de Salesforce admiten Script del agente como un lenguaje de programación, al igual que admiten Apex y LWC.
En esta insignia no aprenderemos sobre el lenguaje de Script del agente en sí, pero vale la pena tomarse unos minutos para comprender el archivo. Por ejemplo, el archivo está compuesto por bloques, como system (sistema), config (configuración) y variables. El bloque config (configuración) contiene los parámetros de configuración que definen el agente. Cambiará uno de estos parámetros más adelante en esta insignia.
Consulte Primeros pasos con Script del agente para obtener más información y detalles.
Obtener una vista previa del agente solo mediante su archivo de Script del agente
A medida que programa el archivo de Script del agente de su agente, es útil mantener pláticas con él periódicamente. Puede verificar cómo responde a medida que realiza cambios y actualizaciones en tiempo real. Estas pláticas previas sirven como pruebas interactivas para garantizar que el agente se comporte de la manera esperada.
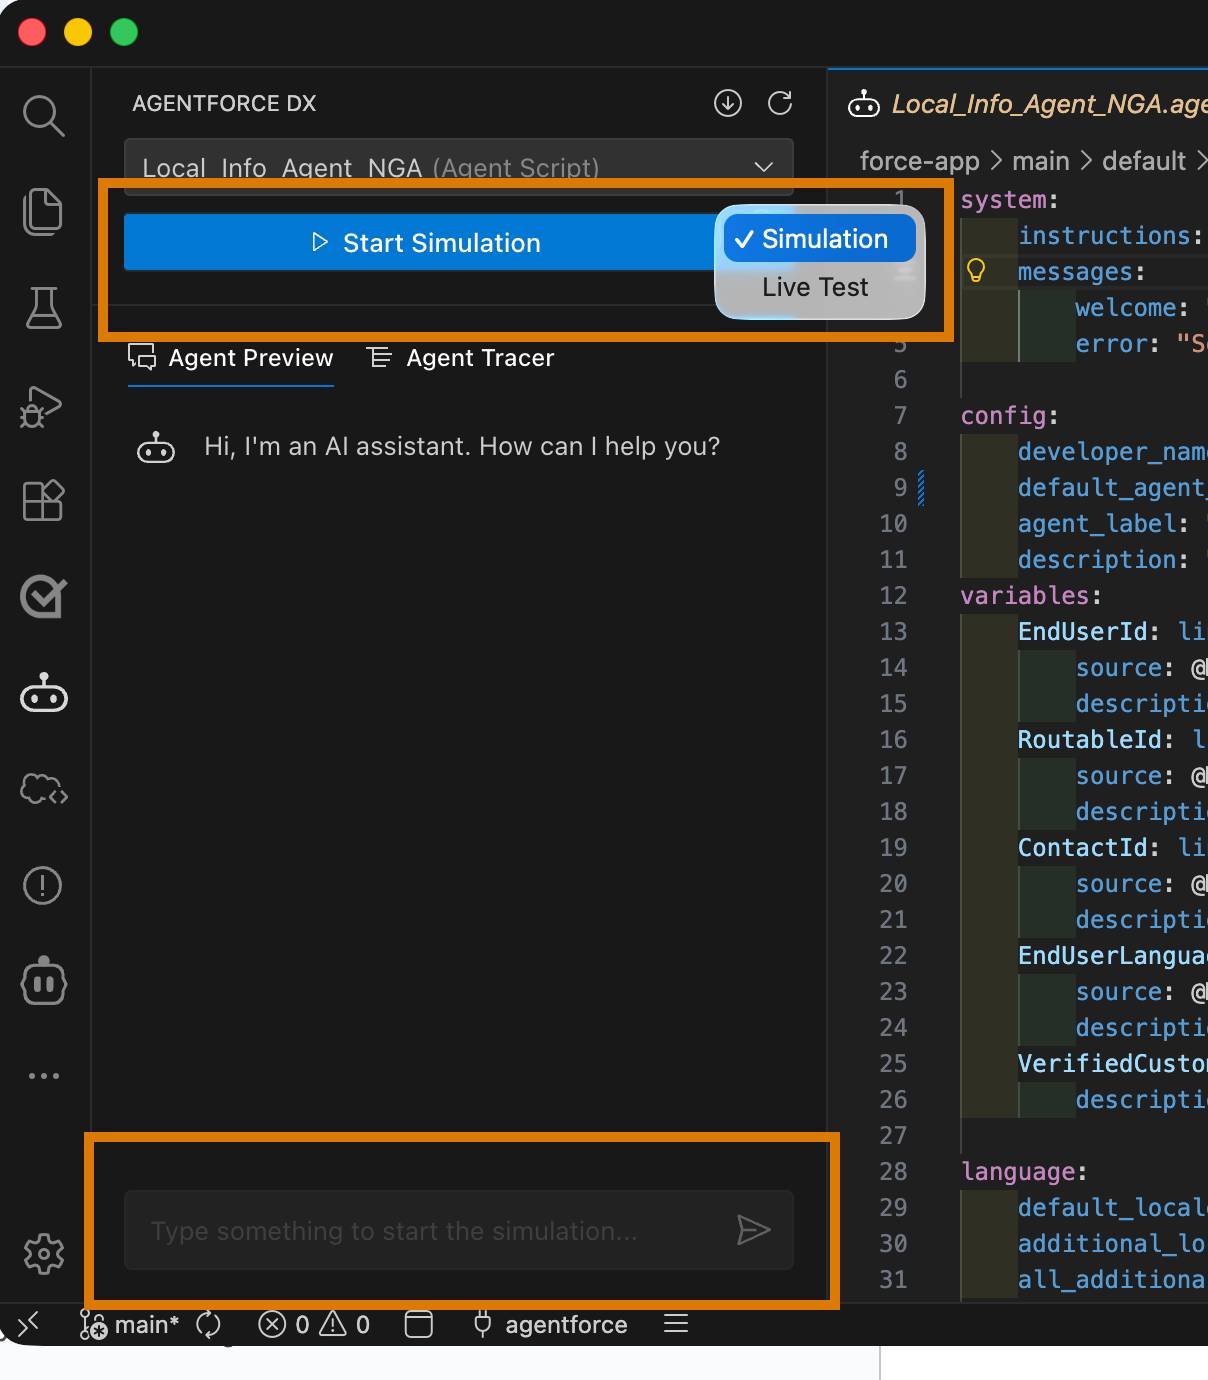
Primero, use el modo de simulación para obtener una vista previa del agente. Este modo solo usa el archivo de Script del agente para platicar y simular todas las herramientas. Resulta particularmente útil si aún no están disponibles las clases de Apex, los flujos y las plantillas de solicitud que implementan las herramientas. El LLM usa la información que agregó sobre los subagentes al archivo de Script del agente para simular lo que la herramienta hace o cómo responde. Accede al LLM a través de su organización, por lo que aún en modo de simulación debe estar autorizado en su organización.
- En VS Code, abra el menú contextual (clic con el botón derecho) en el archivo de Script del agente Local_Info_Agent.agent.
- Seleccione AFDX: Preview This Agent (AFDX: Obtener una vista previa de este agente).
Se abre un panel de Agentforce DX en el lado izquierdo.
- En la lista desplegable Select agent… (Seleccionar agente…), seleccione Local_Info_Agent (es posible que ya esté seleccionado).
Observe su ubicación en la sección Agent Script (Script del agente) de la lista. A menos que haya creado un agente nuevo, Local_Info_Agent es el único agente en la lista.
- En el menú desplegable, seleccione Simulation (Simulación) y, luego, haga clic en Start Simulation (Iniciar simulación) para iniciar la vista previa.
- En el cuadro de chat, ingrese esta pregunta para ver una demostración de lo que el agente puede hacer:
What can you help me with?(¿Con qué puedes ayudarme?)
El agente piensa un momento y, luego, ofrece una respuesta.
- Escriba esta pregunta:
What’s the weather like?
Obtiene un resumen del clima, pero ¿se dio cuenta de que el agente habla como un pirata? Por ejemplo, es probable que su respuesta comience con Ahhh compañero. ¡Qué extraño! El motivo por el que el agente responde así es que su archivo de Script del agente lo instruyó para que hable como un pirata cuando describa el clima local.
A pesar de que un perfil de pirata es una forma divertida de probar la personalidad, los agentes profesionales necesitan una voz de marca coherente. Aprenda cómo modificar el archivo de Script del agente para mejorar las respuestas conversacionales de su agente.
Programar el archivo de Script del agente
Si desea modificar el comportamiento de su agente, programe su archivo de Script del agente. A medida que escribe el código, valide el archivo para asegurarse de que no haya errores. Probablemente sea un buen momento para hacer que el agente deje de responder como un pirata. ¿Todo listo para aprender a hacerlo?
- En VS Code, analice el archivo de Script del agente para determinar si puede encontrar la instrucción que hace que el agente responda como un pirata cuando habla sobre el clima local.
Sugerencia: Revise las instrucciones de razonamiento de local_weather. ¿Todavía no puede encontrarlo? Observe cerca de la línea 114 una oración que comienza con Finally, ALWAYS give answers (Finalmente, SIEMPRE responde).
- Para modificar el archivo, quite toda la línea que comienza con Finally, ALWAYS give answers (Finalmente, SIEMPRE responde). No haga ninguna otra modificación, a menos que sepa lo que hace.
- Guarde el archivo.
- Abra el menú contextual (clic con el botón derecho) del archivo de Script del agente y seleccione AFDX: Validate this Agent (AFDX: Validar este agente).
Mientras el archivo se valida, se abre una pequeña ventana en la esquina inferior derecha de VS Code. Si la validación no se realiza correctamente, se abre la ficha Problems (Problemas) con los mensajes de error y las sugerencias para ayudarlo a corregirlos. Sin embargo, si siguió las instrucciones, el archivo de Script del agente debería validarse correctamente.
- Haga clic en Restart Options (Opciones de reinicio) y, luego, en Compile & Restart (Compilar y reiniciar) en la esquina superior derecha de la ventana de vista previa de Agentforce DX.

- Escriba la misma pregunta (
What’s the weather like?[¿Cómo está el clima?] ) en el cuadro de chat. También puede seleccionar la flecha hacia arriba para usar el historial del chat.
Esta vez, la respuesta debería ser más profesional, lo cual es mejor, aunque más aburrido.
- Haga clic en Stop Simulation (Detener la simulación) cuando termine de formular preguntas.
Obtener una vista previa del agente con el modo activo
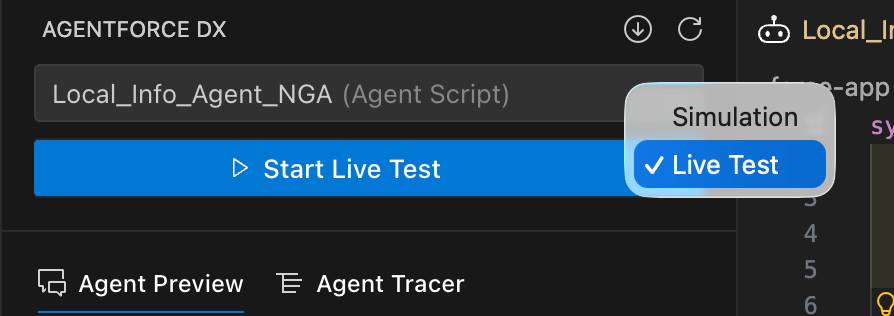
Cuando obtiene una vista previa del agente en el modo activo, este utiliza las clases de Apex, los flujos y las plantillas de solicitud reales de su organización de desarrollo para ofrecer la vista más precisa del comportamiento del agente.
Ya implementó las clases de Apex necesarias y los activos relacionados en su organización como parte de la configuración inicial para esta insignia de Trailhead. Si realizó cambios en su proyecto de DX local, debe volver a implementarlos para garantizar que se usen en la vista previa en modo activo.
Además, utilizará un usuario real de la organización en esta vista previa en modo activo, específicamente el que creó en la unidad anterior. Para esto, es necesario un cambio en el archivo de Script del agente. ¡Hagámoslo!
- En VS Code, abra el archivo de Script del agente Local_Info_Agent.agent en el editor.
- En la sección config (configuración), cerca de la línea 7, encuentre la propiedad default_agent_user.
- Para modificar el archivo de Script del agente, actualice el marcador de posición UPDATE_WITH_YOUR_DEFAULT_AGENT_USER con el nombre de usuario generado por la secuencia de comandos en la unidad anterior.
- Por ejemplo, si el nombre de usuario generado es afdx-agent@testdrive.org98eca4a312-3456xyz, la propiedad actualizada sería:
default_agent_user: "afdx-agent@testdrive.org98eca4a312-3456xyz"
- Por ejemplo, si el nombre de usuario generado es afdx-agent@testdrive.org98eca4a312-3456xyz, la propiedad actualizada sería:
- Valide el agente. Esta es una práctica recomendada cada vez que modifique el archivo de Script del agente.
- Si el panel de Agentforce DX no está abierto, seleccione el menú contextual (clic con el botón derecho) en cualquier parte del archivo y seleccione AFDX: Preview This Agent (AFDX: Obtener una vista previa de este agente).
- En el menú desplegable, seleccione Live Test (Prueba en vivo) y, luego, haga clic en Start Live Test (Iniciar prueba en vivo) para obtener una vista previa del agente.
- Vuelva a formular la pregunta:
What’s the weather like?(¿Cómo está el clima?)
La respuesta es similar a cuando ejecutó la simulación, pero esta vez el rango de temperatura debe ser exactamente entre 65,3 °F y 81,1 °F. Esto sucede porque el agente está usando la clase de Apex (WeatherService) verdadera en la organización, que, para las pruebas, incorpora la temperatura dentro de este rango. ¿Quiere verlo usted mismo? Consulte el archivo force-app/main/default/classes/WeatherService.cls.
Ver y modificar el agente en el Generador de Agentforce
Regrese a la IU del Generador de Agentforce de su organización. Aquí puede obtener una vista previa de su agente y programarlo, tal como lo hizo en VS Code. De hecho, hará los cambios correspondientes para que el agente responda como un payaso, porque decidimos que nos gusta más ser graciosos que profesionales.
Sin embargo, antes de hacer eso, recuerde que ya modificó el archivo de Script del agente local. Para asegurarse de trabajar con el mismo código cuando use el generador de la organización, debe implementar el paquete de creación Local_Info_Agent en su organización. Cuando use herramientas con poco código o con código de computación profesional, es importante sincronizar el proyecto de DX y la organización.
- En VS Code, ejecute este comando de la CLI en el terminal integrado para implementar el paquete de creación actualizado en su organización.
sf project deploy start --metadata aiAuthoringBundle:Local_Info_Agent
El terminal muestra el siguiente estado de implementación.
- Para abrir Local_Info_Agent en el Generador de Agentforce en un navegador, ejecute el siguiente comando de la CLI en el terminal integrado de VS Code.
sf org open agent --authoring-bundle Local_Info_Agent
Si no conoce al Generador de Agentforce, explore sus funciones. Tenga en cuenta que la versión del Agente de información local es Version 1 (Draft) (Versión 1 [Borrador]).![El Generador de Agentforce abierto en el Agente de información local, con Version 1 (Draft) (Versión 1 [Borrador]) resaltado. También está resaltado el menú desplegable para cambiar de Canvas (Lienzo) a Script (Secuencia de comandos).](https://res.cloudinary.com/hy4kyit2a/f_auto/fl_lossy/q_70/learn/projects/create-an-agent-using-pro-code-tools/create-an-agent-from-your-dx-project/images/es-MX/1b89996e80536f807dc71b4d923aa90f_kix.bbd2r144kqn4.png)
- En el Generador de Agentforce, seleccione la vista Script y agregue la siguiente instrucción en una línea nueva inmediatamente debajo de la oración ALWAYS Provide forecasts that include a temperature range (SIEMPRE brinda pronósticos que incluyan un rango de temperatura) (alrededor de la línea 112):
Finally, ALWAYS give answers like you're a clown in a circus, using clown-themed language and expressions to make the interaction more engaging and fun for the user.
- Haga clic en Save (Guardar).
- De manera opcional, use el botón Preview (Vista previa) para obtener una vista previa del agente dentro de la organización.
- En VS Code, ejecute este comando de la CLI en el terminal para recuperar el paquete de creación actualizado en el proyecto de DX de su organización.
sf project retrieve start --metadata AiAuthoringBundle:Local_Info_Agent
- Compile y reinicie la vista previa en el modo activo, y vuelva a preguntar sobre el clima. El agente debería responder como un payaso.
Publicar el paquete de creación
Cuando publica un paquete de creación en su organización, esta utiliza el archivo de Script del agente para generar los metadatos asociados al agente, ya sea una versión inicial de esos metadatos o versiones nuevas. Los metadatos del agente incluyen componentes tales como Bot, BotVersion, GenAiPlannerBundle, GenAiFunction y muchos más. Estos metadatos del agente originan un nuevo agente en su organización, o bien una nueva versión de un agente existente. A continuación, puede probar este agente publicado e implementarlo luego en su organización de producción para activarlo y ponerlo a disposición de sus usuarios. Finalmente, el proyecto de DX recupera todos los metadatos nuevos o actualizados de la organización.
- En VS Code, abra el archivo de Script del agente Local_Info_Agent.agent en el editor.
- Abra el menú contextual (clic con el botón derecho) del archivo de Script del agente y seleccione AFDX: Publish This Agent (AFDX: Publicar este agente).
Revise la ficha Output (Salida) para ver los pasos de publicación en curso a medida que se llevan a cabo. Asegúrese de utilizar el botón desplegable para filtrar la información de Agentforce DX.
- Utilice Explorer para ver los metadatos que se recuperaron en el directorio del paquete force-app/main/default de su proyecto de DX. En este ejemplo, se muestra el archivo XML con el componente de metadatos GenAiPlannerBundle abierto en el editor.
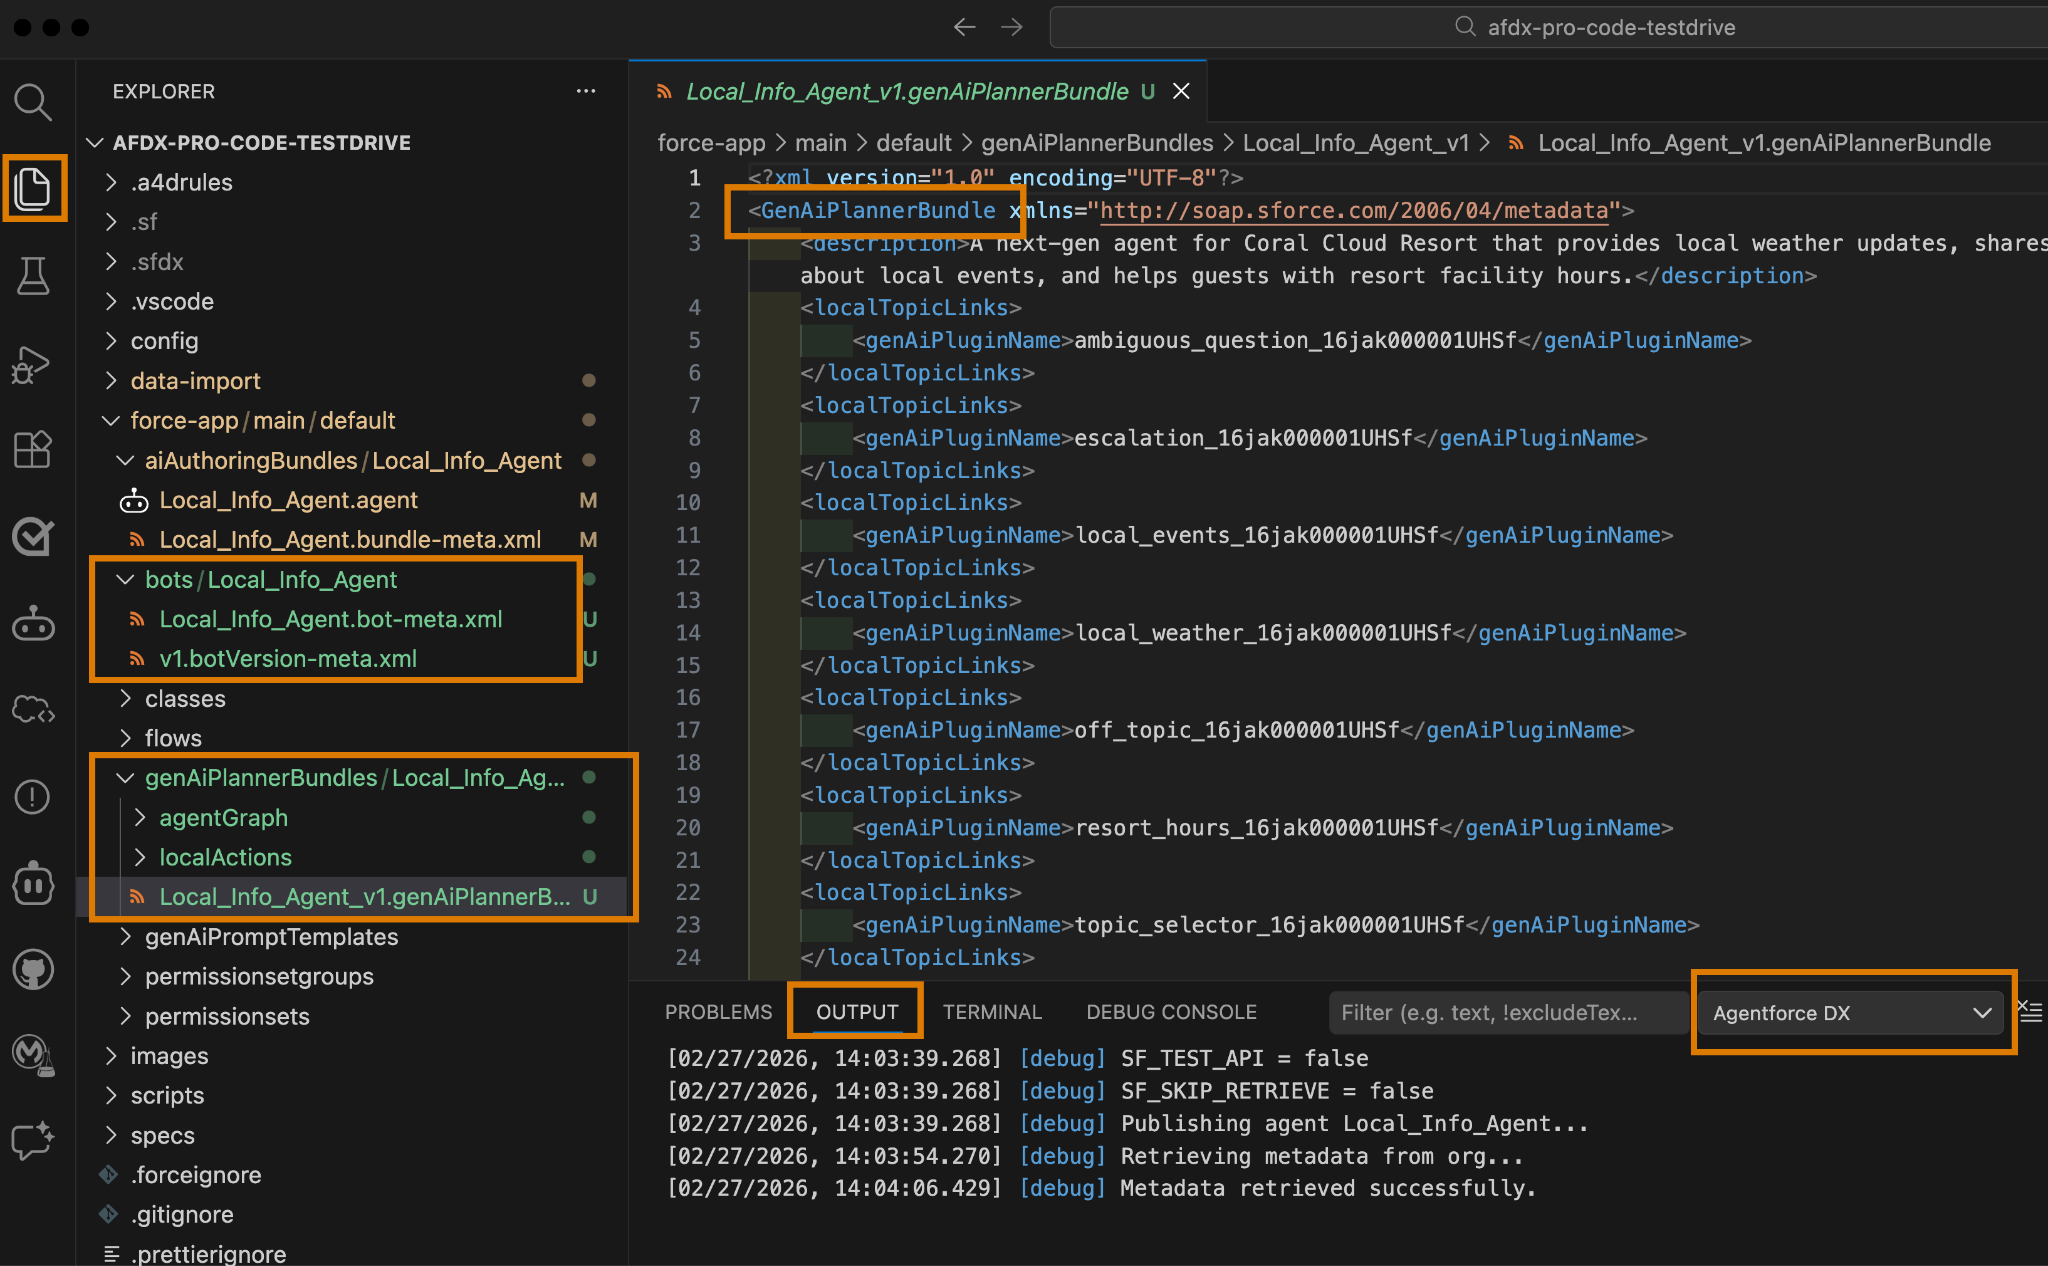
- Regrese al Generador de Agentforce en su organización y actualice la página. Ya cuenta con una versión confirmada del Agente de información local: Version 1 (Committed) (Versión 1 [Confirmada]).
Al publicar un paquete de creación, se generan versiones nuevas de los metadatos del agente, incluidas BotVersion y GenAiPlannerBundle. Puede identificarlas como v1 en la imagen anterior.
Activar el agente
Permita que los huéspedes de Coral Cloud Resorts utilicen el Agente de información local. Desde VS Code, puede usar el archivo de metadatos BotVersion de un agente para activarlo.
- En VS Code, use Explorer para desplazarse al directorio force-app/main/default/bots/Local_Info_Agent.
- Abra el menú contextual (clic con el botón derecho) desde el archivo Local_Info_Agent.bot-meta.xml y seleccione AFDX: Activate Agent (AFDX: Activar el agente).

- Haga clic en Version 1 (Versión 1) en el menú desplegable de la parte superior de VS Code.
- Vaya al Generador de Agentforce en su organización y actualice la página de Agente de información local. Ya debería tener una versión activa del agente, como Version 1 (Active) (Versión 1 [Activa]).
¡Felicitaciones! Usó Agentforce DX correctamente para programar el archivo de Script del agente de un agente, obtener una vista previa del agente y publicarlo en su organización. Con estas herramientas de código profesional en su kit, ya puede crear sus propios agentes. Antes de publicar un agente de producción, recuerde mejorar su voz para garantizar que se ajuste a su caso de uso específico.
Recursos
- Desarrolladores de Salesforce: Crear agentes con Agentforce DX
- Desarrolladores de Salesforce: Referencia de comandos de Salesforce CLI | Comandos agent
- Salesforce Developers: Extensión Agentforce Vibes
- Ayuda de Salesforce: Diseño e implementación de agentes
- Trailhead: Conocer el nuevo Generador de Agentforce