Update the Record and Debug the Flow
Updating a Record in Two Steps
You don't just want to send an acknowledgment email—you also want to record that the donation was acknowledged. In Nonprofit Success Pack (NPSP) you can record those values in the Acknowledgment Status and Acknowledgment Date fields on an opportunity record.
Start by using an Assignment element to change your opportunity's record variable—that special type of variable in flow that holds details about a Salesforce record—to reflect what you want to change. You then use an Update Records element to make those changes in the database.
Add an Assignment Element to the Flow
Start with the Assignment element.
- On the flow canvas, on the path after the Send Email action, click
 .
.
If your flow is getting too big for the page and you can’t find the icon, you can use the Zoom out (
 ) or Fit to canvas (
 ) buttons on the canvas to make space.
- Select Assignment in the Logic section.
- Specify these details.
- Label:
Acknowledgment Status(Check your spelling and make sure your Assignment element has this exact name to pass the challenge.)
- API Name:
Acknowledgment_Status(This should automatically generate.)
- Description:
The assignment element sets the values for the opportunity record before we update it in the database.
- Label:
- In Set Variable Values, specify these details:

- In the first row:
- Variable: Opportunity from Get Opportunity and then Acknowledgment Status.
- Operator: Equals
- Value: Acknowledged
- Variable: Opportunity from Get Opportunity and then Acknowledgment Status.
- Click + Add Assignment.
- In the second row:
- Variable: Opportunity from Get Opportunity and then Acknowledgment Date.
- Operator: Equals
- Value: Select Running Flow Interview and then CurrentDate.
- Variable: Opportunity from Get Opportunity and then Acknowledgment Date.
- In the first row:
- Click
 .
.

Save your flow.
Update the Record
Now that the Assignment element is storing the values, it's time to use Update Records to put those values on the original opportunity where they belong.
- On the flow canvas, on the path after the Acknowledgement Status assignment, click
 .
.
- Select Update Records in the Data section.
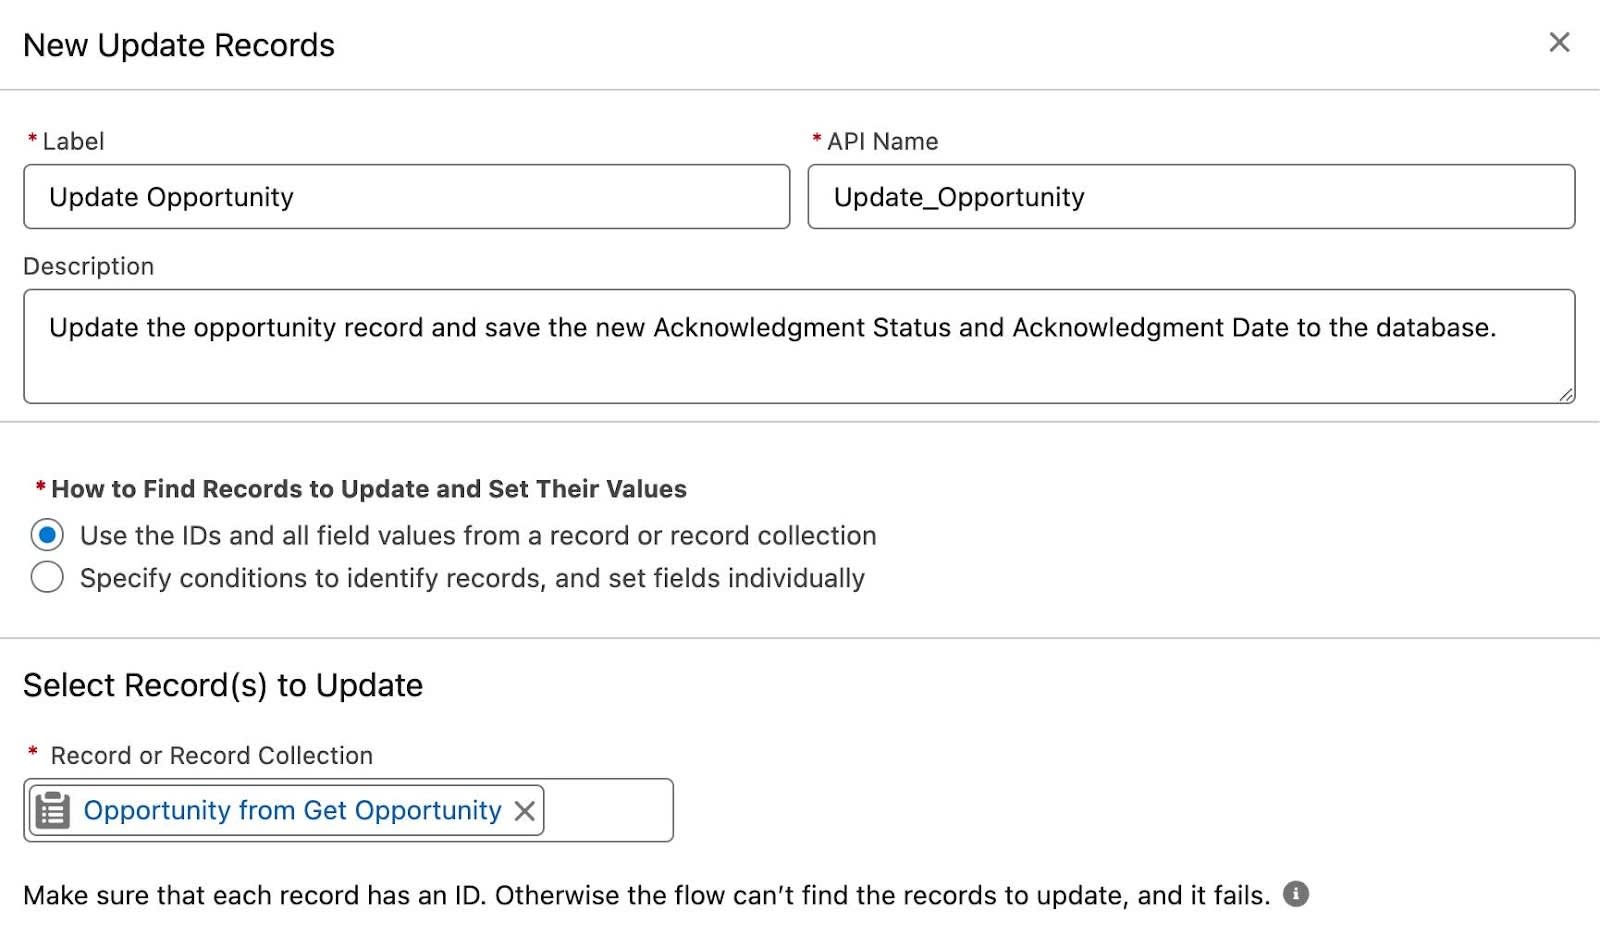
- Specify these details:
- Label:
Update Opportunity - API Name:
Update_Opportunity(This should automatically generate.)
- Description:
Update the opportunity record and save the new Acknowledgment Status and Acknowledgment Date to the database. - How to Find Records to Update and Set Their Values: Use the IDs and all field values from a record or record collection
- Record or Record Collection: Opportunity from Get Opportunity

- Label:
- Click
 .
.
Your flow now has all the elements you need!

Save your work in the Flow Builder.
Testing and Debugging the Flow
Before you move out of Flow Builder, you can test your work two ways: either by clicking Run or Debug.
If you click Run, you'll be able to see your flow as it'll appear to your users, with both screens you created. It can be helpful to see your screens, but it doesn't show us everything that'll happen in practice. For this flow, for example, Run doesn't pass details from an opportunity record to the flow, so your email template appears mostly empty and there's no email address to send to.
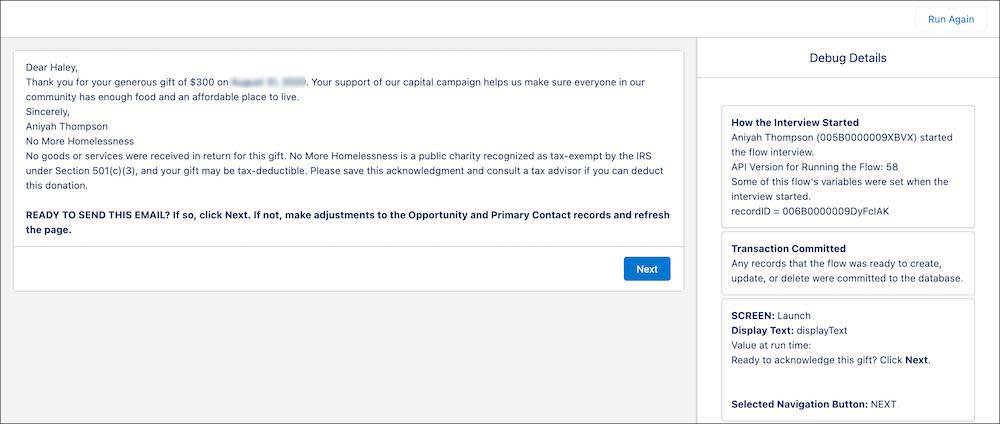
If you click Debug, you get many more options and details about the flow and how it works. Debug is especially helpful for this flow because you can input the variables the flow needs on the first screen. For example, if you pasted in an opportunity ID (the 18-character code right after /Opportunity/ in the URL) and clicked Run in Debug, you would see the flow with all of its functionality, plus Debug Details that tell us exactly what the flow is doing as it does it. If you run the whole flow and it's successful, the part of the interface where your flow appears will read All done and you'll see a Transaction Committed message under Debug Details. If you encounter an error, Debug Details will include error messages.

Try both Run and Debug to see how they work. After you're done, close the tabs in your browser to go back to the Flow Builder.
Activate the Flow
It's the big moment! Activate the flow!
In the Flow Builder, click Activate. That's it. The flow is active!

That doesn't mean that users can find it, though. In the next step you place the flow on the opportunity page, create a test record, and send yourself the email to see how it all works together.
To complete this step and move on, launch your Trailhead Playground and click Verify to check that Update Records is properly configured and the flow is activated.
Resources
- Salesforce Help: Assignment Element
- Salesforce Help: Update Records Element
- Salesforce Help: Testing Your Flow Before Activation
- Salesforce Help: Activate or Deactivate a Flow