
Create and Activate a Service Process Definition

Learning Objectives

After completing this unit, you’ll be able to:

  • Describe the basics of Service Process Studio.
  • Assign permission sets to run Service Process Studio.
  • Assign object permissions.
  • Create a service process definition.
  • Associate a request form to an Action Launcher Deployment.

Get Started with Service Process Definitions

Cumulus receives a multitude of requests from customers requesting checkbooks. It starts with verifying customer orders and collecting customer information. If all goes well, it’s time for fulfillment. The entire process is complicated and cumbersome. Moreover, it takes time. 

Because of this, the bank worries about customer experience. Matt is on a team working to fix the problem, and decides to use Service Process Studio to create a service process that supports service reps with checkbook order requests.

Matt starts by exploring Service Process Studio. This screen shows an example service process definition.
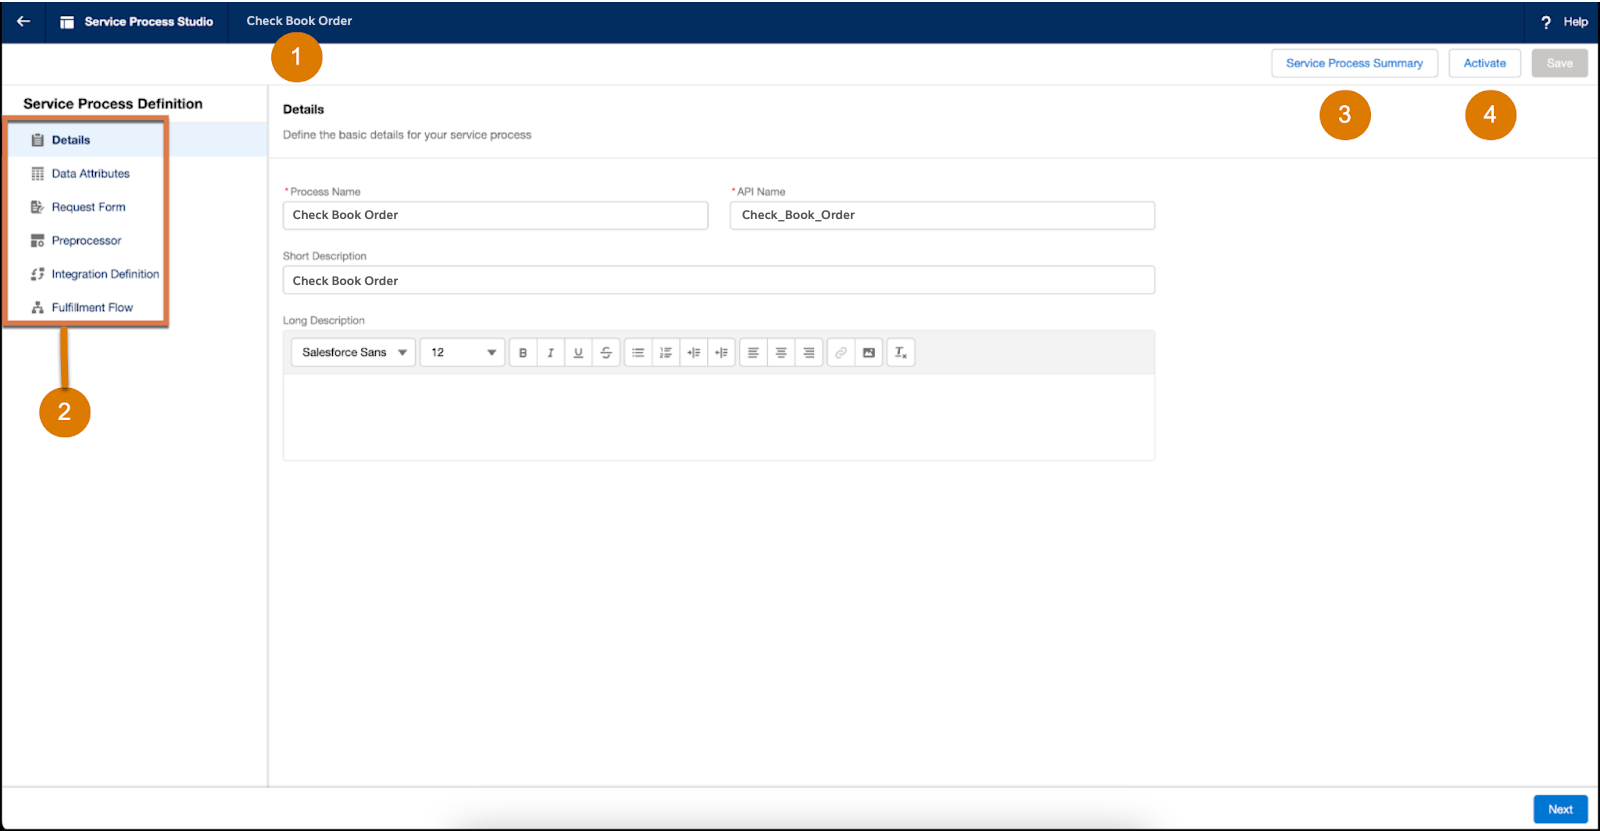
Annotated screen capture of the main Service Process Studio features.

Let’s explore the highlighted pieces.

Number

Description

1

Name of the service process definition that’s being defined.

2

A service process definition contains several sections. Expand each section and specify the details.

3

After you specify the details for a service process definition and save it, view the definition summary for a quick overview.

4

Activate the service process definition so that you can deploy it using Action Launcher.

Create a Service Process Definition

Matt creates a service process definition in Service Process Studio so that service reps can launch the process and use it to fulfill the checkbook order requests for their customers. Next, Matt creates an Apex class that invokes the connect API by using the definition and its associated process attributes.  

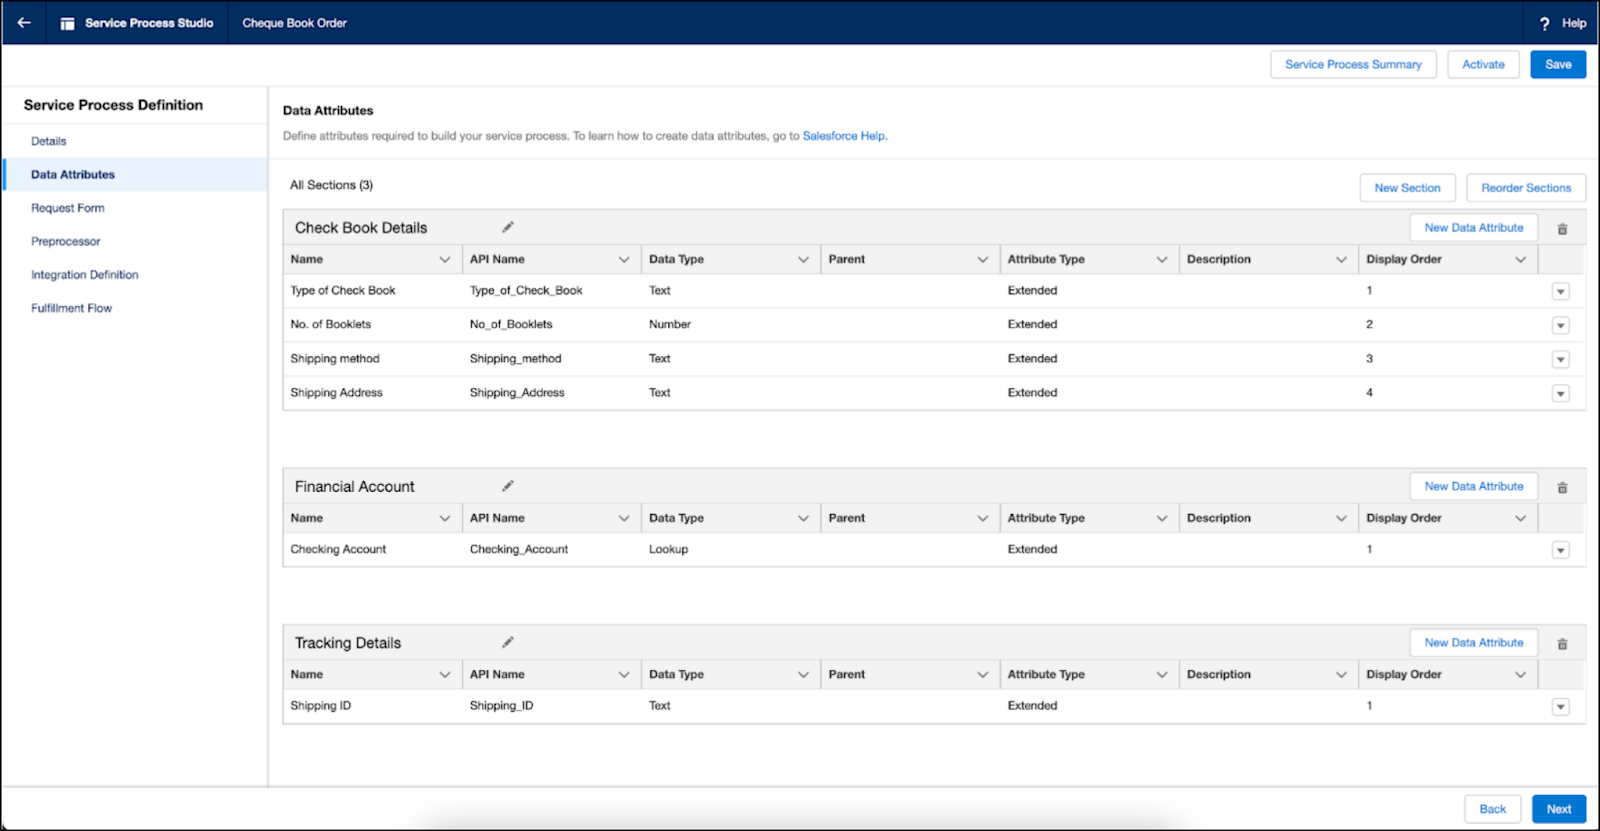
Create Data Attributes

First, he creates data attributes for the service process.

  1. From Setup, in the Quick Find box, enter Service Process Studio and select it.
  2. Click New Service Process.
  3. Click Create New.
  4. Enter a Process Name and API Name, and select Save & Launch.
    Screen capture of the New Service Process window and Create New tab with the Process Name and API Name fields populated.
  5. Click Details. The Process Name, API Name, and Short Description populate automatically. In this example, the Process Name is Cheque Book Order.
  6. Click Next. The Data Attributes page appears. Here, define the request attributes that are grouped into relevant sections. These sections display the data of the request in the dynamic case info widget when a case is created.
    • An untitled section appears by default. To rename the Untitled Section as Cheque Book Details, click edit, enter the section name, and then click Enter.
    • To add the Financial Account and Tracking Details sections, repeat the previous step.
  1. To add data attributes to the Cheque Book Details section, click New Data Attribute and complete the required fields.
    Screen capture of New Data Attribute window with Attribute Name, API name, Attribute Type, and Data Type fields populated.
  2. To create attributes for Financial Account, Tracking Details, No. of Booklets, Shipping method, and Shipping Address repeat the previous steps.Screen capture of the Check Book Details, Financial Account, and Tracking Details sections with data attributes.

Create an Apex Class and Invoke the Connect API to Create Case/Service Request

  1. Click Setup and then Developer Console.
  2. Create an Apex class. In this example, the Apex class is ChequeBookOrderHelper. To learn about creating Apex classes, see the Resources section.
  3. Copy and paste the following code.
    global with sharing class ChequeBookOrderHelper implements System.Callable {
    public Object call(String action, Map<String, Object> args) {
    Map<String, Object> inputMap = (Map<String, Object>)args.get('input');
    Map<String, Object> outputMap = (Map<String, Object>)args.get('output');
    Map<String, Object> options = (Map<String, Object>)args.get('options');
    if(action == 'callCreateCaseApi') {
    // retrieve the attributes from the request payload
    String chequeBookType = (String) inputMap.get('ChequeBookType');
    String shippingMethod = (String) inputMap.get('ShippingMethod');
    String shippingAddress = (String)inputMap.get('ShippingAddress');
    String checkingAccount = (String)inputMap.get('Account');
    String svcCatalogItemDefApiName = (String)inputMap.get('SvcCatalogItemDefApiName');
    String noOfBooklets = String.valueOf(inputMap.get('NoOfBooklets'));
    // Set the input rep
    ConnectApi.ServiceProcessRequestInputRepresentation input = new ConnectApi.ServiceProcessRequestInputRepresentation();
    input.svcCatalogItemDefApiName = svcCatalogItemDefApiName;
    input.caseInfo = new Map<String, ConnectApi.GenericObject>();
    input.attributes = new Map<String, ConnectApi.GenericObject>();
    // set attributes
    ConnectApi.GenericObject chequeBookTypeObj = new ConnectApi.GenericObject();
    chequeBookTypeObj.value = chequeBookType;
    input.attributes.put('Type_of_Cheque_Book', chequeBookTypeObj);
    ConnectApi.GenericObject noOfBookletsObj = new ConnectApi.GenericObject();
    noOfBookletsObj.value = noOfBooklets;
    input.attributes.put('No_of_Booklets', noOfBookletsObj);
    ConnectApi.GenericObject shippingMethodObj = new ConnectApi.GenericObject();
    shippingMethodObj.value = shippingMethod;
    input.attributes.put('Shipping_method', shippingMethodObj);
    ConnectApi.GenericObject shippingAddressObj = new ConnectApi.GenericObject();
    shippingAddressObj.value = shippingAddress;
    input.attributes.put('Shipping_Address', shippingAddressObj);
    ConnectApi.GenericObject checkingAccountObj = new ConnectApi.GenericObject();
    checkingAccountObj.value = checkingAccount;
    input.attributes.put('Checking_Account', checkingAccountObj);
    // Invoke API
    Map<String, String> responseMap = new Map<String, String>();
    ConnectApi.ServiceProcessRepresentation output = ConnectApi.IServiceProcessConnectFamily.createCaseServiceProcess(input);
    responseMap.put('caseId', output.caseId);
    responseMap.put('caseNumber', output.caseNumber);
    responseMap.put('svcCatalogRequestId', output.svcCatalogRequestId);
    outputMap.put('apiResponse', responseMap);
    return outputMap;
    }
    return null;
    }
    }

The Apex class is invoked from the Omniscript that’s used to create the case. You can now invoke this Apex class from the Omniscript that'll be used to capture the request.

Create a Request Form With Omniscript

Matt now can create the Omniscript to build the experience for request intake. He can call the previous Apex from within the Omniscript to create the case.

  1. From the App Launcher (App Launcher), find and select Omniscripts.
  2. Click New.
  3. In the New Omniscript dialog, enter these details:
    • Name: Cheque Book Order
    • Language: English
    • Type: CumulusBank
    • SubType: ChequeBookOrder
    • Description: This is the intake Omniscript for the Cheque Book Order Service Process Definition.
  4. Save your work.

Now configure your new Omniscript.

  1. From the list of Omniscripts, select the Cheque Book Order Omniscript.
    Screen capture that shows the selection of the Cheque Book Order Omniscript from the list of Omniscripts.
  2. Rename the default step as Cheque Details in the Properties section.
  3. Drag and drop the required elements to the Cheque Details step. In this example, add Type of Cheque Book, No of Booklets, Shipping Method, and Shipping Address.Dragging the required elements for the Cheque Details step.
  4. To add Financial Account Info as Step 2, repeat the previous steps.
  5. Drag the Account element to the Financial Account Info step.Screen that shows the Cheque Details and Financial Account Info steps.
  6. Drag the Remote Action element, and enter the basic details in the Properties section. In this example, Name is CallCreateCaseAPI, Field Label is Call Create Case API, Invoke Mode is Default. The Remote Action element invokes the Apex class that calls the Connect API to create the service process request for the Checkbook Order definition.
    Screen that shows Remote action properties.
  7. For the Remote Action step, expand REMOTE PROPERTIES and specify these values.
    • Remote Class: ChequeBookOrderHelper
    • Remote Method: callCreatecaseApi
  1. Map the data collected through the Omniscript to the attributes defined in the service process definition. In the Remote Options section, select Add New Key/Value Pair to enter these items as keys and values:
    • The elements added in Cheque Details and Financial Account Info.
    • SvcCatalogItemDefApiName, which is the API name of the service process definition you created. The connect API uses this API name to create the request of the definition.
      This example uses the following key-value pairs:

      Key

      Value

      ChequeBookType

      %ChequeBookType%

      NoOfBooklets

      %NoOfBooklets%

      ShippingMethod

      %ShippingMethod%

      ShippingAddress

      %ShippingAddress%

      Account

      %Account%

      SvcCatalogItemDefApiName

      Cheque_Book_Order
    • Select Send Only Extra Payload.
      Screen capture that shows the keys and values added for this example.
  1. Drag a step onto the canvas, and name it Confirmation. In this example, the Apex class called in the previous step returns the case number. The case number is shown on the Confirmation page.
  2. Add a text block to the Confirmation step with the following text:
    Your request is taken. Please save the reference number for future communication %apiResponse.caseNumber%.Screen that shows the Confirmation step and the text added to it.
  3. To view the Omniscript, click Preview.
  4. Activate the Omniscript.

The request intake form for the Cheque Book Order service process is activated. The next step is to define the automation required for fulfilling this request.

Create a Flow Orchestration

Matt creates a simple record-triggered flow orchestration that’s called after a case is created to initiate and automate the request fulfillment. For information on using flow orchestration, see the Resources section.

First, he creates a flow to associate it as an interactive step in the flow orchestration.    

  1. From the App Launcher (App Launcher), find and select Automation.
  2. In the Flows list, click New.
  3. In the Frequently Used section, select Screen Flow.
  4. Configure your flow. We won’t go into detail here, but to learn more about creating a flow, check out the Build Flows with Flow Builder trail.

  5. Save and activate your flow.

Next, he creates a flow orchestration and associates the flow he created as an interactive step.

  1. From the App Launcher(App Launcher), find and select Automation.
  2. In the Flows list, click New.
  3. In the Search automations box, find and select for Record-Triggered Orchestration.
  4. Create the orchestration flow.
    The Cheque Book Order Definition flow orchestration.
  5. Save and activate the flow.

Now associate the Flow Orchestration to the Service Process Definition.

  1. Navigate to the Cheque Book Order service definition and select Fulfillment Flow.
  2. Select Add Fulfillment Flow.
  3. Select the Cheque Book Order Orchestration, and select Add.

Add a fulfillment flow.

To learn more about creating flows and flow orchestration, see the Resources section.

Associate a Request Form to an Action Launcher Deployment

Now it’s time for Matt to link the request form associated with the activated service process definition to the Action Launcher component. Linking the request form enables reps to search for and launch the Omniscript using the Action Launcher component.

  1. From Setup, in the Quick Find box, enter Action Launcher and select it..Selecting Action Launcher from the Setup.
  2. Click New Deployment. 
  3. In the New Deployment dialog box, click Next.
  4. Enter the high-level information for your deployment and select Omniscripts in the GUIDANCE TO SHOW section.
  5. Click Next. In this example screen, Label is Cheque Book Order and API Name is ChequeBookOrder.Entering the information in the New Deployment window.
  6. Select Account from the list of Available Objects, and click Next.Selecting Account object in the New Deployment window.
  7. Select the Cheque Book Order Omniscript from the list, and click Next.Selecting the Cheque Book Order Omniscript.
  8. To add the Cheque Book Order Omniscript for display as an action button in the Action Launcher, click the plus icon.Screen that shows Cheque Book Order Omniscript added as an action button.
  9. Save your work..

Assign Permission Sets

Matt starts by giving service reps access to run service processes built with Service Process Studio.

  1. From Setup, in the Quick Find box, enter Users, and then select Users.
  2. Click a user’s name.
  3. Under Permission Set Assignments, click Edit Assignments.
  4. Add the Industry Service Excellence permission set.
  5. Save your changes.

Assign Object Permissions

Matt assigns permissions for the Service Catalog Request and Service Catalog Request Extd Attr Val objects to enable service reps to run the checkbook order service processes.

  1. From Setup, in the Quick Find box, enter Profiles and select it.
  2. Select the profile that you’re editing.
  3. Select Edit.
  4. Under Standard Object Permissions, locate these objects and assign permissions:
    • Service Catalog Request — Read, Create, Edit, and Delete
    • Service Catalog Request Extd Attr Val — Read, Create, Edit, and Delete
  1. Save your changes.

With these permissions enabled, service reps have required access to run the Checkbook Order service process.

Add the Case Details Component to the Case Record Page

The last step is to add a component to the case page to view details.

  1. Navigate to the Case record page, and click Edit.
  2. Drag and drop the Case Details component on the page.
  3. Click Save.

The new process is ready for service reps. In the next unit, you will follow to see how Matt’s hard work pays off and delights customers and service reps, both.

Resources

Comparta sus comentarios de Trailhead en la Ayuda de Salesforce.

Nos encantaría saber más sobre su experiencia con Trailhead. Ahora puede acceder al nuevo formulario de comentarios en cualquier momento en el sitio de Ayuda de Salesforce.

Más información Continuar a Compartir comentarios