Primeros pasos con su implementación
Objetivos de aprendizaje
Después de completar esta unidad, podrá:
- Describir la funcionalidad general de un sistema de gestión de pedidos.
- Describir los beneficios de la Gestión de pedidos de Salesforce.
- Enumerar los pasos que necesita realizar para preparar su organización para la Gestión de pedidos de Salesforce.
- Enumerar las funciones y opciones de configuración de la Gestión de pedidos de Salesforce que necesita habilitar y configurar.
- Explicar cómo funcionan las cuentas personales con la Gestión de pedidos de Salesforce.
¿Qué es la Gestión de pedidos?
Ursa Major Solar, un fabricante de dispositivos solares ubicado en el suroeste de los Estados Unidos, se trata de la eficiencia energética y de mantener un impacto ambiental bajo. Ya implementó Salesforce Commerce. Desea los beneficios agregados de un sistema de gestión de pedidos basado en Salesforce que admita sus tiendas de comercio: desde la compra de productos hasta la realización y el servicio.
Maria Jimenez, la administradora de Ursa Major Solar, tiene la tarea de implementar un sistema de gestión de pedidos: concretamente, la Gestión de pedidos de Salesforce. Antes de comenzar, desea aprender más sobre los sistemas de gestión de pedidos en general y sobre la Gestión de pedidos de Salesforce en específico.

Por lo general, el procesamiento de pedidos inicia dentro de una aplicación de tienda cuando el cliente realiza un pedido. La aplicación crea registros complementarios como artículos de pedido, ajustes, envíos y resúmenes, además de comprobar el inventario y procesar los pagos.
El sistema de gestión de pedidos se ocupa del proceso de realización y se asegura de que el cliente reciba lo que ordenó. También presta los servicios, como las devoluciones, los apaciguamientos y los reenvíos, y mantiene el historial de clientes.
Estos son los pasos típicos de un sistema de procesamiento de pedidos.
-
Allocation (Asignación): el sistema determina qué ubicación o ubicaciones realizarán el pedido.
-
Realización: una persona o un sistema confirma los detalles de envío, genera una factura y, luego, selecciona, empaqueta y envía el pedido.
-
Servicio: de ser necesario, una persona o un sistema cancela, descuenta, devuelve, reenvía o intercambia artículos de pedido.
Salesforce Order Management
La Gestión de pedidos de Salesforce ofrece un flujo de trabajo potente con funciones de asignación de pedidos, realización y servicio. Proporciona una vista única de los pedidos, las acciones realizadas en estos y el historial de pedidos. Ofrece paquetes de realización de muestra que incluyen flujos, procesos y clases de Apex para ayudar a Maria a implementar su sistema.
La Gestión de pedidos de Salesforce funciona con los siguientes productos de Salesforce.
- Salesforce Commerce
- B2B Commerce
- D2C Commerce
- Salesforce B2C Commerce
- Service Cloud
- Aplicación móvil de realización en tienda
- Inventario de OmniCanal
- Salesforce Payments
Datos de pedidos
Un proceso de Gestión de pedidos de Salesforce tiene un aspecto similar al siguiente.
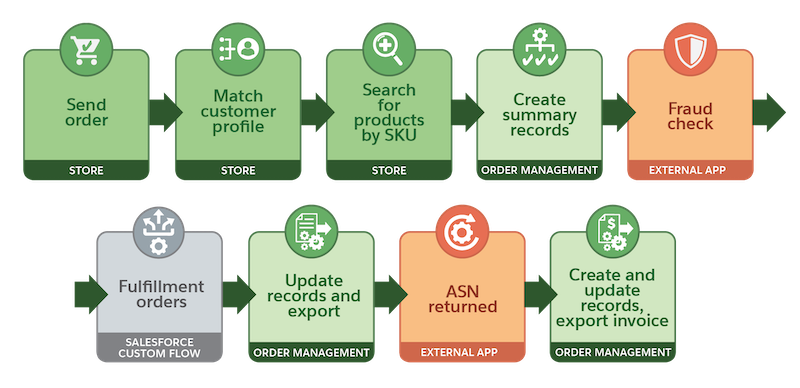
- La tienda de Salesforce Commerce (B2B o D2C):
- Crea un carrito.
- Hace coincidir un perfil de cliente con una cuenta de cliente en Salesforce.
- Busca cada producto del pedido mediante la unidad de mantenimiento de stock (stock keeping unit, SKU) de productos.
- Crea un pedido.
- La Gestión de pedidos crea registros de resumen para el pedido y sus registros relacionados.
- Un proveedor de terceros (mediante una integración personalizada) realiza una comprobación de fraude.
- Un flujo personalizado crea pedidos de realización y productos de estos, y los asigna a ubicaciones de realización en función de los grupos de entrega de pedidos, el inventario y otros criterios.
- La Gestión de pedidos actualiza las cantidades de los registros de resumen y exporta los datos de realización.
- Un proveedor externo muestra un aviso de envío anticipado (advance shipping notice, ASN).
- Gestión de pedidos:
- Crea registros de envío y cambia el estado del pedido de realización a Fulfilled (Realizado).
- Crea facturas y realiza llamadas al proveedor de pago para garantizar los fondos.
- Actualiza las cantidades y los estados de los registros de resumen asociados y exporta las facturas a un sistema de planificación de recursos empresariales (enterprise resource planning, ERP).
Primeros pasos
Una licencia de Gestión de pedidos le proporciona a Maria acceso completo a las funcionalidades de esta. El producto de la Gestión de pedidos que viene con D2C Commerce tiene una funcionalidad limitada, y algunas instrucciones difieren (como se indica en este módulo).
A continuación, se presentan los pasos generales que Maria realiza para implementar la Gestión de pedidos con B2B y D2C Commerce.
Paso |
Tarea |
|---|---|
1 |
Prepare la organización para la Gestión de pedidos. |
2 |
Configure la visualización de impuestos. |
3 |
Configure la realización. |
4 |
Configure el procesamiento de pagos. |
5 |
Importe datos de pedidos históricos. |
Preparar su organización
A continuación, se muestra la forma en que Maria prepara su organización para la Gestión de pedidos.
Paso |
Tarea |
|---|---|
1 |
Asegúrese de que Lightning Experience se encuentre habilitado en la organización. |
2 |
Establezca las funciones y los parámetros de configuración en la organización para que funcione con la Gestión de pedidos. |
3 |
Configure el acceso y los permisos. |
4 |
Configure los parámetros de seguridad a nivel de campo, los usuarios y los permisos. |
5 |
Configure flujos. La Gestión de pedidos y Salesforce Flow funcionan bien juntos, lo que facilita la creación de funciones manuales y automatizadas en la organización. |
En esta unidad, Maria se enfoca en las primeras dos tareas.
Habilitar Lightning
Debe utilizar la interfaz de Lightning para acceder a la Gestión de pedidos. No es compatible con Salesforce Classic o Mobile.
Configurar funciones y ajustes
Maria necesita habilitar y configurar las siguientes funciones y ajustes de la Gestión de pedidos.
- Cuentas personales (solo se requieren para D2C Commerce)
- Divisas múltiples (opcional)
- Parámetros de configuración de administración
Activar cuentas personales
Con Salesforce Commerce, Maria puede representar a los compradores mediante cuentas personales o cuentas de negocio estándar. Si bien las cuentas personales son opcionales en B2B Commerce, debe utilizarlas en D2C Commerce.
No puede desactivar la función de cuentas personales en la organización, pero puede volver a configurar la Gestión de pedidos para que deje de utilizarla. Este proceso irreversible modifica la estructura de la base de datos de la organización.
Un comprador que se representa mediante una cuenta de negocio también se representa mediante un contacto. Una cuenta personal es un tipo especial de registro de cuenta que incluye datos que normalmente se encuentran en los contactos. Si Maria utiliza una cuenta personal, no puede trabajar directamente con el contacto en la interfaz de usuario de Salesforce. En su lugar, accede a los datos de contacto mediante campos especiales en cuentas personales. Las cuentas personales le permiten trabajar con un único registro en lugar de un registro individual de cuenta y de contacto para cada cliente.
La Gestión de pedidos siempre utiliza cuentas estándar y contactos para representar cuentas de compradores de negocio (B2B), incluso si habilita las cuentas personales. Solo utiliza cuentas personales para cuentas de comprador individuales. Antes de que la Gestión de pedidos pueda utilizar cuentas personales, Maria debe activar la configuración de administración Person Accounts for Shoppers (Cuentas personales para compradores) para representar a clientes individuales mediante cuentas personales.
Cuando Maria habilita las cuentas personales en su organización, el sistema crea dos tipos de registro predeterminados para su objeto de cuenta: cuenta de negocio y cuenta personal. Una cuenta de negocio es solo una cuenta estándar.
Una vez que habilite las cuentas personales en su organización, no podrá desactivarlas. Sin embargo, puede configurar la Gestión de pedidos para que trate a los compradores individuales como cuentas de negocio en lugar de cuentas personales. Para ello, desactive la configuración Person Accounts for Shoppers (Cuentas personales para compradores) de una persona.
Antes de poder habilitar las cuentas personales, debe crear un caso de asistencia y esperar cinco días hábiles a que el servicio de asistencia complete el caso.
En este módulo, se da por sentado que usted es un administrador de Salesforce con los permisos adecuados para implementar la Gestión de pedidos. Si no es usted administrador de Salesforce, tampoco importa. Siga leyendo para conocer cómo podría realizar los pasos su administrador en una organización de producción. No intente seguir estos pasos en su Trailhead Playground. La Gestión de pedidos no está disponible en Trailhead Playground.
A continuación, se muestra cómo Maria habilita las cuentas personales.
- Abra su organización.
- En Setup (Configuración), en el cuadro de Quick Find (Búsqueda rápida), ingrese
Profiles(Perfiles) y, luego, seleccione Profiles (Perfiles).
- Seleccione System Administrator (Administrador del sistema).
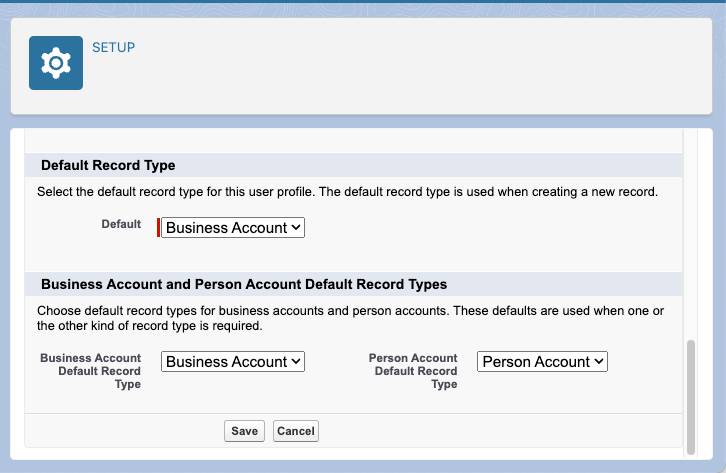
- Desplácese hasta la sección Record Type Settings (Configuración de tipo de registro), busque Accounts (Cuentas) y haga clic en su vínculo Edit (Modificar).
- En la sección Selected Record Types (Tipos de registro seleccionados), mueva --Master-- (--Principal--) al cuadro Available Record Types (Tipos de registro disponibles).
- Mueva Business Account (Cuenta de negocio) y Person Account (Cuenta personal) al cuadro Selected Record Types (Tipos de registro seleccionados).
- Establezca Default Record Type (Tipo de registro predeterminado) y Business Account Default Record Type (Tipo de registro predeterminado de la cuenta de negocio) como Business Account (Cuenta de negocio).
- Establezca Person Account Default Record Type (Tipo de registro predeterminado de la cuenta personal) como Person Account (Cuenta personal).
- Haga clic en Save (Guardar).
Otorgar acceso a cuentas personales
Maria desea utilizar cuentas personales para representar compradores, por lo que necesita proporcionar a los conjuntos de permisos adecuados la capacidad de acceso a cuentas personales. Veamos cómo lo hace.
- Desde Setup (Configuración), en el cuadro Quick Find (Búsqueda rápida), ingrese
Permission Sets(Conjuntos de permisos) y seleccione Permission Sets (Conjuntos de permisos).
- Duplique el conjunto de permisos que controla el acceso para sus usuarios de la Gestión de pedidos:
Usuario de Gestión de pedidos de 1Commerce - Ingrese un nombre de etiqueta.
- Haga clic en Save (Guardar).
- Seleccione el conjunto de permisos recién duplicado.
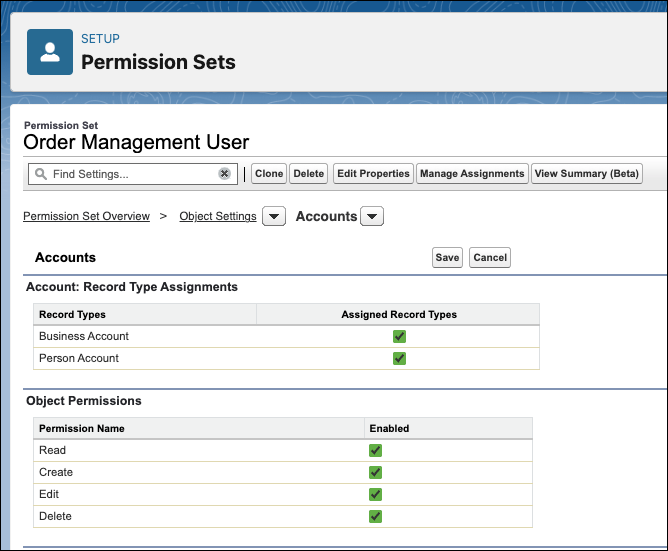
- En la sección Aplicaciones, haga clic en Configuración de objetos.
- Seleccione Accounts (Cuentas).
- Haga clic en Edit (Modificar).
- En la sección Account: Record Type Assignments (Cuenta: Asignaciones de tipo de registro), seleccione Business Account (Cuenta de negocio) y Person Account (Cuenta personal).
- Haga clic en Save (Guardar).
Enable Multiple Currencies
Maria desea utilizar divisas múltiples con su organización porque sus sitios las admiten. A continuación, se muestra cómo habilita divisas múltiples.
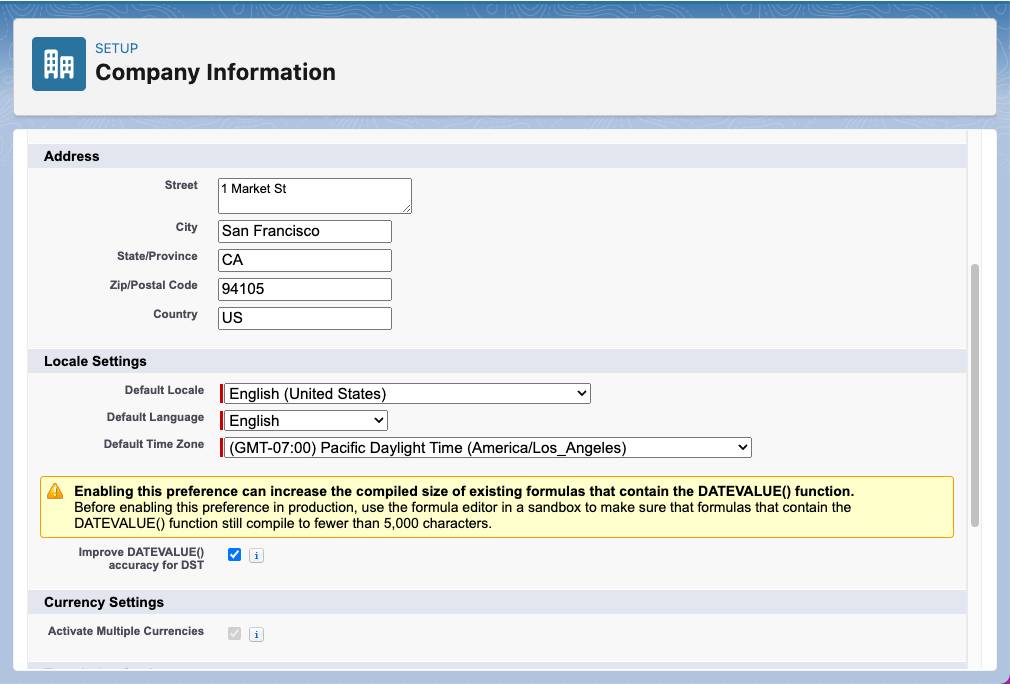
- Desde Setup (Configuración), en el cuadro Quick Find (Búsqueda rápida), ingrese
Company Information(Información de la compañía) y, luego, seleccione Company Information (Información de la compañía).
- Haga clic en Edit (Modificar).
- Asegúrese de que la configuración regional de divisa seleccionada sea la divisa predeterminada que desea utilizar.
- Habilite Activate Multiple Currencies (Activar divisas múltiples).
- Haga clic en Save (Guardar).
Habilitar la configuración de administración
A continuación, se muestra cómo Maria establece la configuración de administración requerida para la Gestión de pedidos.
- Desde Setup (Configuración), en el cuadro Quick Find (Búsqueda rápida), ingrese
Order Settings(Configuración de pedidos) y, luego, seleccione Order Settings (Configuración de pedidos).- Seleccione lo siguiente: Enable Orders (Habilitar pedidos), Enable Negative Quantity (Habilitar cantidad negativa), Enable Zero Quantity (Habilitar cantidad cero) y Enable Enhanced Commerce Orders (Habilitar pedidos de comercio mejorados).
- Seleccione Enable Optional Price Books for Orders (Habilitar listas de precios opcionales para los pedidos), lo cual es opcional.
Si utiliza D2C Commerce, debe activar esta función.
- Haga clic en Save (Guardar).
- Cierre la sesión de la organización y vuelva a iniciarla, o actualice la página.
- Desde Setup (Configuración), en el cuadro Quick Find (Búsqueda rápida), ingrese
Order Management(Gestión de pedidos) y, luego, seleccione Order Management (Gestión de pedidos).
- Active el conmutador Order Management (Gestión de pedidos).
Puede que a la Gestión de pedidos le tome varios minutos activarse. Si no ve la aplicación de Gestión de pedidos en el Iniciador de aplicación, espere unos minutos y actualice la página.
- Desde Setup (Configuración), en el cuadro Quick Find (Búsqueda rápida), ingrese
- Si utiliza cuentas personales para representar compradores individuales, active el conmutador Person Accounts for Shoppers (Cuentas personales para compradores).
Puede que la modificación de esta configuración tarde hasta una hora debido a la forma en que se encuentra almacenada en caché.
- Haga clic en Save (Guardar).
- Seleccione lo siguiente: Enable Orders (Habilitar pedidos), Enable Negative Quantity (Habilitar cantidad negativa), Enable Zero Quantity (Habilitar cantidad cero) y Enable Enhanced Commerce Orders (Habilitar pedidos de comercio mejorados).
- Cierre la sesión de la organización y vuelva a iniciarla, o actualice la página.
- Desde Setup (Configuración), en el cuadro Quick Find (Búsqueda rápida), ingrese
Order Management(Gestión de pedidos) y, luego, seleccione Order Management (Gestión de pedidos).
- Active el conmutador Order Management (Gestión de pedidos).
Puede que a la Gestión de pedidos le tome varios minutos activarse. Si no ve la aplicación de Gestión de pedidos en el Iniciador de aplicación, espere unos minutos y actualice la página.
- Desde Setup (Configuración), en el cuadro Quick Find (Búsqueda rápida), ingrese
- Si utiliza cuentas personales para representar compradores individuales, active el conmutador Person Accounts for Shoppers (Cuentas personales para compradores).
Puede que la modificación de esta configuración tarde hasta una hora debido a la forma en que se encuentra almacenada en caché.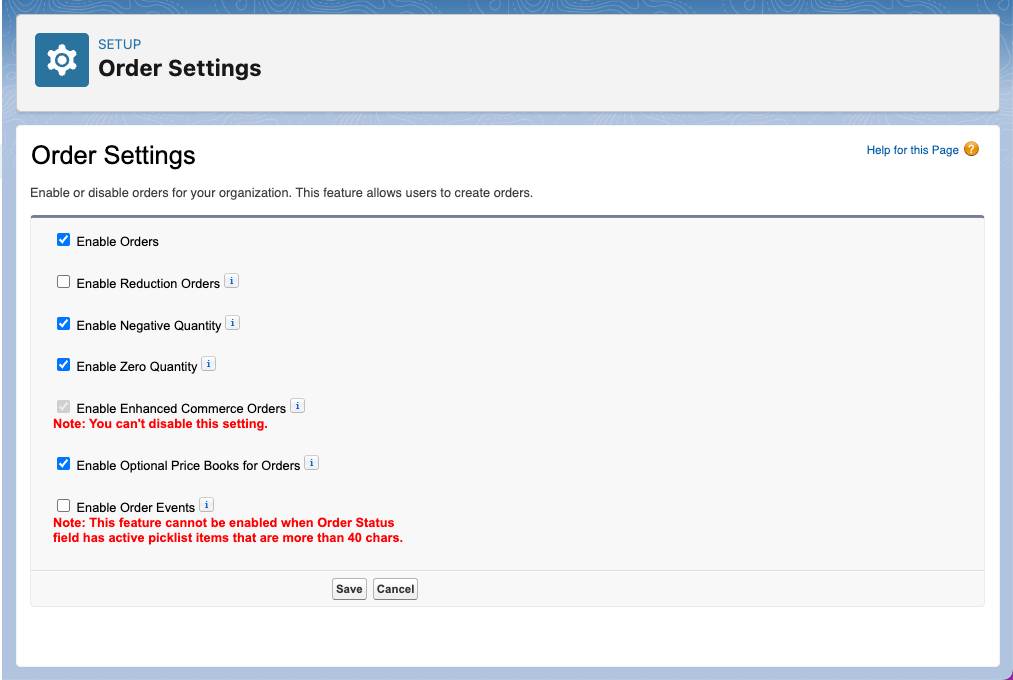
Siguientes pasos
En esta unidad, aprendió sobre la gestión de pedidos y exploró los aspectos básicos de la Gestión de pedidos de Salesforce. También comenzó a preparar su organización para una Gestión de pedidos. A continuación, configurará el acceso y los permisos de la Gestión de pedidos.
Recursos
- Ayuda de Salesforce: Utilizar una cuenta personal para crear un comprador para tiendas B2B
- Ayuda de Salesforce: Habilitar divisas
- Ayuda de Salesforce: Gestionar divisas múltiples
- Ayuda de Salesforce: Pedidos de reducción
- Ayuda de Salesforce: Personalizar procesos de negocio para distintos usuarios mediante tipos de registro
- Ayuda de Salesforce: Habilitar pedidos sin listas de precios
- Salesforce: Guía de implementación de la Gestión de pedidos de Salesforce
