Upload Plan Assignments
Learning Objectives
After completing this unit, you’ll be able to:
- Upload new Salesforce Spiff plan assignments in bulk.
- Update existing plan assignments in bulk.
In the first unit, you learned how to upload and manage Salesforce Spiff user records in bulk to efficiently manage your team—saving time and reducing potential errors. Now let’s focus on uploading and updating plan assignments in bulk. Plan assignments are crucial because they define which sales compensation plans apply to each user. Managing these assignments efficiently ensures that the right people are aligned with the right plans, helping organizations maintain accurate commission tracking and payouts.
Upload New Plan Assignments
Plan assignments link users to their compensation plans. Before uploading assignments, ensure that the plans themselves have already been created. This step is important because users cannot be assigned to plans that do not exist in the system.
Here’s how to upload a new plan assignment.
- Start by navigating to the Users section under the Admin tab, and click Plan Assignments in the left panel.
- Click the upload icon
 at the top-right corner of the screen.
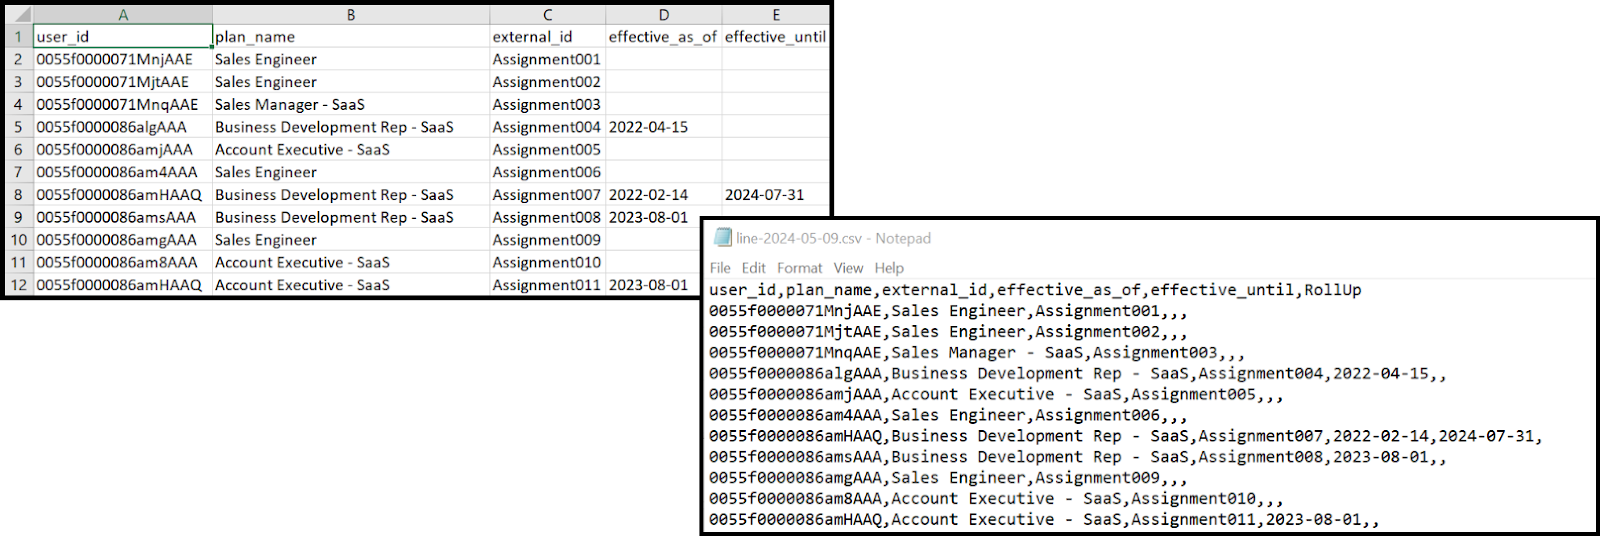
- Click Download the example file. The template contains five fields, two of which are required for import. They are:
-
user_id (required): An external ID of the user being assigned to the plan, found in the User External ID column under Admin | Users.
-
plan_name (required): The name of the plan being assigned. Ensure the plan already exists in the system, or the upload fails.
-
Effective_as_of is: The start date of the plan assignment in YYYY-MM-DD format.
-
effective_until: The end date of the plan assignment in YYYY-MM-DD format.
-
external_id: A unique identifier for each plan assignment. This field is recommended, as it simplifies future updates to the same plan assignment. Make sure to remove this field from the column header if you don’t use the external_id.
-
user_id (required): An external ID of the user being assigned to the plan, found in the User External ID column under Admin | Users.
- When filling out the template, make sure the required fields (user_id and plan_name) are completed for each record. You should also assign a unique external ID to each plan assignment, especially if you anticipate needing to update these records in the future. This helps Salesforce Spiff recognize the correct records during future uploads. If using a spreadsheet program, be cautious with date formats. Make sure all dates are in the required YYYY-MM-DD format before uploading.
- Once your file is ready, click the upload icon, then either browse your computer for the file or drag and drop it.
- A notification confirms the upload is in progress.
- You can monitor the upload status on the File Import Status page, accessible via a link in the notification. This page provides important details, including any errors encountered. If the file contains any errors, only those specific records are rejected.
Update Existing Plan Assignments
The process for editing existing plan assignment records is similar to uploading new records. However, before updating, you need to ensure that each plan assignment has an external ID set.
To apply a plan assignment external ID:
- Navigate to Admin and select Plan Assignments to view all existing plan assignments.
- Click Edit.
- For each plan assignment without a Plan Assignment External ID, double-click in the box and enter a unique identifier (any alphanumeric code that hasn’t been used for another assignment).
- Click Save.
Once you have ensured that every plan assignment has an external ID, you are ready to update existing plan assignments.
To update existing plan assignments:
- Navigate to Admin and select Plan Assignments to view all existing plan assignments.
- Click the download icon
 in the top right of the table to export a CSV file of all existing plan assignment records.
- Make edits to the existing records.
- Prepare the file for import. To ensure successful imports, it’s best to keep the format as close as possible to the example file. Remove any extraneous columns that are not needed for the import. These columns should be removed: User Name and User Email.
- Rename the remaining column headers to match those in the example file. For example, User ID should be user_id. Plan Name should be plan_name. External ID should be external_id. Effective As Of should be effective_as_of (format required YYYY-MM-DD), and Effective Until should be effective_until (format required YYYY-MM-DD).
Alternatively, you can copy the records from the exported table and paste them into the example file.
- Once your file is ready, click the upload icon, then either browse your computer for the file or drag and drop it.
- A notification confirms the upload is in progress.
- You can monitor the upload status on the File Import Status page, accessible via a link in the notification. This page provides important details, including any errors encountered. If the file contains any errors, only those specific records are rejected.
A Quick Note About Boolean Plan Assignment Custom Field Uploads
An uploaded value of true shows as True in the plan assignment table. An imported value of false shows as False. All other values, including null, appear as empty cells. If a false value is turned on in the UI and then turned off again, it shows as an empty cell. The plan assignment export displays the same values as shown in the UI.
In this unit, you learned how to upload new plan assignments and update existing ones. You also learned the importance of applying unique identifiers to ensure smooth updates and maintaining proper formatting for successful uploads. In the next unit, you learn how to upload team assignments, which further enhances your ability to manage users.